ASP.NET Core - 001 源码编译与调试

一、源码编译

需要编译的源码的代码仓库有两个,一个是 aspnetcore,另外一个是 extensions

如果有代理,编译的过程比较简单,参考微软的文档进行编译即可。

如果没有代理,那么整个编译流程可能非常慢,甚至无法正常进行,可以B站这个视频执行编译:编译并调试 Asp.Net Core 源码 —— B站视频

如果使用代理软件,建议使用 Global(全局)代理,同时命令行与 Powershell 需要设置代理:

1
2
3
4
5
# CMD
set http_proxy=http://127.0.0.1:7890 & set https_proxy=http://127.0.0.1:7890

# Powershell
$Env:http_proxy="http://127.0.0.1:7890";$Env:https_proxy="http://127.0.0.1:7890"

编译时可能出现的错误:C4819 或其他的错误。实际代码是没有问题的,是编码的锅,解决方案:系统编码设置使用 UTF-8

系统设置 → 时间和语言 → 语言 → 相关设置 → 管理语言设置 → 管理 → 更改系统区域设置 → 勾选:使用 Unicode UTF-8 提供全球语言支持

设置以后重启系统即可,网上反馈设置后部分软件可能出现乱码,目前我没发现类似问题。但是,我第一次设置后,系统所有图标丢失,部分软件无法正常使用,但是取消选项又重新勾选了一次就正常了,如果像我一样出现问题,可以多设置几次试试。

补:发现了一个小问题,登录穿越火线,频道名、房间名、游戏玩家昵称的中文不显示了。/(ㄒoㄒ)/~~

二、调试

后续需要学习 ASP.NET Core,并深入了解其实现原理,所以肯定希望能够直接调试源码。

这里提供两个调试方案,第一个方案是借助调试工具 dnSpy 来进行调试,第二则是直接使用 Visual Studio 进行调试。

1. dnSpy 反编译调试

首先需要下载 dnSpy:dnSpy/dnSpy: .NET debugger and assembly editor (github.com),解压后可以直接打开。

然后我们可以随意创建一个 ASP.NET Core 的示例项目,打开 Visual Studio Code,创建一个 MVC 项目并编译。

1
2
dotnet new mvc -n 002_Debug
dotnet build

找到生成的 002_Debug.dll 拖到 dnSpy 中,找到程序入口设置断点并运行,即可进入调试:

debug-with-dnspy

2. 源服务器支持

首先如果是使用 Visual Studio Code,设置 launch.json 文件,增加如下内容:

1
2
3
4
5
6
//关闭 “仅我的代码” 项
"justMyCode": false,
"symbolOptions": {
//查找并下载symbol文件
"searchMicrosoftSymbolServer": true
}

debug-with-vsc

如果时使用 Visual Studio:

选项 → 调试 → 常规 → 取消 “仅我的代码” 的勾选 → 勾选 “启用源链接支持”
选项 → 调试 → 符号 → 符号文件(.pdb)的位置 → 勾选 “Microsoft 符号服务器”

配置完成后,调试时将会下载符号文件,可以正常调试 ASP.NET Core 的源代码。

debug-with-vs

3. 使用源码调试

首先是 ASP.NET Core,前文我们已经进行了编译,我们可以在 \artifacts\installers\Debug 找到 aspnetcore-runtime-3.1.9-dev-win-x64.msi 进行安装。

然后是 .NET Extensions,我们可以在项目中创建一个 NuGet.config,然后配置本地程序包源:

1
2
3
4
5
6
7
8
9
<?xml version="1.0" encoding="utf-8"?>
<configuration>
<packageSources>
<clear />
<add key="local1" value="C:\Users\hd2y\code\extensions\artifacts\packages\Debug\Shipping" />
<add key="local2" value="C:\Users\hd2y\code\aspnetcore\artifacts\packages\Debug\Shipping" />
<add key="nuget.org" value="https://api.nuget.org/v3/index.json" protocolVersion="3" />
</packageSources>
</configuration>

这时,运行程序进入调试,就可以通过单步调试进入 ASP.NET Core 的源码。

如果以上操作无法正常调试,可以 F12 查看对应的方法的程序集版本。

例如我的程序集版本是 3.1.10,而我编译的 ASP.NET Core 的版本是 3.1.9,调试就无法正常进入。

这里有两种解决方案,第一种是查看 3.1.9 的版本对应的 .NET SDK 的版本进行安装,然后指定引用程序集的版本:

1
2
3
4
5
6
7
8
9
10
11
<Project Sdk="Microsoft.NET.Sdk.Web">

<PropertyGroup>
<TargetFramework>netcoreapp3.1</TargetFramework>
<RootNamespace>_002_Debug</RootNamespace>
</PropertyGroup>

<ItemGroup>
<PackageReference Include="Microsoft.Extensions.Hosting" Version="3.1.9" />
</ItemGroup>
</Project>

不指定版本的话,在我测试的时候不知道为什么转到定义程序集版本是 3.1.8,而不是文档中提到的 3.1.9
直接指定会使用 NuGet.config 配置的本地程序包源,如果设置后发现仍旧不行,可能 NuGet 有缓存,需要在 选项 → NuGet 包管理器 → 常规 → 清除所有 NuGet 缓存。

第二种方案是根据当前 .NET SDK 对应的 ASP.NET Core 版本,重新进行编译,具体版本对应关系可以查看 .NET Core SDK 的下载页:Download .NET Core 3.1 (Linux, macOS, and Windows) (microsoft.com)

ASP.NET Core - 000 开发环境配置

IDE 推荐

主流的 C# 开发工具如下:

  • Rider:收费、跨平台,习惯使用 JetBrains 家的产品首选。
  • Visual Studio:社区版免费、不支持跨平台,Windows 下首选。
  • Visual Studio Code:免费、跨平台、流行,配置、调试以及使用不及以上两个傻瓜化,有学习成本。

我的开发环境

这里我的开发环境是:Windows + Visual Studio Code + WSL 2

当然,我平时不这么用,因为 Visual Studio 2019 还是香的,但是接下来内容主要抱着学习的目的,这样的环境可以帮助我了解 .NET Core 的一些细节。

TerminalWSL 2

该环境需要 Windows 10 版本不低于 2004,升级可以前往官网下载 升级工具

安装 WSL 2 需要启用 适用于 Linux 的 Windows 子系统 选项,也可以使用 PowerShell 运行命令:

1
dism.exe /online /enable-feature /featurename:VirtualMachinePlatform /all /norestart

接下来前往应用商店安装 Ubuntu 20.04 LTS 以及 Windows Terminal

详细的 Windows Terminal 以及 WSL 2 安装美化参考:Win10 Terminal + WSL 2 安装配置指南,精致开发体验 - 精致码农 - 博客园 (cnblogs.com)

WSL 2 安装 .NET Core

首先修改镜像源,修改 sources.list 文件,我的路径是:C:\Users\hd2y\AppData\Local\Packages\CanonicalGroupLimited.Ubuntu20.04onWindows_79rhkp1fndgsc\LocalState\rootfs\etc\apt

修改为阿里云的源:

1
2
3
4
5
6
7
8
9
10
deb http://mirrors.aliyun.com/ubuntu/ focal main restricted universe multiverse
deb-src http://mirrors.aliyun.com/ubuntu/ focal main restricted universe multiverse
deb http://mirrors.aliyun.com/ubuntu/ focal-security main restricted universe multiverse
deb-src http://mirrors.aliyun.com/ubuntu/ focal-security main restricted universe multiverse
deb http://mirrors.aliyun.com/ubuntu/ focal-updates main restricted universe multiverse
deb-src http://mirrors.aliyun.com/ubuntu/ focal-updates main restricted universe multiverse
deb http://mirrors.aliyun.com/ubuntu/ focal-proposed main restricted universe multiverse
deb-src http://mirrors.aliyun.com/ubuntu/ focal-proposed main restricted universe multiverse
deb http://mirrors.aliyun.com/ubuntu/ focal-backports main restricted universe multiverse
deb-src http://mirrors.aliyun.com/ubuntu/ focal-backports main restricted universe multiverse

修改以后执行命令:

1
2
sudo apt-get update
sudo apt-get upgrade

然后安装 .NET Core SDK,分别需要执行以下命令:

1
2
3
4
5
6
7
8
9
10
11
12
# 将 Microsoft 包签名密钥添加到受信任密钥列表,并添加包存储库
wget https://packages.microsoft.com/config/ubuntu/20.04/packages-microsoft-prod.deb -O packages-microsoft-prod.deb
sudo dpkg -i packages-microsoft-prod.deb

# 安装 .NET SDK
sudo apt-get update; \
sudo apt-get install -y apt-transport-https && \
sudo apt-get update && \
sudo apt-get install -y dotnet-sdk-5.0

# 安装 .NET Core 3.1 SDK
sudo apt-get install -y dotnet-sdk-3.1

安装完成后可以运行 dotnet --list-sdks 命令查看已安装的 SDK ,可以运行 dotnet --help 命令查看帮助信息。

以上步骤安装完成以后,dotnet 命令使用的是 .NET 5.0 的 SDK,可以通过以下命令切换到 .NET Core 3.1

1
dotnet new globaljson --sdk-version 3.1.404 --force

以上命令会在文件夹创建一个 global.json 文件:

1
2
3
4
5
{
"sdk": {
"version": "3.1.404"
}
}

详细的 WSL 2 中配置 .NET Core 开发环境可以参考系列文章:WSL 2 准备 .NET Core 开发环境 - luzemin - 博客园 (cnblogs.com)

VS Code 配置

需要安装的几个插件:

  • C#
  • Visual Studio IntelliCode
  • .NET Core Test Explorer
  • vscode-solution-explorer
  • Remote - WSL

vscode-keyboard-shortcuts-for-windows

具体使用 Visual Studio Code 开发 .NET Core 可以参考:使用 Visual Studio Code 开发 .NET Core 看这篇就够了 - 依乐祝 - 博客园 (cnblogs.com)

测试

创建一个控制台项目,输出经典的 Hello world!

1
2
3
4
5
mkdir code
cd code
mkdir 001_HelloWorld
cd 001_HelloWorld
dotnet new console --name HelloWorld

在 VS Code 中使用 Ctrl + Shift + P 搜索 Remote-WSL: Open Folder in WSL,打开我们新建项目所在的文件夹。

修改 Main 函数内容为:

1
2
Console.WriteLine(Environment.OSVersion);
Console.WriteLine("Hello World!");

此时在终端输入 dotnet run,将打印:

1
2
Unix 4.4.0.19041
Hello World!

demo

迁移 Web Service 项目到 .NET Core

目前公司产品由 .NET Framework 升级到 .NET Core 过程中,因一部分对内或对外界接口使用的是 Web Service

为了保证这些接口在升级后正常提供服务,开始考虑过使用 SoapCore 对这些接口进行实现。

但是尝试之后发现 SoapHeader 问题不好解决,所以暂时放弃将 Web Service 迁移到 .NET Core,而是将 Web Service 进行独立部署。

最终开发时决定使用的方案有以下两种:

  1. “类库” 的目标框架调整为可供 .NET Framework 使用的 SDK,例如 netstandard2.0(使用 TargetFrameworks 指定多个依赖项也可),方便托管 Web Service 的 ASP.NET Web 网站使用;
  2. .NET Core 中提供 Web API 接口,Web Service 的项目内不涉及具体业务,将请求转发到 .NET Core 的项目中处理。

考虑到如果采用方案一,每次发布要发布两套程序,即 .NET CoreASP.NET Web,并且使用 Web Service 转发消息产生的延迟可以接受,所以最终采用方案二来进行实现。

接下来的内容最好了解一下 *.csproj 项目文件,可以参考:理解 C# 项目 csproj 文件格式的本质和编译流程

创建项目并编辑项目文件

首先我们需要创建一个 .NET Standard 的类库项目:

netstandard

创建以后需要编辑我们的 csproj 项目文件,内容如下:

1
2
3
4
5
6
7
8
9
10
11
12
13
<Project Sdk="Microsoft.NET.Sdk">

<PropertyGroup>
<TargetFramework>net452</TargetFramework>
<OutputPath>bin\</OutputPath>
<AppendTargetFrameworkToOutputPath>false</AppendTargetFrameworkToOutputPath>
</PropertyGroup>

<ItemGroup>
<Reference Include="System.Web.Services" />
</ItemGroup>

</Project>

配置文件中我们做了这些事情:

  • TargetFramework:指定目标框架为 .NET Framework 4.5.2
  • OutputPath:指定了生成文件的目录;
  • AppendTargetFrameworkToOutputPath:指定不附加目标框架到生成目录,不指定目录会是 bin\net452\*
  • Reference:添加了 Web Service 所依赖的程序集;

关于 TargetFramework 可以参考文档:.NET Standard

增加 Web Service 文件

Test.asmx 文件内容:

1
<%@ WebService Language="C#" CodeBehind="Test.asmx.cs" Class="WebServiceTest.Test" %>

Test.asmx.cs 文件内容:

1
2
3
4
5
6
7
8
9
10
11
12
13
14
15
16
17
18
19
20
21
22
23
24
25
26
27
28
29
30
31
32
33
34
35
36
37
38
using System.Net;
using System.Text;
using System.Web.Services;
using System.Web.Services.Protocols;

namespace WebServiceTest
{
[WebService(Namespace = "http://tempuri.org/")]
[WebServiceBinding(ConformsTo = WsiProfiles.BasicProfile1_1)]
[System.ComponentModel.ToolboxItem(false)]
public class Test : System.Web.Services.WebService
{
public TokenHeader TokenHeader { get; set; }

[WebMethod]
[SoapHeader("TokenHeader")]
public string Get()
{
if (TokenHeader == null || TokenHeader.Token != "123")
{
return "Error";
}
else
{
using (WebClient client = new WebClient())
{
var data = client.DownloadData("https://api.lovelive.tools/api/SweetNothings");
return Encoding.UTF8.GetString(data);
}
}
}
}

public class TokenHeader : SoapHeader
{
public string Token { get; set; }
}
}

以上 Web Service 添加了一个简单的 Get 方法,当请求该方法并传入了正确的 token,服务将转发请求到 Web API,并将结果返回。

可以直接从其他项目拷贝,因为没有模板,从项目中添加会稍麻烦一些。

添加 Web.config 文件

了解 ASP.NET MVC 的大佬们对这个配置文件应该都很熟悉:

1
2
3
4
5
6
7
8
9
10
11
12
13
14
<?xml version="1.0"?>
<configuration>
<system.webServer>
<defaultDocument>
<files>
<add value="Test.asmx"/>
</files>
</defaultDocument>
</system.webServer>
<system.web>
<compilation debug="true" targetFramework="4.5.2"/>
<httpRuntime targetFramework="4.5.2"/>
</system.web>
</configuration>

稍稍调整了网站的默认文档为我们刚刚添加的 Web Service 服务,避免请求根目录出现 400 错误。

增加用于调试的配置文件

项目中增加 Properties 文件夹,并创建 launchSetting.json 文件,内容如下:

1
2
3
4
5
6
7
8
9
10
11
12
13
14
15
16
17
18
19
20
21
22
{
"iisSettings": {
"windowsAuthentication": false,
"anonymousAuthentication": true,
"iisExpress": {
"applicationUrl": "http://localhost:10880/",
"sslPort": 0
}
},
"profiles": {
"IIS Express": {
"commandName": "Executable",
"executablePath": "C:\\Program Files\\IIS Express\\iisexpress.exe",
"commandLineArgs": "/path:\"$(SolutionDir)src\\$(ProjectName)\" /port:10880",
"launchBrowser": true,
"launchUrl": "/",
"environmentVariables": {
"ASPNETCORE_ENVIRONMENT": "Development"
}
}
}
}

该部分内容指定了 IIS Express 进行调试,因为我的解决方案中,Web 项目放在 src 文件夹下,所以命令行参数路径中加了 src,实际可能要根据自己的项目进行调整。

IIS Express 的命令行参数可以参考文档:Running IIS Express from the Command Line

不是必须添加这个文件,发布到 IIS,通过附加到 w3wp 进程的方式进行调试也是可以的。

至此,托管了一个 Web Service 服务的网站项目就完成了:

solution-items

测试

如果一切准备就绪后,无法正常运行调试,可能需要重启一下 VS。

正常开启调试以后,会弹出命令行:

iis-express

这时我们在浏览器中可以通过 http://localhost:10880/Test.asmx 正常访问。

test

而通过 Soap UI 测试,Web Service 也可以正常的运行。

soap-ui

至此,这篇文章正文就结束了,虽然没有解决 Web Service 的迁移问题,但是也给大家提供了一个解决思路,希望对大家能有所帮助。

源码已经提交到 github:https://github.com/hd2y/WebServiceCore

而接下来会出一篇使用将 ASP.NET MVC 的项目迁移到 Microsoft.NET.Sdk 的避坑说明。

虽然有些老项目不能快速迁移到 ASP.NET Core MVC,但是使用 .NET Core SDK 风格管理项目还是很香的。

环境部署

配置数据库

首先需要安装数据库,安装的版本必须是 Oracle 11.2.0.4.0

安装完成后,需要创建两个用户:

1
2
3
4
create user userhita170524 identified by hishita;
grant connect,resource,dba to userhita170524;
create user useremr_hita170524 identified by hita;
grant connect,resource,dba to useremr_hita170524;

用户创建完成后,使用 imp 导入数据前还需要创建表空间。

1
2
3
4
5
6
7
8
9
10
11
12
13
14
15
16
17
18
19
20
21
22
23
24
25
26
27
28
29
30
31
32
33
34
35
36
37
38
39
40
41
42
43
44
45
46
47
48
49
50
51
52
53
54
55
56
57
58
59
60
61
62
63
64
65
66
67
68
69
70
71
72
73
74
75
76
77
78
79
80
81
82
83
84
85
86
87
88
89
90
create tablespace USERS datafile 'C:\app\oradata\USERS.dbf' size 50M autoextend on next 10M maxsize unlimited;
create tablespace MAIN datafile 'C:\app\oradata\MAIN.dbf' size 50M autoextend on next 10M maxsize unlimited;
create tablespace TSP_ZICHAN datafile 'C:\app\oradata\TSP_ZICHAN.dbf' size 50M autoextend on next 10M maxsize unlimited;
create tablespace TSP_WUZI datafile 'C:\app\oradata\TSP_WUZI.dbf' size 50M autoextend on next 10M maxsize unlimited;
create tablespace TSP_MENZHEN2012 datafile 'C:\app\oradata\TSP_MENZHEN2012.dbf' size 50M autoextend on next 10M maxsize unlimited;
create tablespace TSP_XITONGCANSHU datafile 'C:\app\oradata\TSP_XITONGCANSHU.dbf' size 50M autoextend on next 10M maxsize unlimited;
create tablespace TSP_HYBASEFLAT datafile 'C:\app\oradata\TSP_HYBASEFLAT.dbf' size 50M autoextend on next 10M maxsize unlimited;
create tablespace TSP_HYBASEFLAT_IDX datafile 'C:\app\oradata\TSP_HYBASEFLAT_IDX.dbf' size 50M autoextend on next 10M maxsize unlimited;
create tablespace TSP_XITONGCANSHU_IDX datafile 'C:\app\oradata\TSP_XITONGCANSHU_IDX.dbf' size 50M autoextend on next 10M maxsize unlimited;
create tablespace TSP_EMR datafile 'C:\app\oradata\TSP_EMR.dbf' size 50M autoextend on next 10M maxsize unlimited;
create tablespace TSP_XITONGSHUJU datafile 'C:\app\oradata\TSP_XITONGSHUJU.dbf' size 50M autoextend on next 10M maxsize unlimited;
create tablespace TSP_XITONGSHUJU_IDX datafile 'C:\app\oradata\TSP_XITONGSHUJU_IDX.dbf' size 50M autoextend on next 10M maxsize unlimited;
create tablespace TSP_MENZHEN datafile 'C:\app\oradata\TSP_MENZHEN.dbf' size 50M autoextend on next 10M maxsize unlimited;
create tablespace TSP_ZONGHESHUJU datafile 'C:\app\oradata\TSP_ZONGHESHUJU.dbf' size 50M autoextend on next 10M maxsize unlimited;
create tablespace TSP_ZONGHESHUJU_IDX datafile 'C:\app\oradata\TSP_ZONGHESHUJU_IDX.dbf' size 50M autoextend on next 10M maxsize unlimited;
create tablespace TSP_CPMIS datafile 'C:\app\oradata\TSP_CPMIS.dbf' size 50M autoextend on next 10M maxsize unlimited;
create tablespace TSP_CPMIS_IDX datafile 'C:\app\oradata\TSP_CPMIS_IDX.dbf' size 50M autoextend on next 10M maxsize unlimited;
create tablespace TSP_ZHUYUAN datafile 'C:\app\oradata\TSP_ZHUYUAN.dbf' size 50M autoextend on next 10M maxsize unlimited;
create tablespace TSP_GRADING datafile 'C:\app\oradata\TSP_GRADING.dbf' size 50M autoextend on next 10M maxsize unlimited;
create tablespace TSP_GRADING_IDX datafile 'C:\app\oradata\TSP_GRADING_IDX.dbf' size 50M autoextend on next 10M maxsize unlimited;
create tablespace TSP_BASEFLAT datafile 'C:\app\oradata\TSP_BASEFLAT.dbf' size 50M autoextend on next 10M maxsize unlimited;
create tablespace TSP_BASEFLAT_IDX datafile 'C:\app\oradata\TSP_BASEFLAT_IDX.dbf' size 50M autoextend on next 10M maxsize unlimited;
create tablespace TSP_MENZHEN_IDX datafile 'C:\app\oradata\TSP_MENZHEN_IDX.dbf' size 50M autoextend on next 10M maxsize unlimited;
create tablespace SYSTEM datafile 'C:\app\oradata\SYSTEM.dbf' size 50M autoextend on next 10M maxsize unlimited;
create tablespace TSP_HULIZHILIANG datafile 'C:\app\oradata\TSP_HULIZHILIANG.dbf' size 50M autoextend on next 10M maxsize unlimited;
create tablespace TSP_HYFYSJ datafile 'C:\app\oradata\TSP_HYFYSJ.dbf' size 50M autoextend on next 10M maxsize unlimited;
create tablespace TSP_HYFYSJ_IDX datafile 'C:\app\oradata\TSP_HYFYSJ_IDX.dbf' size 50M autoextend on next 10M maxsize unlimited;
create tablespace TSP_LISSHUJU datafile 'C:\app\oradata\TSP_LISSHUJU.dbf' size 50M autoextend on next 10M maxsize unlimited;
create tablespace TSP_LISCANSHU datafile 'C:\app\oradata\TSP_LISCANSHU.dbf' size 50M autoextend on next 10M maxsize unlimited;
create tablespace TSP_LISSHUJU_IDX datafile 'C:\app\oradata\TSP_LISSHUJU_IDX.dbf' size 50M autoextend on next 10M maxsize unlimited;
create tablespace TSP_MENZHEN2017_IDX datafile 'C:\app\oradata\TSP_MENZHEN2017_IDX.dbf' size 50M autoextend on next 10M maxsize unlimited;
create tablespace TSP_MENZHEN2018_IDX datafile 'C:\app\oradata\TSP_MENZHEN2018_IDX.dbf' size 50M autoextend on next 10M maxsize unlimited;
create tablespace TSP_LISCANSHU_IDX datafile 'C:\app\oradata\TSP_LISCANSHU_IDX.dbf' size 50M autoextend on next 10M maxsize unlimited;
create tablespace TSP_MENZHEN2015 datafile 'C:\app\oradata\TSP_MENZHEN2015.dbf' size 50M autoextend on next 10M maxsize unlimited;
create tablespace TSP_MENZHEN2015_IDX datafile 'C:\app\oradata\TSP_MENZHEN2015_IDX.dbf' size 50M autoextend on next 10M maxsize unlimited;
create tablespace TSP_MENZHEN2016 datafile 'C:\app\oradata\TSP_MENZHEN2016.dbf' size 50M autoextend on next 10M maxsize unlimited;
create tablespace TSP_MENZHEN2016_IDX datafile 'C:\app\oradata\TSP_MENZHEN2016_IDX.dbf' size 50M autoextend on next 10M maxsize unlimited;
create tablespace TSP_MENZHEN2017 datafile 'C:\app\oradata\TSP_MENZHEN2017.dbf' size 50M autoextend on next 10M maxsize unlimited;
create tablespace TSP_MENZHEN2018 datafile 'C:\app\oradata\TSP_MENZHEN2018.dbf' size 50M autoextend on next 10M maxsize unlimited;
create tablespace TSP_ZHUYUAN2015 datafile 'C:\app\oradata\TSP_ZHUYUAN2015.dbf' size 50M autoextend on next 10M maxsize unlimited;
create tablespace TSP_ZHUYUAN2015_IDX datafile 'C:\app\oradata\TSP_ZHUYUAN2015_IDX.dbf' size 50M autoextend on next 10M maxsize unlimited;
create tablespace TSP_ZHUYUAN2016 datafile 'C:\app\oradata\TSP_ZHUYUAN2016.dbf' size 50M autoextend on next 10M maxsize unlimited;
create tablespace TSP_ZHUYUAN2016_IDX datafile 'C:\app\oradata\TSP_ZHUYUAN2016_IDX.dbf' size 50M autoextend on next 10M maxsize unlimited;
create tablespace TSP_ZHUYUAN2017 datafile 'C:\app\oradata\TSP_ZHUYUAN2017.dbf' size 50M autoextend on next 10M maxsize unlimited;
create tablespace TSP_ZHUYUAN2017_IDX datafile 'C:\app\oradata\TSP_ZHUYUAN2017_IDX.dbf' size 50M autoextend on next 10M maxsize unlimited;
create tablespace TSP_ZHUYUAN2018 datafile 'C:\app\oradata\TSP_ZHUYUAN2018.dbf' size 50M autoextend on next 10M maxsize unlimited;
create tablespace TSP_MENZHEN2020_IDX datafile 'C:\app\oradata\TSP_MENZHEN2020_IDX.dbf' size 50M autoextend on next 10M maxsize unlimited;
create tablespace TSP_MENZHEN2020 datafile 'C:\app\oradata\TSP_MENZHEN2020.dbf' size 50M autoextend on next 10M maxsize unlimited;
create tablespace TSP_OA datafile 'C:\app\oradata\TSP_OA.dbf' size 50M autoextend on next 10M maxsize unlimited;
create tablespace TSP_OA_IDX datafile 'C:\app\oradata\TSP_OA_IDX.dbf' size 50M autoextend on next 10M maxsize unlimited;
create tablespace TSP_OAFILEIMG datafile 'C:\app\oradata\TSP_OAFILEIMG.dbf' size 50M autoextend on next 10M maxsize unlimited;
create tablespace TSP_PAIDUI datafile 'C:\app\oradata\TSP_PAIDUI.dbf' size 50M autoextend on next 10M maxsize unlimited;
create tablespace TSP_PAIDUI_IDX datafile 'C:\app\oradata\TSP_PAIDUI_IDX.dbf' size 50M autoextend on next 10M maxsize unlimited;
create tablespace TSP_RANKAPPRAISAL datafile 'C:\app\oradata\TSP_RANKAPPRAISAL.dbf' size 50M autoextend on next 10M maxsize unlimited;
create tablespace CRDS2 datafile 'C:\app\oradata\CRDS2.dbf' size 50M autoextend on next 10M maxsize unlimited;
create tablespace TSP_TIJIAN datafile 'C:\app\oradata\TSP_TIJIAN.dbf' size 50M autoextend on next 10M maxsize unlimited;
create tablespace TSP_TIJIAN_IDX datafile 'C:\app\oradata\TSP_TIJIAN_IDX.dbf' size 50M autoextend on next 10M maxsize unlimited;
create tablespace TSP_WUZI_IDX datafile 'C:\app\oradata\TSP_WUZI_IDX.dbf' size 50M autoextend on next 10M maxsize unlimited;
create tablespace TSP_WXSHUYE datafile 'C:\app\oradata\TSP_WXSHUYE.dbf' size 50M autoextend on next 10M maxsize unlimited;
create tablespace TSP_WXSHUYE_IDX datafile 'C:\app\oradata\TSP_WXSHUYE_IDX.dbf' size 50M autoextend on next 10M maxsize unlimited;
create tablespace TSP_XUEYE datafile 'C:\app\oradata\TSP_XUEYE.dbf' size 50M autoextend on next 10M maxsize unlimited;
create tablespace TSP_XUEYE_IDX datafile 'C:\app\oradata\TSP_XUEYE_IDX.dbf' size 50M autoextend on next 10M maxsize unlimited;
create tablespace TSP_HISWEB datafile 'C:\app\oradata\TSP_HISWEB.dbf' size 50M autoextend on next 10M maxsize unlimited;
create tablespace TSP_ZONGHESHUJU2015 datafile 'C:\app\oradata\TSP_ZONGHESHUJU2015.dbf' size 50M autoextend on next 10M maxsize unlimited;
create tablespace TSP_ZONGHESHUJU2015_IDX datafile 'C:\app\oradata\TSP_ZONGHESHUJU2015_IDX.dbf' size 50M autoextend on next 10M maxsize unlimited;
create tablespace TSP_ZONGHESHUJU2016 datafile 'C:\app\oradata\TSP_ZONGHESHUJU2016.dbf' size 50M autoextend on next 10M maxsize unlimited;
create tablespace TSP_ZONGHESHUJU2017 datafile 'C:\app\oradata\TSP_ZONGHESHUJU2017.dbf' size 50M autoextend on next 10M maxsize unlimited;
create tablespace TSP_ZONGHESHUJU2018 datafile 'C:\app\oradata\TSP_ZONGHESHUJU2018.dbf' size 50M autoextend on next 10M maxsize unlimited;
create tablespace TSP_HISWEB_IDX datafile 'C:\app\oradata\TSP_HISWEB_IDX.dbf' size 50M autoextend on next 10M maxsize unlimited;
create tablespace TSP_ZONGHECANSHU datafile 'C:\app\oradata\TSP_ZONGHECANSHU.dbf' size 50M autoextend on next 10M maxsize unlimited;
create tablespace TSP_ZONGHECANSHU_IDX datafile 'C:\app\oradata\TSP_ZONGHECANSHU_IDX.dbf' size 50M autoextend on next 10M maxsize unlimited;
create tablespace TSP_ZONGHESHUJU2016_IDX datafile 'C:\app\oradata\TSP_ZONGHESHUJU2016_IDX.dbf' size 50M autoextend on next 10M maxsize unlimited;
create tablespace TSP_ZONGHESHUJU2017_IDX datafile 'C:\app\oradata\TSP_ZONGHESHUJU2017_IDX.dbf' size 50M autoextend on next 10M maxsize unlimited;
create tablespace TSP_ZONGHESHUJU2018_IDX datafile 'C:\app\oradata\TSP_ZONGHESHUJU2018_IDX.dbf' size 50M autoextend on next 10M maxsize unlimited;
create tablespace TSP_ZHUYUAN_IDX datafile 'C:\app\oradata\TSP_ZHUYUAN_IDX.dbf' size 50M autoextend on next 10M maxsize unlimited;
create tablespace TSP_ZHUYUAN2018_IDX datafile 'C:\app\oradata\TSP_ZHUYUAN2018_IDX.dbf' size 50M autoextend on next 10M maxsize unlimited;
create tablespace TSP_EMR datafile 'C:\app\oradata\TSP_EMR.dbf' size 50M autoextend on next 10M maxsize unlimited;
create tablespace TSP_EMR_IDX datafile 'C:\app\oradata\TSP_EMR_IDX.dbf' size 50M autoextend on next 10M maxsize unlimited;
create tablespace USERS datafile 'C:\app\oradata\USERS.dbf' size 50M autoextend on next 10M maxsize unlimited;
create tablespace TSP_EMR2017 datafile 'C:\app\oradata\TSP_EMR2017.dbf' size 50M autoextend on next 10M maxsize unlimited;
create tablespace TSP_EMR2018 datafile 'C:\app\oradata\TSP_EMR2018.dbf' size 50M autoextend on next 10M maxsize unlimited;
create tablespace TSP_EMR2019 datafile 'C:\app\oradata\TSP_EMR2019.dbf' size 50M autoextend on next 10M maxsize unlimited;
create tablespace TSP_EMR2020 datafile 'C:\app\oradata\TSP_EMR2020.dbf' size 50M autoextend on next 10M maxsize unlimited;
create tablespace TSP_XITONGCANSHU datafile 'C:\app\oradata\TSP_XITONGCANSHU.dbf' size 50M autoextend on next 10M maxsize unlimited;
create tablespace TSP_XITONGCANSHU_IDX datafile 'C:\app\oradata\TSP_XITONGCANSHU_IDX.dbf' size 50M autoextend on next 10M maxsize unlimited;
create tablespace TSP_EMR2017_IDX datafile 'C:\app\oradata\TSP_EMR2017_IDX.dbf' size 50M autoextend on next 10M maxsize unlimited;
create tablespace TSP_EMR2018_IDX datafile 'C:\app\oradata\TSP_EMR2018_IDX.dbf' size 50M autoextend on next 10M maxsize unlimited;
create tablespace TSP_EMR2019_IDX datafile 'C:\app\oradata\TSP_EMR2019_IDX.dbf' size 50M autoextend on next 10M maxsize unlimited;
create tablespace TSP_EMR2020_IDX datafile 'C:\app\oradata\TSP_EMR2020_IDX.dbf' size 50M autoextend on next 10M maxsize unlimited;
create tablespace TSP_ZONGHESHUJU datafile 'C:\app\oradata\TSP_ZONGHESHUJU.dbf' size 50M autoextend on next 10M maxsize unlimited;

表空间创建完成后,便可以恢复数据了:

1
2
C:\app\hd2y\product\11.2.0\dbhome_1\BIN\imp userhita170524/hishita@127.0.0.1/ORCL file=F:\Oracle\userhita170524.dmp log=F:\Oracle\userhita170524.log buffer=819200 full=y
C:\app\hd2y\product\11.2.0\dbhome_1\BIN\imp useremr_hita170524/hita@127.0.0.1/ORCL file=F:\Oracle\useremr_hita170524.dmp log=F:\Oracle\useremr_hita170524.log buffer=819200 full=y

至此,数据已经恢复,可以安装 Web 环境。

安装 Web 环境

Web 解压,建议解压到 E:\HongYang 下。

解压后,在 IIS 默认站点右键“添加应用程序”,别名输入 his_hita,应用程序池选择 .NET v4.5 Classic,物理路径选择刚刚解压文件的 web 路径下。

首先还需要到服务中,启动 ASP.NET State Service 服务,建议设置自动启动。

这时还不要着急访问,还需要到 Web 下,修改 DBConfig.xml 文件,调整数据库配置文件,并将对应的数据库配置文件的内容适当调整,修改 tns,如果用户名密码修改也应适当调整。

如果没有问题,可以使用 http://127.0.0.1/his_hita/W_LIS/login.html 访问 LIS 登录界面。

如果出现问题,可以到 http://127.0.0.1/his_hita/W_LIS/Common/PaddleCard.ashx?type=-1&id=0001 测试,查看是否是数据库连接问题。

如果出现 System.Data.OracleClient 需要 Oracle 客户端软件 version 8.1.7 或更高版本 可以尝试以下操作:

  1. 管理工具 → 计算机管理 → 本地用户和组 → 组 → Administrators 属性,添加 NETWORK SERVICE
  2. Oracle 安装路径 → 属性 → 安全,添加 NETWORK SERVICE 允许完全控制,确定一下 ORACLEBIN 目录有没有这个权限。
  3. 重启IIS。

这时应该就可以解决数据库无法连接的问题。

登录使用

LIS 需要在 Chrome 内核浏览器下访问,登录界面为:http://127.0.0.1/his_hita/W_LIS/login.html

HIS 需要在 IE 下访问:http://127.0.0.1/his_hita/

常用工号:

  • 2999:医生
  • 3999:护士
  • 4999:收费
  • 5999:检验
  • 8888:信息科

密码默认为 0000,如果错误可以将数据库内密码更新为 0000 即可访问。

需要注意的是,HIS 使用 IE 还需要设置添加兼容站点、设置安全站点、允许 ActiveX 控件控制、禁用弹窗拦截、禁用缓存等设置。

如果树形控件无法显示,需要按照文章 Win10 中 TreeView 控件显示问题 进行设置。

PlantUML 的安装与使用

工作中经常需要输出一些文档,需要叙述产品的设计、研发、使用等。

如果只是文字,肯定显得很晦涩,所以最好是结合一些图表,方便读者理解。

之前绘图主要是使用 Visio,提供的模板很多,搭配 Office 套件使用很舒服。但是 Visio 需要单独购买安装,并且价格略贵。

之前在微信看到有人在讨论 PlantUML,就搜索试用了一下,虽然有学习成本,但是相比 Visio 的拖拽,我更喜欢 PlantUML 编码生成图形的方式。

安装

PlantUML 的示例可以参考官方文档,这里建议使用 VS Code 搭配对应的扩展进行绘图。

PlantUML 官方中文文档:https://plantuml.com/zh/

安装 VS Code 插件

直接在插件里搜索 PlantUML,然后进行安装即可。

plantuml extension

安装 Java JDK

这里建议安装 jdk8,否则生成预览时,可能会有一些警告信息。

jdk8 下载路径:https://www.oracle.com/java/technologies/javase/javase-jdk8-downloads.html

安装以后还需要配置系统环境变量:

1
2
3
4
JAVA_HOME = 'C:\Program Files\Java\jdk1.8.0_251'
CLASSPATH = '.;%JAVA_HOME%\bin'
// 双击后选择“编辑文本” 然后将内容追加到最前
Path = 'C:\Program Files (x86)\Common Files\Oracle\Java\javapath;%JAVA_HOME%\bin;%JAVA_HOME%\jre\bin;'

如果没有问题,可以在 cmd 中使用 java -version 看看能否正常使用 java 命令。

安装 Graphviz

虽然安装以后已经可以完成部分图形的绘制,但是测试发现部分图例还需要使用 Graphviz

Graphviz 下载链接:https://graphviz.gitlab.io/download/

安装以后一样需要配置系统环境变量:

1
2
3
4
GRAPHVIZ_DOT = 'C:\Program Files (x86)\Graphviz2.38\bin\dot.exe'
GRAPHVIZ_INSTALL_DIR = 'C:\Program Files (x86)\Graphviz2.38'
// 双击后新建
Path = 'C:\Program Files (x86)\Graphviz2.38\bin\'

绘制预览与导出

绘制可以参考前文提到的 PlantUML中文文档

首先需要创建文件,需要注意的是支持的文件后缀名是 *.wsd, *.pu, *.puml, *.plantuml, *.iuml,否则没有高亮显示关键字、不能使用智能提示、无法使用格式化。

edit uml diagram

预览需要使用快捷键:Alt + D
内容格式化:Shift + Alt + F

导出首先使用 Ctrl + Shift + P,输入 PlantUML,使用 PlantUML: Export Current File Diagrams

export diagram

参考:

使用 frp 实现内网穿透访问内网电脑

远程办公的工具,一般会选择 TeamViewer 或者向日葵,但是这些都是收费工具。

免费的 TeamViewer 经常会被禁用,又不想用破解版,收费价格比较贵。向日葵虽然收费可以接收,但是使用过都知道,使用体验比 TeamViewer 差了太多。

我个人更倾向于使用 mstsc,但是访问公司内网电脑,就需要想办法穿透到内网来使用。

准备工作

后续的操作需要一台有公网 IP 的电脑或服务器,否则就可以跳过这篇文章了。

我的服务器系统为 CentOS 7.6,其他的可以参考,除了下载的程序包不同外,其他大同小异。

首先是下载安装包,下载地址:https://github.com/fatedier/frp/releases

我下载的时候,最新发布版本是 v0.33.0,建议使用最新版。

因为我使用的服务器是 CentOS,所以要下载一个 Linux 的程序包。客户端是 Windows 10,需要下载一个 Windows 的程序包。

Linux 选项又那么多,如果不能确定可以先通过以下命令打印出服务器类型:

1
2
3
# 查看服务器类型
uname -m
x86_64

如果输出是 i386i686 需要下载 386,如果和我一样是 x86_64 需要下载 amd64,如果是 arm 需要选择 arm64arm

服务端配置

可以通过以下命令,下载并解压:

1
2
3
4
# 下载 frp
wget https://github.com/fatedier/frp/releases/download/v0.33.0/frp_0.33.0_linux_amd64.tar.gz frp.tar.gz
# 解压到 frp 文件夹
tar -zxvf frp.tar.gz --strip-components 1 -C ./frp

解压完成后可以先查看解压的内容:

1
2
3
4
5
# 进入解压目录
cd frp
# 列出文件夹内文件信息
ls
frpc_full.ini frps frps_full.ini frps.ini LICENSE systemd

很容易理解,*.ini 为配置文件,frpss 结尾就是服务端,frpcc 结尾就是客户端。

我们部署的是服务端,所以只需要关注 frps.inifrps

首先修改 frps.ini 配置文件:

1
2
# 修改 frp 服务配置文件
vim /root/frp/frps.ini

内容如下:

1
2
3
4
5
6
[common]
bind_port = 7000
dashboard_port = 7500
token = 12345678
dashboard_user = admin
dashboard_pwd = 12345678

配置节点的内容说明如下:

  • bind_port:服务端监听的端口,客户端配置的时候需要用到。
  • token:就是一个平平无奇的 token,同样是配置客户端时要用到的。
  • dashboard_port:状态面板的端口,服务启动以后可以通过该端口查看状态信息。
  • dashboard_user:状态面板的登录用户名。
  • dashboard_pwd:状态面板的登录密码。

配置完成保存后,就可以通过该配置文件启动 frp 服务端了。

1
2
# 启动 frp 服务
./frps -c frps.ini

成功启动后,我们可以登录状态面板查看。

frps bashboard

此时虽然启动成功,但是如果我们 Ctrl + C 退出,程序也就跟着退出了,我们需要让该服务端后台运行,并且能够开机启动,就需要执行以下操作。

1
2
# 创建后台启动模版
vim /etc/systemd/system/frp.service

该文件内容如下:

1
2
3
4
5
6
7
8
9
[Unit]
Description=frps
After=network.target

[Service]
ExecStart=/root/frp/frps -c /root/frp/frps.ini

[Install]
WantedBy=multi-user.target

配置完成就可以启动服务了。

1
2
3
4
5
6
# 启动测试
systemctl start frp.service
# 查看启动状态
systemctl status frp.service
# 开机自启
systemctl enable frp.service

客户端配置

客户端的话就需要调戏以下 frpc.exefrpc.ini 了。

frpc.ini 文件修改如下:

1
2
3
4
5
6
7
8
9
10
11
12
13
14
[common]
server_addr = 111.231.237.167
server_port = 7000
token = 12345678
[rdp]
type = tcp
local_ip = 127.0.0.1
local_port = 3389
remote_port = 7001
[smb]
type = tcp
local_ip = 127.0.0.1
local_port = 445
remote_port = 7002

配置节点的内容说明如下:

  • server_addr:这个很好理解了,就是我们服务器的 IP 地址。
  • server_port:前文 frps 中配置的服务器监听的端口。
  • token:前文 frps 中配置的通行证。
  • local_ip:本地 IP,无需赘述。
  • local_port:需要转发到的本地端口,因为 Windows 的远程端口默认是 3389,所以这里使用的是 3389
  • remote_port:服务端转发用的端口,例如我这里配置的是 7001,那么我从其他电脑远程到这台电脑时,就可以使用 111.231.237.167:7001 来完成连接。

配置完成后需要启动客户端,才可以从其他电脑访问。(这不是废话吗?)

1
2
cd C:\frp
./frpc -c frpc.ini

这时有个命令窗不能关闭,太麻烦了,如果想隐藏,建议创建一个批处理文件,并放到启动文件夹下。

frpc.bat 文件内容如下:

1
2
3
4
5
6
7
8
9
@echo off
cd /d %~dp0
if "%1" == "h" goto begin
mshta vbscript:createobject("wscript.shell").run("""%~nx0"" h",0)(window.close)&&exit
:begin
REM
cd C:\frp
frpc -c frpc.ini
exit

可以通过运行 %programdata%\Microsoft\Windows\Start Menu\Programs\Startup 打开启动文件夹,把文件放进去就能开机启动。

执行该批处理文件,把软件运行起来,接下来就是测试效果了。

注意:cd /d %~dp0 这一行不添加,以管理员身份运行脚本将报错 当前页面脚本发生错误:系统找不到指定的文件

注意:客户端节点 [rdp][smb] 为代理任务名,在多台电脑配置时,除需要修改 remote_port 外,该名称也需要调整,否则执行 frpc -c frpc.ini 将提示名称被占用。

测试效果

当然,正常情况下 Windows 的 mstsc 肯定是没问题了,接下来要玩点花样。

这里首先使用我的小黑果来完成测试,使用的软件是 Microsoft Remote Desktop,测试效果如下。

remote test

而且移动设备也可以连接,例如本文部分内容是小米手机安装了 RD Client 后,连接了罗技的蓝牙鼠标与键盘编辑的,输入和鼠标使用都很正常,就是有点费眼睛。

image.png

另外我还尝试了 iPad 连接使用,毕竟 iPad OS 现在吹的神乎其神。

但是实际体验鼠标体验很差,而键盘连接后在远程工具中既不能调用远程电脑的输入法,也不能使用 iPad 的输入法输入,还是别想拿 iPad 充当生产力工具了,还是老老实实爱奇艺吧。

参考:

WPF 系列教程:控件之布局

布局(Layout)控件用于管理子元素的大小、尺寸、位置和排列方式。

边框(Border)

Border 可以在另一个元素周围绘制边框与背景。

需要注意的是,Border 内最多只能有一个子级。

若要显示多个子元素,需要在父 Border 中放置其他 Panel 元素,可以将子元素放在该 Panel 元素中。

1
<Border Background="LightBlue" BorderBrush="Black" BorderThickness="2" CornerRadius="45" Padding="25" />

子弹装饰器(BulletDecorator)

BulletDecorator 是一个布局控件,该控件可以将项目符号与另一个可视对象对齐。

1
2
3
4
5
6
7
8
9
10
11
12
13
14
15
16
17
18
19
20
21
22
23
24
25
26
27
28
29
30
31
32
<StackPanel>
<BulletDecorator Margin="5" VerticalAlignment="Center" Background="Yellow">
<BulletDecorator.Bullet>
<Image Width="50" Source="pack://application:,,,/WpfExample;component/images/bullet.png"/>
</BulletDecorator.Bullet>
<TextBlock TextWrapping="Wrap" VerticalAlignment="Center" HorizontalAlignment="Left" Foreground ="Purple">A Simple BulletDecorator</TextBlock>
</BulletDecorator>
<BulletDecorator Margin="5" VerticalAlignment="Center" Background="Yellow">
<BulletDecorator.Bullet>
<Image Width="20" Source="pack://application:,,,/WpfExample;component/images/apple.jpg"/>
</BulletDecorator.Bullet>
<TextBlock TextWrapping="Wrap" VerticalAlignment="Center" HorizontalAlignment="Left" Foreground ="Purple">A Simple BulletDecorator</TextBlock>
</BulletDecorator>
<BulletDecorator Margin="5" VerticalAlignment="Center" Background="Yellow">
<BulletDecorator.Bullet>
<Ellipse Margin="5,0,0,0" Height="10" Width="10" Fill="Purple" HorizontalAlignment="Left" ></Ellipse>
</BulletDecorator.Bullet>
<TextBlock Margin="10,0,0,0" TextWrapping="Wrap" VerticalAlignment="Center" HorizontalAlignment="Left" Foreground ="Purple">A Simple BulletDecorator</TextBlock>
</BulletDecorator>
<BulletDecorator Margin="5" VerticalAlignment="Center" Background="Yellow">
<BulletDecorator.Bullet>
<CheckBox />
</BulletDecorator.Bullet>
<TextBlock Margin="10,0,0,0" TextWrapping="Wrap" Width="200" VerticalAlignment="Center" HorizontalAlignment="Left" Foreground ="Purple">A very very veryvery very very very long text BulletDecorator</TextBlock>
</BulletDecorator>
</StackPanel>

如上代码所展示的是一个使用 BulletDecorator 控件实现一个无序列表。可以任意定义 Bullet 以及 Child 内的内容。

以上例子分别使用了图形与圆形放置在 Bullet 中作为列表的符号,Child 内容固定为一段文本内容,当文本换行时,文本的第一行将与列表符号对齐。

该控件除可以作为列表提供展示外,还可以在 Bullet 中放置单选框、多选框、输入框等。

Canvas(画布)

定义一个区域,可在其中使用相对于 Canvas 区域的坐标以显式方式来定位子元素。

1
2
3
4
5
<Canvas Height="400" Width="400">
<Canvas Height="100" Width="100" Top="0" Left="0" Background="Red"/>
<Canvas Height="100" Width="100" Top="100" Left="100" Background="Green"/>
<Canvas Height="100" Width="100" Top="50" Left="50" Background="Blue"/>
</Canvas>

需要注意的是 Canvas 作为一个存储控件的容器,其不会自动调整内部元素的大小与排列。

Canvas 默认也不会裁剪超出自身范围的内容,溢出的内容将会显示在 Canvas 外,可以通过通过调整 ClipToBounds 属性,来控制是否裁剪多出的内容。

停靠面板(DockPanel)

定义一个区域,从中可以按相对位置水平或垂直排列各个子元素。

1
2
3
4
5
6
7
8
9
10
11
<DockPanel>
<Button DockPanel.Dock="Top" Background="Aqua">1(Top)</Button>
<Button DockPanel.Dock="Left" Background="Green">2(Left)</Button>
<Button DockPanel.Dock="Right" Background="Yellow">3(Right)</Button>
<Button DockPanel.Dock="Bottom" Background="Blue">4(Bottom)</Button>
<DockPanel Background="Orange" LastChildFill="False">
<Button Height="20">Button 1</Button>
<Button Height="20">Button 2</Button>
<Button DockPanel.Dock="Right" Height="20">Button 3</Button>
</DockPanel>
</DockPanel>

SetDock 方法更改某个元素相对于同一容器中的其他元素的位置。对齐属性(如 HorizontalAlignment)更改元素相对于其父元素的位置。

默认情况下 DockPanel 中的最后一个元素将填充剩余空间,而不考虑最后一个元素设置的任何其他 Dock 值,可以通过指定 LastChildFill 属性并设置停靠方向来调整。

默认情况下,Panel 元素不接收焦点。 若要强制 Panel 元素接收焦点,请将 Focusable 属性设置为 true

扩展器(Expander)

Expander 是一个可以展开和折叠的控件,它包含标头 Header 和内容 Content 两个部分。

1
2
3
4
5
6
7
8
9
10
<Expander Background="Tan" HorizontalAlignment="Left" ExpandDirection="Down" IsExpanded="True" Width="100">
<Expander.Header>
<TextBlock>hd2y</TextBlock>
</Expander.Header>
<StackPanel HorizontalAlignment="Center">
<TextBlock><Hyperlink>用户中心</Hyperlink></TextBlock>
<TextBlock><Hyperlink>博客</Hyperlink></TextBlock>
<TextBlock><Hyperlink>注销</Hyperlink></TextBlock>
</StackPanel>
</Expander>

ContentHeader 属性可以是任何类型(如字符串、图像或面板)。

如果展开窗口的内容对窗口而言太大,则可以将 Expander 的内容包装在 ScrollViewer 控件中以提供可滚动的内容。 Expander 控件不自动提供滚动功能。

网格(Grid)

Grid 用来定义由列和行组成的灵活的网格区域。

1
2
3
4
5
6
7
8
9
10
11
12
13
14
15
16
17
18
19
20
21
22
<Grid VerticalAlignment="Top" HorizontalAlignment="Left" ShowGridLines="True" Width="250" Height="100">
<Grid.ColumnDefinitions>
<ColumnDefinition />
</Grid.ColumnDefinitions>
<Grid.RowDefinitions>
<RowDefinition />
<RowDefinition />
<RowDefinition />
<RowDefinition />
</Grid.RowDefinitions>

<TextBlock FontSize="20" FontWeight="Bold" Grid.ColumnSpan="3" Grid.Row="0">2005 Products Shipped</TextBlock>
<TextBlock FontSize="12" FontWeight="Bold" Grid.Row="1" Grid.Column="0">Quarter 1</TextBlock>
<TextBlock FontSize="12" FontWeight="Bold" Grid.Row="1" Grid.Column="1">Quarter 2</TextBlock>
<TextBlock FontSize="12" FontWeight="Bold" Grid.Row="1" Grid.Column="2">Quarter 3</TextBlock>
<TextBlock Grid.Row="2" Grid.Column="0">50000</TextBlock>
<TextBlock Grid.Row="2" Grid.Column="1">100000</TextBlock>
<TextBlock Grid.Row="2" Grid.Column="2">150000</TextBlock>
<TextBlock FontSize="16" FontWeight="Bold" Grid.ColumnSpan="3" Grid.Row="3">Total Units: 300000</TextBlock>
</Grid>

默认情况下列宽与行高是等比例分配,可以设置 WidthHeight 属性为 Auto 让宽高自适应。

宽高除可以设置为 Auto 外,其默认值为 1*,这里 * 会使用设定了固定值外的剩余空间,按前面设置的数值进行等比例分配。

固定值我们可以设置 100100px100pt100cm100in,默认单位为 px,所以 100100px 是同样的。

在子元素中,我们可以通过设置 ColumnSpanRowSpan,让这个元素跨列或跨行显示。

网格拆分器(GridSplitter)

利用 Grid 我们可以很方便的划分单元格,并通过设定宽高来控制每行每列所占用的空间。

但是如果想要让用户来改变每行每列的宽高,就需要使用 GridSplitter 来实现这样的效果。

例如以下代码,定义了一个 GridSplitter,通过覆盖列的边缘来调整 Grid 中列的大小:

1
2
3
4
5
6
7
<Grid>
<Grid.ColumnDefinitions>
<ColumnDefinition/>
<ColumnDefinition/>
</Grid.ColumnDefinitions>
<GridSplitter Grid.Column="0" Background="Blue" Width="5" HorizontalAlignment="Right" VerticalAlignment="Stretch"/>
</Grid>

而以下代码中,GridSplitter 将在 Grid 中占用一列:

1
2
3
4
5
6
<Grid.ColumnDefinitions>
<ColumnDefinition Width="2*"/>
<ColumnDefinition Width="Auto"/>
<ColumnDefinition/>
</Grid.ColumnDefinitions>
<GridSplitter Grid.Column="1" HorizontalAlignment="Center" VerticalAlignment="Stretch" Background="Black" ShowsPreview="True" Width="5"/>

组框(GroupBox)

GroupBox 控件可以在用户界面的内容外创建一个带有边框与标题的容器。

1
2
3
4
5
6
7
8
9
10
11
12
13
14
15
16
17
18
19
20
<GroupBox>
<GroupBox.Header>
<Label>health information</Label>
</GroupBox.Header>
<Grid>
<Grid.RowDefinitions>
<RowDefinition Height="30"/>
<RowDefinition/>
</Grid.RowDefinitions>
<Grid.ColumnDefinitions>
<ColumnDefinition Width="100"/>
<ColumnDefinition/>
</Grid.ColumnDefinitions>
<Label VerticalAlignment="Center" HorizontalAlignment="Right">height:</Label>
<Label Grid.Row="1" VerticalAlignment="Center" HorizontalAlignment="Right">weight:</Label>
<TextBox Grid.Row="0" Grid.Column="1" Margin="3"></TextBox>
<TextBox Grid.Row="1" Grid.Column="1" Margin="3"></TextBox>
</Grid>
</GroupBox>

GroupBox 的效果类似 html 中的 fieldset 标签。

另外需要注意的是,GroupBoxHeaderedContentControl,这意味着其 ContentHeader 属性可以是任何类型(如字符串、图像或面板)。

分离器(Separator)

Separator 控件是用来分隔控件中的多个项。

1
2
3
4
5
6
7
8
9
10
11
12
13
14
<ToolBarTray Background="White">
<ToolBar Band="1" BandIndex="1">
<Button>New</Button>
<Button>Open</Button>
<Button>Save</Button>
<Separator/>
<Button>Cut</Button>
<Button>Copy</Button>
<Button>Paste</Button>
<Separator/>
<Button>Print</Button>
<Button>Preview</Button>
</ToolBar>
</ToolBarTray>

滚动条(ScrollBar)

ScrollBar 提供一个滚动条的控件,其位置对应于值。

1
<ScrollBar Orientation="Horizontal" Width ="4in" Value="50" Minimum="1" Maximum="100" />

滚动查看器(ScrollViewer)

ScrollViewer 定义可滚动的区域,可以包含其他可见元素。

1
2
3
4
5
6
<ScrollViewer HorizontalScrollBarVisibility="Auto">
<StackPanel VerticalAlignment="Top" HorizontalAlignment="Left">
<TextBlock TextWrapping="Wrap" Margin="0,0,0,20">Scrolling is enabled when it is necessary. Resize the window, making it larger and smaller.</TextBlock>
<Rectangle Fill="Red" Width="500" Height="500"></Rectangle>
</StackPanel>
</ScrollViewer>

堆栈面板(StackPanel)

StackPanel 可以将子元素排列成水平或垂直的一行。

1
2
3
4
5
6
7
8
9
10
11
12
13
14
15
16
<Grid>
<Grid.RowDefinitions>
<RowDefinition/>
<RowDefinition/>
</Grid.RowDefinitions>
<StackPanel>
<Button>Test1</Button>
<Button>Test2</Button>
<Button>Test3</Button>
</StackPanel>
<StackPanel Grid.Row="1" Orientation="Horizontal">
<Button>Test4</Button>
<Button>Test5</Button>
<Button>Test6</Button>
</StackPanel>
</Grid>

默认子元素会垂直排列,可以修改 Orientation 属性为 Horizontal,子元素将水平排列。

查看框(ViewBox)

ViewBox 组件的作用是拉伸或延展位于其中的组件,使之有更好的布局及视觉效果。

1
2
3
<Viewbox Stretch="Fill" StretchDirection="Both" Width="400" Height="60">
<Button>测试</Button>
</Viewbox>

ViewBox 内只能有一个子元素,另外可以通过设置 StretchStretchDirection 属性,来设置内容的缩放效果。

Stretch 可选项有:

  • None:原始大小。
  • Fill:填充,子元素占满整个 Viewbox,不保证宽高比例。
  • Uniform:等比例缩放。在 Viewbox 能完整显示子元素的最大尺寸;
  • UniformToFill:等比例缩放填充,子元素在保证缩放的情况下填充 Viewbox,多余的部分被裁剪。

StretchDirection 可选项有:

  • Both:内容根据 Stretch 模式进行缩放以适合父项的大小;
  • DownOnly:内容仅在大于父级时缩放。如果内容较小,则不会执行任何缩放。
  • UpOnly:内容仅在小于父级时缩放。如果内容较大,则不执行缩放。

窗口(Window)

Window 提供了创建、配置、显示、管理窗口与对话框的生命周期的能力。

1
<Window xmlns="http://schemas.microsoft.com/winfx/2006/xaml/presentation" Title="Main Window in Markup Only" Height="300" Width="300" />

用户与独立应用程序之间的交互点是一个窗口。WPF 窗口包含两个不同的区域:

  • 承载 Windows 修饰的非工作区,包括图标、标题、系统菜单、最小化按钮、最大化按钮、还原按钮、关闭按钮和边框。
  • 承载特定于应用程序的内容的工作区。

Window 封装了创建、配置、显示和管理窗口和对话框的声明周期的功能,并提供了以下关键服务:

  • 生命周期管理:ActivateActivatedCloseClosedClosingDeactivatedHideIsActiveShowSourceInitialized
  • 窗口管理:GetWindowOwnedWindowsOwner
  • 外观和行为:AllowsTransparencyContentRenderedDragMoveIconLeftLocationChangedResizeModeRestoreBoundsShowActivatedShowInTaskbarSizeToContentStateChangedTitleTopTopmostWindowStartupLocationWindowStateWindowStyle
  • 对话框:DialogResultShowDialog

此外,Application 公开了对管理应用程序中的所有窗口的特殊支持:应用程序维护当前在应用程序中实例化的所有窗口的列表。 此列表由 Windows 属性公开。

默认情况下,将使用对应用程序中实例化的第一个 Window 的引用自动设置 MainWindow。 从而使窗口成为主应用程序窗口。

Window 主要用于显示独立应用程序的窗口和对话框。但是,对于需要在窗口级别导航的应用程序(如向导),可以改用 NavigationWindowNavigationWindow 派生自 Window 并通过浏览器样式的导航支持对其进行扩展。
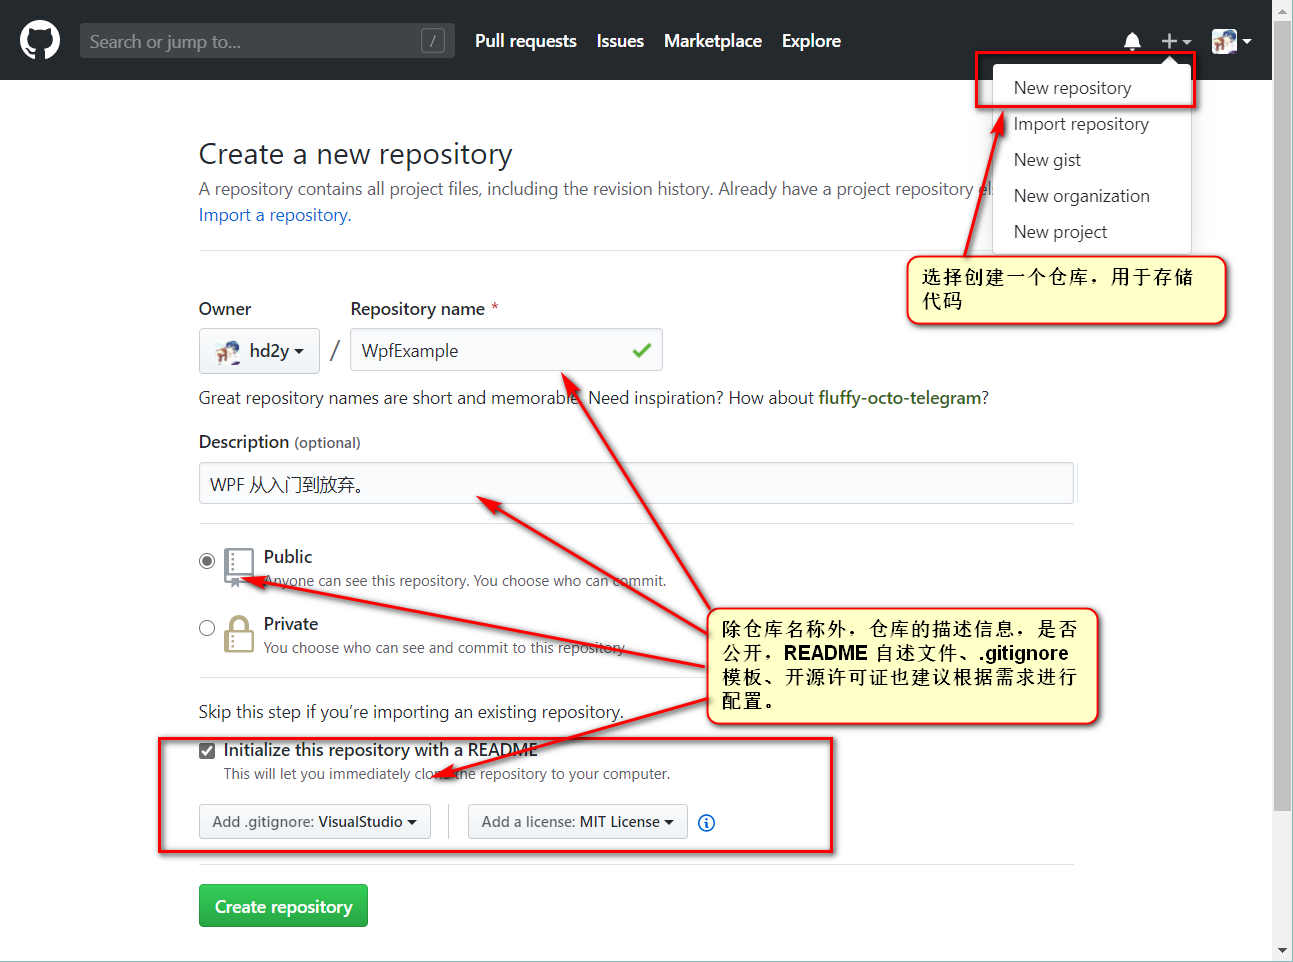
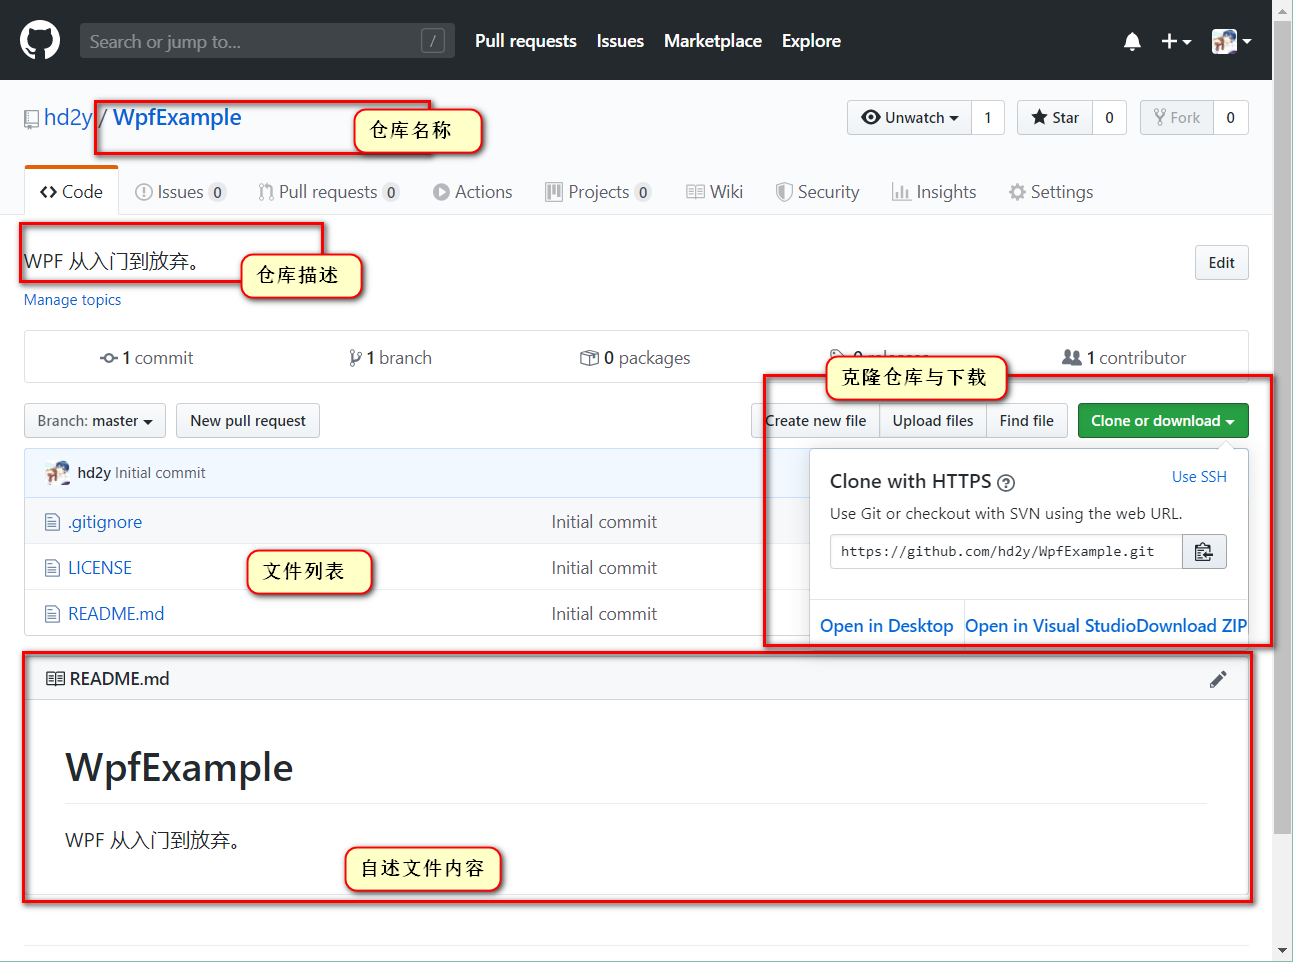
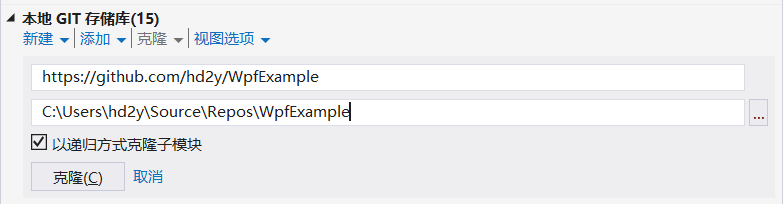
注: 本文的目的是为了熟悉常见的布局控件,所以存在大段的复制粘贴。
示例代码来自 MSDN,内容已经上传至 githubhd2y/WpfExample

参考:

Git 删除大文件

之前创建的一个 git 仓库提交了几个大文件,影响小伙伴的下载体验,于是便想把大文件删除掉,大文件通过网盘等方式分享。

试过几种方案,最终使用 BFG Repo-Cleaner 解决,这里记录处理的过程。

查看仓库大文件

打开 Git Bash,进入到本地仓库,运行以下命令:

1
2
3
4
5
6
7
8
9
10
11
12
hd2y@DESKTOP-V2RPVP4 MINGW64 /e/LIS接口/Instruments (master)
$ git rev-list --all | xargs -rL1 git ls-tree -r --long | sort -uk3 | sort -rnk4 | head -10
100644 blob e212baea0de1eceda3fb219bb5ef65e51dcfc047 29208376 "dist/Tools/Access\346\225\260\346\215\256\345\272\223\351\251\261\345\212\250/AccessDatabaseEngine_2010_X64.exe"
100644 blob 89d525d7930c40f25dbc4a70fe9043a2d5a50a0e 27162256 "dist/Tools/Access\346\225\260\346\215\256\345\272\223\351\251\261\345\212\250/AccessDatabaseEngine_2010_x86.exe"
100644 blob d9b021ae60274f40bfec0e6c9c95c4be4be62f45 26481656 "dist/Tools/Access\346\225\260\346\215\256\345\272\223\351\251\261\345\212\250/AccessDatabaseEngine_2007_x86.exe"
100644 blob af48c267a4c9b21fbd0db6f6dcdafc38e3f0c4c0 10513579 dist/WPF/LIS.Connector.WpfApp.0.2.2.7z
100644 blob 76a62fd5d9bb82b7d6725c187f0a3031e152d561 3862528 "dist/\345\205\266\344\273\226/\351\230\264\351\201\223\345\276\256\347\224\237\346\200\201 BPR-2014A MDB/Data/BV.mdb"
100644 blob bdb57e3515850b78ec861b60cef54a105f43974a 1048495 "dist/\347\224\265\346\263\263\344\273\252/\350\265\233\346\257\224\344\272\232 HYDRASYS/Data/\345\234\260\350\264\253\347\224\265\346\263\263\345\233\276\350\260\261\345\210\244\350\257\273\350\247\204\345\210\231.pptx"
100644 blob 8a2b843f42381c22fe8574dce59fa11c09410b99 758498 "dist/\347\224\265\346\263\263\344\273\252/\350\265\233\346\257\224\344\272\232 HYDRASYS/Data/Phoresis Extended 5.6.x.pdf"
100644 blob ea69b14549302725315f28b4999c8cd4837e4519 709825 "dist/\350\241\200\346\260\224\344\273\252/GEM3500/Data/GEM 3500\351\200\232\350\256\257\345\215\217\350\256\256 Interface Spec 6.X.pdf"
100644 blob db4d2d0f6c405a7e980511d6a1a7ac1290ad350c 330416 "dist/\345\205\266\344\273\226/\351\230\264\351\201\223\345\276\256\347\224\237\346\200\201 BPR-2014A MDB/Data/\351\230\264\351\201\223\345\276\256\347\224\237\346\200\201.jpg"
100644 blob f2a467b4fe413cb6fbc10223c6ade54d789d5db8 23120 "dist/\347\224\265\346\263\263\344\273\252/\350\265\233\346\257\224\344\272\232 HYDRASYS/Data/OUT.DAT"

需要注意的是,Git Bash 中使用 cd 进入仓库的路径要调整,将 \ 修改为 /

尝试删除

开始是尝试使用博客园 Git 删除大文件的方法 的方案删除,出现如下错误。

1
2
3
4
hd2y@DESKTOP-V2RPVP4 MINGW64 /e/LIS接口/Instruments (master)
$ git verify-pack -v .git/objects/pack/pack-*.idx | sort -k 3 -g | tail -10
fatal: Cannot open existing pack file '.git/objects/pack/pack-*.idx'
.git/objects/pack/pack-*.pack: bad

后搜索该错误,在 Google 发现了 git瘦身:清除大文件或敏感文件记录 这篇文章。

这里不得不说,用百度搜出来的内容经常都是 Ctrl C + Ctrl V 的 :poop:。

使用 BFG 删除

安装 JDK

首先我们需要安装 JDK,因为该工具是 Java 开发,下载地址:Java SE Downloads

安装后还需要配置环境变量,否则无法使用 java 命令,当然也可以直接用 java.exe 的绝对路径。

1
2
3
4
5
// 用户变量
JAVA_HOME = 'C:\Program Files\Java\jdk-14.0.1'
// 系统变量
CLASSPATH = '.;%JAVA_HOME%\lib'
Path = '.;%JAVA_HOME%\bin;'

注意:Path 如果是单个编辑框,直接追加到最前,如果是一个列表,那就增加 .%JAVA_HOME%\bin。以上内容复制的时候,不要复制单引号 '

如果安装正确,运行 java -version 可以看到当前的版本信息,注意配置后命令行需要重启才能生效。

下载 BFG

JDK 安装完成后,需要下载 BFG 工具:BFG Repo-Cleaner

需要注意的是,这里提供的是 maven 的下载,国内下载会非常慢,所以建议挂代理。

下载 Git 仓库

这里处理完成后,就可以操作删除大文件了,首先需要重新下载仓库:

1
$ git clone --mirror git://example.com/some-big-repo.git

注:需要重新下载的主要原因就是下载时需要使用 --mirror,所以不要漏掉该参数。

删除文件并提交

使用 BFG 删除指定文件名的文件:

1
$ java -jar bfg.jar --delete-files (filename) some-big-repo.git

使用 BFG 删除超出指定大小的文件:

1
$ java -jar bfg.jar --strip-blobs-bigger-than 100M some-big-repo.git

以上只是更新所有的分支与提交,并没有真正的删除,所以需要进入仓库,执行以下命令:

1
2
$ cd some-big-repo.git
$ git reflog expire --expire=now --all && git gc --prune=now --aggressive

删除以后就可以推送到远程分支了:

1
2
3
4
5
6
7
8
$ git push
Enumerating objects: 71, done.
Writing objects: 100% (71/71), 2.61 MiB | 589.00 KiB/s, done.
Total 71 (delta 0), reused 0 (delta 0)
remote: . Processing 1 references
remote: Processed 1 references in total
To git://example.com/some-big-repo.git
+ 07534d2...717da32 master -> master (forced update)

完成

虽然提交时,可以看到仓库大小已经变成了 2.61 MiB,但是登录 Gitea 后查看仓库大小仍然是 91 MiB

91MiB

不过不用担心,直接下载该仓库内容,可以看到下载文件大小是正常的。

ZIP File

参考:

WPF 系列教程:使用 MahApps.Metro 控件库

前言

近期需要开发一个编辑图片的小工具,所以借此机会继续补充一下之前的 WPF 教程。

后续内容只涉及几个常用库的使用,快速完成程序的开发以及打包发布,内容不会涉及底层的实现原理。

本次主要介绍使用 MahApps.Metro 控件库来美化程序。

创建项目

需要参考 WPF 系列教程:从 WPF (.NET Core) 开始 创建一个 WPF 的项目。

需要注意的是,要根据用户的使用场景来选择 .NET Framework 版本,我这里用户系统为 Windows 7,所以选择了 .NET Framework 4.0

项目文件内容如下:

1
2
3
4
5
6
7
8
9
10
11
12
13
14
15
16
17
18
19
20
21
22
23
24
25
26
<Project Sdk="Microsoft.NET.Sdk.WindowsDesktop">

<PropertyGroup>
<OutputType>WinExe</OutputType>
<TargetFrameworks>net40;net452</TargetFrameworks>
<UseWPF>true</UseWPF>
<ApplicationIcon>Resources\NotifyIconConnected.ico</ApplicationIcon>
<ApplicationManifest>app.manifest</ApplicationManifest>
<Platforms>AnyCPU;x86</Platforms>
</PropertyGroup>

<PropertyGroup Condition="'$(Configuration)|$(Platform)'=='Debug|AnyCPU'">
<PlatformTarget>x86</PlatformTarget>
</PropertyGroup>

<ItemGroup>
<Resource Include="Resources\HostStopped.png" />
<Resource Include="Resources\HostStarted.png" />
<Resource Include="Resources\NotifyIconConnected.ico" />
<Resource Include="Resources\NotifyIconDisconnected.ico" />
<Resource Include="Resources\NotifyIconError.ico" />
<Resource Include="Resources\ServiceDisconnected.png" />
<Resource Include="Resources\ServiceConnected.png" />
</ItemGroup>

</Project>

以上指定了一个 WPF 应用程序,编译的目标平台为 x86(我这里是方便调用一些基于 x86 发布的动态链接库,如果没有类似需求可以不指定)。

app.manifest 指定程序必须以管理员身份运行(我这里是用了这个很 LOW 的方法,避免程序安装在系统盘后因为 UAC 的原因,无法正常读写根目录的数据文件),内容如下:

1
2
3
4
5
6
7
8
9
10
11
12
13
14
15
16
17
18
19
<?xml version="1.0" encoding="utf-8"?>
<assembly manifestVersion="1.0" xmlns="urn:schemas-microsoft-com:asm.v1">
<assemblyIdentity version="1.0.0.0" name="MyApplication.app" />
<trustInfo xmlns="urn:schemas-microsoft-com:asm.v2">
<security>
<requestedPrivileges xmlns="urn:schemas-microsoft-com:asm.v3">
<requestedExecutionLevel level="requireAdministrator" uiAccess="false" />
</requestedPrivileges>
<applicationRequestMinimum>
<defaultAssemblyRequest permissionSetReference="Custom" />
<PermissionSet class="System.Security.PermissionSet" version="1" ID="Custom" SameSite="site" Unrestricted="true" />
</applicationRequestMinimum>
</security>
</trustInfo>
<compatibility xmlns="urn:schemas-microsoft-com:compatibility.v1">
<application>
</application>
</compatibility>
</assembly>

基本布局

按常规标本检验配置一个界面,左侧为标本信息编辑区,中间为结果区域,右侧为标本列表区。

按需求调整 MainWindow.xaml 内容如下:

1
2
3
4
5
6
7
8
9
10
11
12
13
14
15
16
17
18
19
20
21
22
23
24
25
26
27
28
29
30
31
32
33
34
35
36
37
38
39
40
41
42
43
44
45
46
47
48
49
50
51
52
53
54
55
56
57
58
59
60
61
62
63
64
65
66
67
68
69
70
71
72
73
74
75
76
77
78
79
80
81
82
83
84
85
86
87
88
89
90
91
92
93
94
95
96
97
98
99
100
101
102
103
104
105
106
107
108
109
110
111
112
113
114
115
116
117
118
119
120
121
122
123
124
125
126
127
128
129
130
131
132
133
134
135
136
137
138
139
140
141
142
143
144
145
146
147
148
149
150
151
152
153
154
155
156
157
158
159
160
161
162
163
164
165
166
167
168
169
170
171
172
173
174
175
176
177
178
179
180
181
182
183
184
185
186
187
188
189
190
191
192
193
194
195
196
197
198
199
200
201
202
203
204
205
206
207
208
209
210
211
212
213
214
215
216
217
218
219
220
221
222
223
224
225
226
227
228
229
230
231
232
233
234
235
236
237
238
239
240
241
242
243
244
245
246
247
248
249
250
251
252
253
254
<Window x:Class="SampleImages.MainWindow"
xmlns="http://schemas.microsoft.com/winfx/2006/xaml/presentation"
xmlns:x="http://schemas.microsoft.com/winfx/2006/xaml"
xmlns:d="http://schemas.microsoft.com/expression/blend/2008"
xmlns:mc="http://schemas.openxmlformats.org/markup-compatibility/2006"
mc:Ignorable="d"
Title="标本图片处理工具" Height="450" Width="800">
<Grid>
<Grid.ColumnDefinitions>
<ColumnDefinition Width="160"/>
<ColumnDefinition Width="*"/>
<ColumnDefinition Width="200"/>
</Grid.ColumnDefinitions>
<Grid>
<Grid.RowDefinitions>
<RowDefinition Height="200"/>
<RowDefinition Height="*"/>
<RowDefinition Height="50"/>
</Grid.RowDefinitions>
<StackPanel>
<StackPanel Height="30" VerticalAlignment="Center" HorizontalAlignment="Left" Orientation="Horizontal" Margin="2">
<Label Width="50">日 期:</Label>
<DatePicker Width="100" VerticalAlignment="Center"></DatePicker>
</StackPanel>
<StackPanel Height="30" VerticalAlignment="Center" HorizontalAlignment="Left" Orientation="Horizontal" Margin="2">
<Label Width="50">编 号:</Label>
<TextBox Width="100" VerticalAlignment="Center"></TextBox>
</StackPanel>
<StackPanel Height="30" VerticalAlignment="Center" HorizontalAlignment="Left" Orientation="Horizontal" Margin="2">
<Label Width="50">姓 名:</Label>
<TextBox Width="100" VerticalAlignment="Center"></TextBox>
</StackPanel>
<StackPanel Height="30" VerticalAlignment="Center" HorizontalAlignment="Left" Orientation="Horizontal" Margin="2">
<Label Width="50">条形码:</Label>
<TextBox Width="100" VerticalAlignment="Center"></TextBox>
</StackPanel>
</StackPanel>
</Grid>
<Grid Grid.Column="1">
<Grid.RowDefinitions>
<RowDefinition Height="30"/>
<RowDefinition Height="*"/>
</Grid.RowDefinitions>
<StackPanel Grid.Row="0" Orientation="Horizontal" VerticalAlignment="Center" HorizontalAlignment="Right" Margin="0 0 5 0">
<Button Width="50">保存</Button>
</StackPanel>
<DataGrid Grid.Row="1" CanUserAddRows="False" SelectionMode="Single" AutoGenerateColumns="False" CanUserDeleteRows="False">
<DataGrid.Columns>
<DataGridTemplateColumn Header="名称" Width="50">
<DataGridTemplateColumn.CellTemplate>
<DataTemplate>
<TextBlock TextWrapping="NoWrap" TextTrimming="CharacterEllipsis"></TextBlock>
</DataTemplate>
</DataGridTemplateColumn.CellTemplate>
</DataGridTemplateColumn>
<DataGridTextColumn Header="格式" Width="50" IsReadOnly="True" />
<DataGridTextColumn Header="宽度" Width="50" IsReadOnly="True" />
<DataGridTextColumn Header="高度" Width="50" IsReadOnly="True" />
<DataGridTextColumn Header="缩略图" Width="100" />
<DataGridTemplateColumn Header="操作" Width="*" >
<DataGridTemplateColumn.CellTemplate>
<DataTemplate>
<StackPanel Orientation="Horizontal">
<Button Name="btnInput" Content="修改" Cursor="Hand">
<Button.Template>
<ControlTemplate TargetType="Button">
<TextBlock TextDecorations="Underline" >
<ContentPresenter />
</TextBlock>
</ControlTemplate>
</Button.Template>
<Button.Style>
<Style TargetType="Button">
<Setter Property="Foreground" Value="Blue" />
<Style.Triggers>
<Trigger Property="IsMouseOver" Value="true">
<Setter Property="Foreground" Value="Red" />
</Trigger>
</Style.Triggers>
</Style>
</Button.Style>
</Button>
<Button Name="btnCancel" Content="删除" Margin="10 0 0 0" Cursor="Hand">
<Button.Template>
<ControlTemplate TargetType="Button">
<TextBlock TextDecorations="Underline" >
<ContentPresenter />
</TextBlock>
</ControlTemplate>
</Button.Template>
<Button.Style>
<Style TargetType="Button">
<Setter Property="Foreground" Value="Blue" />
<Style.Triggers>
<Trigger Property="IsMouseOver" Value="true">
<Setter Property="Foreground" Value="Red" />
</Trigger>
</Style.Triggers>
</Style>
</Button.Style>
</Button>
</StackPanel>
</DataTemplate>
</DataGridTemplateColumn.CellTemplate>
</DataGridTemplateColumn>
</DataGrid.Columns>
</DataGrid>
</Grid>
<Grid Grid.Column="1">
<Grid.RowDefinitions>
<RowDefinition Height="30"/>
<RowDefinition Height="*"/>
</Grid.RowDefinitions>
<StackPanel Grid.Row="0" Orientation="Horizontal" VerticalAlignment="Center" HorizontalAlignment="Right" Margin="0 0 5 0">
<Button Width="50">保存</Button>
</StackPanel>
<DataGrid Grid.Row="1" CanUserAddRows="False" SelectionMode="Single" AutoGenerateColumns="False" CanUserDeleteRows="False" BorderBrush="Gray" BorderThickness="1">
<DataGrid.Columns>
<DataGridTemplateColumn Header="名称" Width="50">
<DataGridTemplateColumn.CellTemplate>
<DataTemplate>
<TextBlock TextWrapping="NoWrap" TextTrimming="CharacterEllipsis"></TextBlock>
</DataTemplate>
</DataGridTemplateColumn.CellTemplate>
</DataGridTemplateColumn>
<DataGridTextColumn Header="格式" Width="50" IsReadOnly="True" />
<DataGridTextColumn Header="宽度" Width="50" IsReadOnly="True" />
<DataGridTextColumn Header="高度" Width="50" IsReadOnly="True" />
<DataGridTextColumn Header="缩略图" Width="*" />
<DataGridTemplateColumn Header="操作" Width="100" >
<DataGridTemplateColumn.CellTemplate>
<DataTemplate>
<StackPanel Orientation="Horizontal">
<Button Name="btnInput" Content="修改" Cursor="Hand">
<Button.Template>
<ControlTemplate TargetType="Button">
<TextBlock TextDecorations="Underline" >
<ContentPresenter />
</TextBlock>
</ControlTemplate>
</Button.Template>
<Button.Style>
<Style TargetType="Button">
<Setter Property="Foreground" Value="Blue" />
<Style.Triggers>
<Trigger Property="IsMouseOver" Value="true">
<Setter Property="Foreground" Value="Red" />
</Trigger>
</Style.Triggers>
</Style>
</Button.Style>
</Button>
<Button Name="btnCancel" Content="删除" Margin="10 0 0 0">
<Button.Template>
<ControlTemplate TargetType="Button">
<TextBlock TextDecorations="Underline" >
<ContentPresenter />
</TextBlock>
</ControlTemplate>
</Button.Template>
<Button.Style>
<Style TargetType="Button">
<Setter Property="Foreground" Value="Blue" />
<Style.Triggers>
<Trigger Property="IsMouseOver" Value="true">
<Setter Property="Foreground" Value="Red" />
</Trigger>
</Style.Triggers>
</Style>
</Button.Style>
</Button>
</StackPanel>
</DataTemplate>
</DataGridTemplateColumn.CellTemplate>
</DataGridTemplateColumn>
</DataGrid.Columns>
</DataGrid>
</Grid>
<Grid Grid.Column="2">
<Grid.RowDefinitions>
<RowDefinition Height="30"/>
<RowDefinition Height="*"/>
</Grid.RowDefinitions>
<StackPanel Grid.Row="0" Orientation="Horizontal" VerticalAlignment="Center" HorizontalAlignment="Right" Margin="0 0 5 0">
<Button Width="50">上一个</Button>
<Button Width="50" Margin="5 0 0 0">下一个</Button>
</StackPanel>
<DataGrid Grid.Row="1" CanUserAddRows="False" SelectionMode="Single" AutoGenerateColumns="False" CanUserDeleteRows="False" BorderBrush="Gray" BorderThickness="1">
<DataGrid.Columns>
<DataGridTemplateColumn Header="编号" Width="50">
<DataGridTemplateColumn.CellTemplate>
<DataTemplate>
<TextBlock TextWrapping="NoWrap" TextTrimming="CharacterEllipsis"></TextBlock>
</DataTemplate>
</DataGridTemplateColumn.CellTemplate>
</DataGridTemplateColumn>
<DataGridTemplateColumn Header="姓名" Width="50">
<DataGridTemplateColumn.CellTemplate>
<DataTemplate>
<TextBlock TextWrapping="NoWrap" TextTrimming="CharacterEllipsis"></TextBlock>
</DataTemplate>
</DataGridTemplateColumn.CellTemplate>
</DataGridTemplateColumn>
<DataGridTemplateColumn Header="操作" Width="*" >
<DataGridTemplateColumn.CellTemplate>
<DataTemplate>
<StackPanel Orientation="Horizontal">
<Button Name="btnInput" Content="修改" Cursor="Hand">
<Button.Template>
<ControlTemplate TargetType="Button">
<TextBlock TextDecorations="Underline" >
<ContentPresenter />
</TextBlock>
</ControlTemplate>
</Button.Template>
<Button.Style>
<Style TargetType="Button">
<Setter Property="Foreground" Value="Blue" />
<Style.Triggers>
<Trigger Property="IsMouseOver" Value="true">
<Setter Property="Foreground" Value="Red" />
</Trigger>
</Style.Triggers>
</Style>
</Button.Style>
</Button>
<Button Name="btnCancel" Content="删除" Margin="10 0 0 0" Cursor="Hand">
<Button.Template>
<ControlTemplate TargetType="Button">
<TextBlock TextDecorations="Underline" >
<ContentPresenter />
</TextBlock>
</ControlTemplate>
</Button.Template>
<Button.Style>
<Style TargetType="Button">
<Setter Property="Foreground" Value="Blue" />
<Style.Triggers>
<Trigger Property="IsMouseOver" Value="true">
<Setter Property="Foreground" Value="Red" />
</Trigger>
</Style.Triggers>
</Style>
</Button.Style>
</Button>
</StackPanel>
</DataTemplate>
</DataGridTemplateColumn.CellTemplate>
</DataGridTemplateColumn>
</DataGrid.Columns>
</DataGrid>
</Grid>
</Grid>
</Window>

预览效果如下:

开始美化

首先需要引用 MahApps.Metro 以及 MahApps.Metro.IconPacks,第二个是图标库,如果不需要可以不添加引用。

项目文件中添加如下内容(也可以通过 NuGet 包管理器查找引用到项目):

1
2
3
4
<ItemGroup>
<PackageReference Include="MahApps.Metro" Version="1.6.5" />
<PackageReference Include="MahApps.Metro.IconPacks" Version="2.3.0" />
</ItemGroup>

控件包引用到项目后,需要绑定资源字典,修改 App.Xaml 文件中 Application.Resources 节点,添加以下内容:

1
2
3
4
5
6
7
8
9
10
11
<ResourceDictionary>
<ResourceDictionary.MergedDictionaries>
<!--MahApps.Metro resource dictionaries. Make sure that all file names are Case Sensitive!-->
<ResourceDictionary Source="pack://application:,,,/MahApps.Metro;component/Styles/Controls.xaml" />
<ResourceDictionary Source="pack://application:,,,/MahApps.Metro;component/Styles/Fonts.xaml" />
<ResourceDictionary Source="pack://application:,,,/MahApps.Metro;component/Styles/Colors.xaml" />
<!--Accent and AppTheme setting-->
<ResourceDictionary Source="pack://application:,,,/MahApps.Metro;component/Styles/Accents/Purple.xaml" />
<ResourceDictionary Source="pack://application:,,,/MahApps.Metro;component/Styles/Accents/BaseLight.xaml" />
</ResourceDictionary.MergedDictionaries>
</ResourceDictionary>

然后调整 MainWindow 的继承,修改 MainWindow.xaml.cs 文件,将继承由 Window 修改为 MetroWindow

同样的修改 MainWindow.xaml 文件,增加命名空间 xmlns:Controls="clr-namespace:MahApps.Metro.Controls;assembly=MahApps.Metro",修改父节点 WindowControls:MetroWindow

此时基本的美化已经完成了,可以运行程序查看美化后的效果:

以上内容可以参考官方文档:MahApps.Metro - Quick Start,可以看到更详细的说明。

其他

使用弹窗

MahApps.Metro 提供了多种弹窗方式,包括加载中提示、消息提示、输入框弹窗、登录弹窗等。

需要注意的是,使用这些功能需要使用 async/await 关键字,因为项目使用的是 .NET Framework 4.0,这个版本还不支持这两个关键字,所以需要引用 AsyncBridge

选用 AsyncBridge 而不是官方提供的 Microsoft.Bcl.Async,是因为官方提供的包还需要为 Windows XP 以及 Windows 7 系统打补丁(KB2468871)才可以使用。

我们为 保存 按钮增加一个点击事件,用于演示此功能,点击事件绑定方法内容如下:

1
2
3
4
5
6
7
8
9
10
11
12
13
14
15
16
17
18
19
20
21
22
23
24
25
private async void Button_Click(object sender, RoutedEventArgs e)
{
// 输入框
string name = await this.ShowInputAsync("注册", "请输入注册用户名!");

// 登录框
var data = await this.ShowLoginAsync("注册", "请输入注册用户名以及密码!", new LoginDialogSettings { InitialUsername = name, AffirmativeButtonText = "注册" });

// 弹窗提示
if (string.IsNullOrWhiteSpace(data.Username) || string.IsNullOrWhiteSpace(data.Password))
{
await this.ShowMessageAsync("警告s", $"注册用户名称与密码不能为空!");
}

// 加载提示
var controller = await this.ShowProgressAsync("请稍候", $"正在获取用户[{data.Username}]注册结果!", true);
controller.SetIndeterminate();

// 绑定取消关闭加载
controller.Canceled += new EventHandler(async (obj, args) =>
{
await controller.CloseAsync();
await this.ShowMessageAsync("提示", $"您已取消了用户注册!");
});
}

最终实现的效果如下:

使用图标

前文已经引用了 MahApps.Metro.IconPacks,但是如果想要使用,还需要添加命名空间:xmlns:iconPacks="http://metro.mahapps.com/winfx/xaml/iconpacks"

使用图标可以丰富页面内容,如本程序中在标本信息编辑区增加一个说明信息。

1
2
3
4
5
6
7
8
9
10
<Controls:MetroHeader Margin="5" Header="TextBox Header" Grid.ColumnSpan="2">
<Controls:MetroHeader.HeaderTemplate>
<DataTemplate>
<StackPanel VerticalAlignment="Center" Orientation="Horizontal">
<iconPacks:PackIconMaterial VerticalAlignment="Center" Kind="CircleEditOutline" Foreground="MediumPurple" />
<TextBlock Margin="5 0 0 0" VerticalAlignment="Center" FontWeight="Bold" Text="标本信息" />
</StackPanel>
</DataTemplate>
</Controls:MetroHeader.HeaderTemplate>
</Controls:MetroHeader>

WPF 系列教程:从 WPF (.NET Core) 开始

如果是一名 .NETer,应该有用 Windows Form 与 WPF 创建过一些简单项目,如果没用过至少也应该听说过。

开始我也用 Windows Form 与 WPF 写过很多小工具。

当然后期用 Windows Form 布局感觉太过繁琐耗费精力,现在已经完全投入了 WPF 的怀抱。

因为在这过程中碰到过很多问题,为此查看过很多资料,这里就简单整理一下,以后再碰到这些问题,方便 Copy。

初始化代码仓库

因为我是用 git 托管代码,所以创建项目的第一步,就是先创建一个 git 仓库。

可以选择 github、gitlab,如果担心以后有被美国“制裁”的风险,也可以选择国内的 gitee。当然也可以自己使用 gitlab、gitea 或者 gogs 搭建自己的 git 服务。

虽然选择很多,但是创建一个代码仓的过程都没什么区别,下图是如何在 github 上创建一个仓库。

new repository

创建成功后,待仓库初始化完成会自动跳转到如下界面:

repository homepage

这时我们可以选择用 Open in Visual Studio,使用 Visual Studio 直接克隆下载并打开这个仓库。

git clone

建议也可以安装 git,使用 clone 命令进行下载。下载完成后,可以打开 Visual Studio,选择打开本地文件夹来查看初始化的文件。

1
2
3
git --version
cd C:\Users\hd2y\source\repos
git clone https://github.com/hd2y/WpfExample.git

创建项目

为了方便管理解决方案内的项目,一般我都会新建一个空白的解决方案。有时,使用搜索模板功能是找不到“空白解决方案”的,我们可以在 “所有语言” -> “所有平台” -> “其他” 中找到。

create solution

然后填写需要创建的解决方案名称,并选择所在文件夹,完成创建。

set new solution

创建完成后,在资源管理器中内容如下图。

view in explorer

但是这时我们的解决方案打开后空无一物,这时我们需要创建两个文件夹,一个是 Solution Items,用于管理 .gitignoreLICENSE 与仓库的自述文件,另外一个是 src,用于存放代码文件。

如果需要添加单元测试,还需要增加一个文件夹 test 存放测试代码,而如果有一些静态文件,建议创建 docsrow 文件夹进行存储。

注意,除 Solution Items 文件夹外,其他文件夹还要在文件资源管理器创建文件夹,与解决方案中的文件夹一一对应,因为解决方案中的文件夹实际是虚拟文件夹。

创建完成后,我们需要从文件资源管理器中将仓库初始化生成的文件,拷贝到解决方案的 Solution Items 文件夹,请注意这个过程中,只是解决方案中可以查看到这几个文件,这些文件的路径并不会发生变化。

完成以上以后,我们就可以真正的创建项目了,在 src 文件夹上点击右键并添加“新建项目”,选择 “C#” -> “Windows” -> “桌面” 中的 WPF App (.NET Core)

create wpf project

注意需要选择到 src 目录下,以上都完成后,我们文件资源管理器以及解决方案中的结构如下:

view the solution and explorer

调整项目依赖框架

.NET Standard 类库项目以及 .NET Core 应用项目,在双击项目名后,都可以打开一个 xml 文件。

我们可以调整 xml 文件的配置,默认的 xml 文件有一个 TargetFramework 节点,如果是依赖框架是多个,我们要改成复数形式,再修改里面依赖框架的值,多个用 ; 分隔。

1
2
3
4
5
6
7
8
9
<Project Sdk="Microsoft.NET.Sdk.WindowsDesktop">

<PropertyGroup>
<OutputType>WinExe</OutputType>
<TargetFrameworks>net40;net472;netcoreapp3.1</TargetFrameworks>
<UseWPF>true</UseWPF>
</PropertyGroup>

</Project>

修改完成,可能会提示重新加载项目,确认后我们的依赖项会变成下图:

project dependencies

这时我们再生成项目,\bin\Debug 文件夹就会生成多个文件夹,与我们选择的依赖框架一一对应。

提交修改

代码写好了,自然要提交到代码仓库,此时团队资源管理器中会显示当前的 Git 仓库。

选择“项目”下的“更改”,输入一些本次提交的描述信息,点击“全部提交”。

注意,此时还没有正式的将本次提交推送到远程仓库,还需要点击“同步”下的“推送”才行。

如果使用命令行提交,可以参考以下:

1
2
3
git add .
git commit -m '创建项目'
git push -u origin master

当然以上都是默认已经配置登录,如果没有登录的话,则需要登录 github 账号。