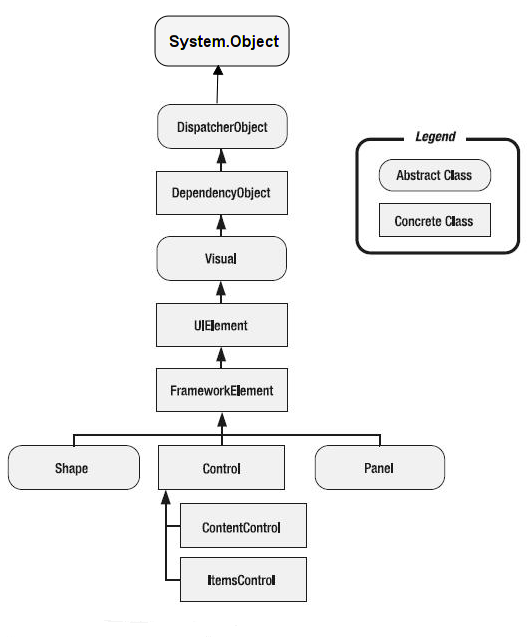
//X轴上坐标点 for (int i = 0; i < 6; i++) { graphics.DrawLine(pen, 10 + i * 50, 260, 10 + i * 50, 262); graphics.DrawString((i * 50).ToString(), new Font("宋体", 10), Brushes.Black, i * 50 - 2, 262); } //描述信息 graphics.DrawString(type, new Font("宋体", 15), Brushes.Black, 130, 275); }
//画直方图 { pen.Brush = Brushes.Red; for (int i = 0; i < list.Count / 2; i++) { int height = (((int)list[i * 2]) >> 8) + (int)list[i * 2]; if (height > 0) { height = height > 255 ? 255 : height; graphics.DrawLine(pen, 10 + i + 1, 260 - 1, 10 + i + 1, 260 - 1 - height); } } }
//画线 { pen.Brush = Brushes.Blue; for (int i = 0; i < listLines.Count; i++) { graphics.DrawLine(pen, 10 + listLines[i], 260, 10 + listLines[i], 5); } } }
return bitmap; }
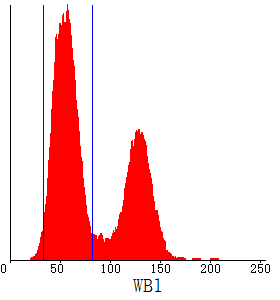
调用测试:
1
2
3
4
5
6
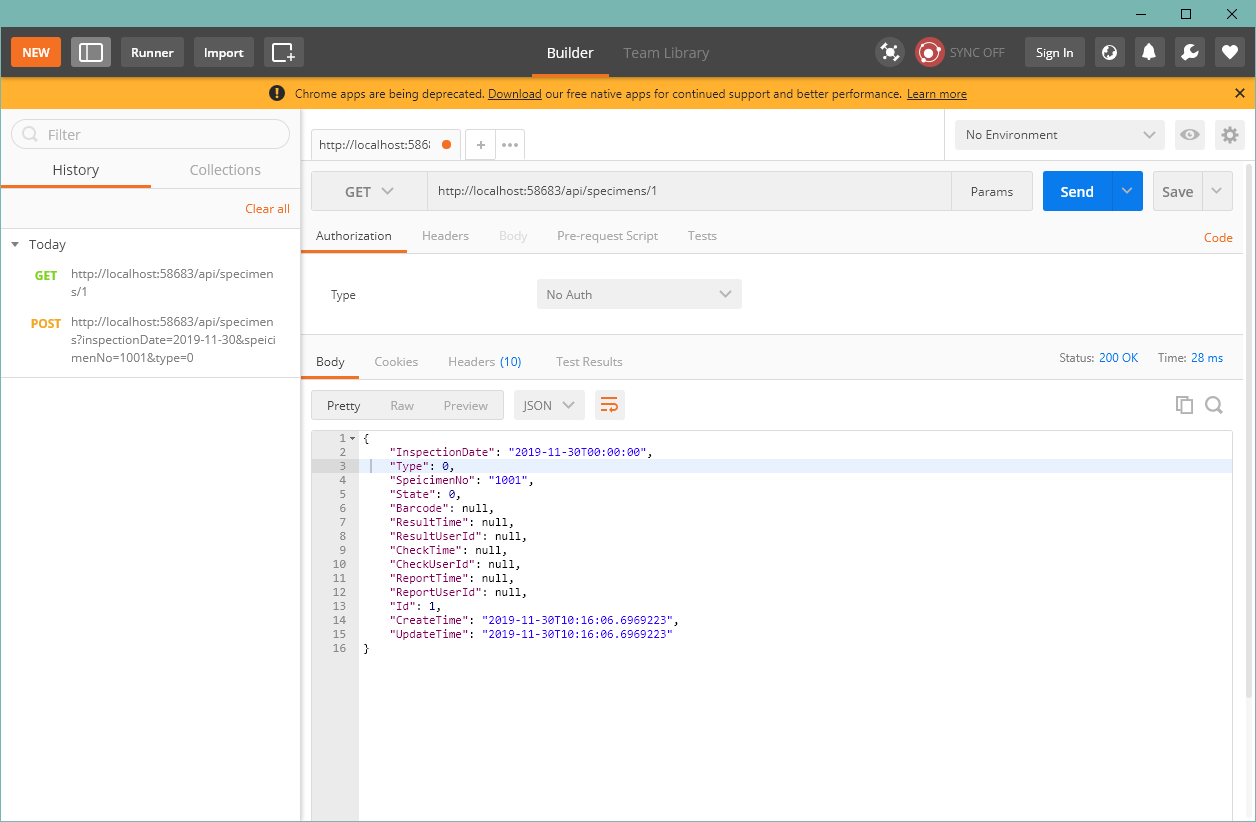
string text = "AAAAAAAAAAAAAAAAAAAAAAAAAAAAAAAAAAAAAAAAAAAAAAAAAAABAAIAAgADAAMABQAGAAkADQAQABYAGwAcACcALwA3AD8AUQBjAHAAfgCWAKgAswDFAN4A4QDcAOEA7ADsAOoA9AD2AO0A7QD4AP8A+QDwAOwA4ADTAMcAwQCzAJ8AlgCOAIAAcQBmAGIAUQBIAEAANgAtACoAJgAhABoAGgAZABkAGAAYABQAFwAYABoAGgAYABQAEQAVABUAFQAVABQAFAAXABoAHQAbACAAHgAhACgALQAvAC8ANQA7AEcATABSAFcAXgBhAG4AdgB3AHEAeAB/AIEAgACCAIIAfQB/AH8AfAB4AHYAcgBnAGAAWgBWAFEASwA/ADoAMQAxADEALAAmACAAHAAbABUAEwASAAkACQAHAAcABgAFAAMAAwACAAMAAQACAAIAAgACAAIAAgACAAEAAQAAAAAAAAAAAAAAAAABAAEAAQABAAEAAQABAAEAAQAAAAAAAAAAAAAAAAAAAAAAAAABAAEAAQABAAEAAQABAAEAAQAAAAAAAAAAAAAAAAAAAAAAAAAAAAAAAAAAAAAAAAAAAAAAAAAAAAAAAAAAAAAAAAAAAAAAAAAAAAAAAAAAAAAAAAAAAAAAAAAAAAAAAAAAAAAAAAAAAAAAAAAAAAAAAAA=";

using (Bitmap bitmap = GetHistgrame("WB1", "33\\82", text))
{
    bitmap.Save("WBC.bmp");
}
publicstatic Bitmap GetHistgrame(string type, string hex) { Bitmap result = new Bitmap(720, 320); using (Bitmap bitmap = new Bitmap(hex.Length, 256)) using (Pen pen = new Pen(Brushes.Black, 3)) {
using (Graphics graphics = Graphics.FromImage(bitmap)) { for (int i = 0; i < hex.Length / 2; i++) { int num1 = i == 0 ? 0 : int.Parse(hex.Substring((i - 1) * 2, 2), NumberStyles.HexNumber); int num2 = int.Parse(hex.Substring(i * 2, 2), NumberStyles.HexNumber); graphics.DrawLine(pen, i * 2 - 1, bitmap.Height - num1, i * 2 + 1, bitmap.Height - num2); } }
int left = 20; int top = 20;
using (Font font = new Font(new FontFamily("宋体"), 25, FontStyle.Bold)) using (Graphics graphics1 = Graphics.FromImage(result)) { //画Y轴 graphics1.DrawLine(pen, left, top, left, top + 256);
//画X轴 graphics1.DrawLine(pen, left, top + 256, left + 640, top + 256);
//将图形填充 graphics1.DrawImage(bitmap, new RectangleF(left, top, 640, 256));
//画刻度 switch (type.ToUpper()) { case"WBC": { int length = 140; for (int i = 0; i <= 640 / length; i++) { graphics1.DrawLine(pen, left + i * length, top + 256, left + i * length, top + 256 + 5); { graphics1.DrawString((i * 100).ToString(), font, Brushes.Black, left + i * length - 20, top + 256 + 5); } } graphics1.DrawString("IL", font, Brushes.Black, left + 640 - 20, top + 256 + 5); } break; case"RBC": { int length = 180; for (int i = 0; i <= 640 / length; i++) { graphics1.DrawLine(pen, left + i * length, top + 256, left + i * length, top + 256 + 5); { graphics1.DrawString((i * 100).ToString(), font, Brushes.Black, left + i * length - 20, top + 256 + 5); } } graphics1.DrawString("IL", font, Brushes.Black, left + 640 - 20, top + 256 + 5); } break; case"PLT": { int length = 180; for (int i = 0; i <= 640 / length; i++) { graphics1.DrawLine(pen, left + i * length, top + 256, left + i * length, top + 256 + 5); { graphics1.DrawString((i * 10).ToString(), font, Brushes.Black, left + i * length - 20, top + 256 + 5); } } graphics1.DrawString("IL", font, Brushes.Black, left + 640 - 20, top + 256 + 5); } break; default: break; } } } return result; }
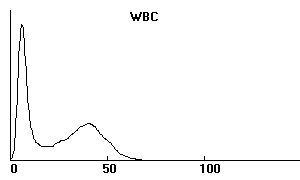
调用测试:
1
2
3
4
5
6
string text = "0102020406090F16202D3C4D5E7081909BA4A8AAA9A59E958A7D7064584D443C35302B2824211F1C1A19171616151514141313121212111111111111111111111111111111121212131414151515161617171818191919191919191A1A1A1A1B1C1D1E1E1F2021212222232324242526272828292A2A2B2B2B2C2C2C2C2D2D2D2E2E2E2E2E2E2D2D2D2C2C2B2B2A29282726252423222121201F1E1D1C1B1B1A1A191918181717161514131211100F0E0D0C0C0B0A090908080707070606060505050505040404040303030202020202020101010101010101010100000000000000000000000000000000000000000000000000000000000000000000000000";

using (Bitmap bitmap = GetHistgrame("WBC", text))
{
    bitmap.Save("WBC.bmp");
}
string text = "0102020406090F16202D3C4D5E7081909BA4A8AAA9A59E958A7D7064584D443C35302B2824211F1C1A19171616151514141313121212111111111111111111111111111111121212131414151515161617171818191919191919191A1A1A1A1B1C1D1E1E1F2021212222232324242526272828292A2A2B2B2B2C2C2C2C2D2D2D2E2E2E2E2E2E2D2D2D2C2C2B2B2A29282726252423222121201F1E1D1C1B1B1A1A191918181717161514131211100F0E0D0C0C0B0A090908080707070606060505050505040404040303030202020202020101010101010101010100000000000000000000000000000000000000000000000000000000000000000000000000";
// 瑞美动态链接库解析需要将数据由十六进制转换成十进制 StringBuilder strGragh = new StringBuilder(); for (int i = 0; i < text.Length; i += 2) { strGragh.Append(int.Parse(text.Substring(i, 2), NumberStyles.HexNumber).ToString("000")); }
// 封装了一个方法 可以传入标本日期标本号等 解析完成后返回该图片所在路径 string path = ""; int result = AddGraphHistogram(DateTime.Now, "1", "WBC", strGragh.ToString(), 1, "gif", ref path);
string text = "0E1001010040004000000800000000000000000000000000000000000000000000000000000000000000000000000000000000000000000000000000000000000000000000000000000000000000000000000000000000000000000000000000000000000000000000000000000000000000000000000000000000000000000000000000000000000000000000000000000000000000000000000000000000000000000000000000000000000000000000000000000000000000000000000000000000000000000000000000000000000000000000000000000000000000000000000000000000000000000000000000000000000000000000000000000000000000000000000000000000000000000000000000000000000000000000000000000000000000000000000000000000000000000000000000000000000000000000000000000000000000000000000000000000000000000000000000000000000000000000000000000000001F00000000000000000000000000000000000000000000000000000000000000000000000000000000000000000000000000000000000000000000000000000000000000000000000000000000000000000000000000000000000000000000000000000000000000000000000000000000000000000000000000000000000000000000000000000000000000000000000000000000000000000000000000000000000000000000000000000000000000000000000000000000000000000000000000000000000000000000000000000000000000000000000000000000000000000000000000000000000000000000000000000000000000000000000000000000000000000B0000000000000000000000000000000000000000000000000000000000000000000000000000000000000000000000000000000000000000000000000000000000000000000000000000000000000000000000000000000000000000000000000000000000000000000000000000000000000000000000000000000000000000000000000000000000000000000000000000000000000000000000000000000000000000000000000000000000000000000000000000000000000000000000000000000000000000000000000000000000000000000000000000000000000000000000000000000000000000000000000000000000000000001F000000000000001500000000000000000000000000000000000000000000000000000000000000000000000000000000000000000000000000000000001F00001F00150000000000000000000000000000000000000000000000000000000000000000000000000000000000000000000000000000000000000000000000001F001F00000015000000000000000000000000000000000000000000000000000000000000000000000000000000000000000000001F1F0000001F00000000001F20001F00000C00000000000000000000000000000000000000000000000000000000000000000000000000000000000000000000000000000000000000001F211F1F1500000B000000000000000000000000000000000000000000000000000000000000000000000000000000000000000000000000000000000000000020211F1F00000B0B00150000000000000000000000000000000000000000000000000000000000000000000000000000000000000000000000000000000000001F20001F000B170B160000000000000000000000000000000000000000000000000000000000000000000000000000000000000000000000000000000000001F2220001F0000161717150000000000000000000000000000000000000000000000000000000000000000000000000000000000000000000000000000000000001F21200000001517180000000000000000000000000000000000000000000000000000000000000000000000000000000000000000000000000000000000000022201F000000191B1A1600000000000000000000000000000000000000000000000000000000000000000000000000000000000000000000000000000000000021231F0000001A1B190000000000000000000000000000000000000000000000000000000000000000000000000000000000000000000000000000000000001F1F1F200000151A0B0B0B000000000000000000000000000000000000000000000000000000000000000000000000000000000000000000000000000000000000000B0000001F1B1B1A160000000000000000000000000000000000000000000000000000000000000015000000000000000000000000000000000000000000000000200000161B0B1A160000000000000000000000000000000000000000000000000000000000000000000000000000000000000000000000000000000000001F00200000161B1B1A1500000000000000000000000000000000000000000000000000000000000000000000000000000000000000000000000000000000000015001F0000181B1B1A160000000000000000000000000000000000000000000000000000000000000000000000000000000000000000000000000000000000000029002000191B1B18150000000000000000000000000000000000000000000000000000000000000015000029000000000015000000000000000000000000002A00000000181B1B191600000000000000000000000000000000000000000000000000000000000000000000290000000000000000000000000000000000002929290000151A1B1B170000000000000000000000000000000000000000000000000000000000000000000000000000000000000000000000000000000000002A292A150000171B1B1A001500150000000000000000000000000000000000000000000000000000000000000000000000000000000000000000000000002929290000000001161A1A17000000000000000000000000000000000000000000000000000000000000000000000000000000000000000000000000000000002929292A0000290100191700000000000000000000000000000000000000000000000000000000000000000000000000000000000000000000000000000000000000292C002A2901151617001515000000000000000000000000000000000000000000000000000000000000000000000000000000000000000000000000000029292E2E2E1500000016150000000000000000000000000000000000000000000000000000000000000000000000000000000000000000000000000000000000002D2E2E2D2D00010000000000000000000000000000000000000000000000000000000000000000000000000000000000000000000000000000000000000000292E2D2E2F2A000000150000000000000000000000000000000000000000000000000000000000000000000000000000000000000000000000000000002900292C2D2E2F2F2A2A0000000000000000000000000000000000000000000000000000000000000000000000000000000000000000000000000000000000000000292C2C2F2E2E29000000000000000000000000000000000000000000000000000000000000000000000000000000000000000000000000000000000000000000292D2E2E2E2E2B2900000000000000000000000000000000000000000000000000000000000000000000000000000000000000000000000000000000000000002C2D2C2E2D2D2A2900000000000000000000000000000000000000000000000000000000000000000000000000000000000000290000000000000000000000002A2E2E2F2C2E2A0000000000000000000000000000000000000000000000000000000000000000000000000000000029000000000000000000000000000000002A2D2E2D2E2E292900000000000000000000000000000000000000000000000000150000000000000000000000000000000000000000000000000000002900002C2C2D2B2F2D292A00000000000000000000000000000000000000000000000000000000000000000000000000000000000000000000000000000000000029002D2D2B2B2E292B0000010000000000000000000000000000000000000000000000000000000000000000000000000000000000000000000000000000000000002929292A2B2929000000000000000000000000000000000000000000000000000000000000000000000000000000000000000000000000000000000000000000000029292A00290000002A171500000000000000000000000000000000000000000000000000000000000000000000000000000000000000000000000000000029000000000000000029352900000000000000000000000000000000000000000000000000000033000000000000000000000000000000000000000000000000000000000000293329353334000000000000000000000000000000000000000000000000000000000000000000000000000000000000000000000000000000000000000000000000333534003300000000000000000000000000000000000000000000000000000000000000000000000000000000000000000000000000000000000000000000333335003300000000000000000000000000000000000000000000000000000000000000000000000000000000000000000000000000000000000000000000003400353434000000000000000000000000000000000000000000000000000000000000000000000000000000000000000000000000000000000000000033383839393837383400000000000000000000000000000000000000000000000000000000000000000000000000000000000000000000000033000000003637393A3B3B3A3A39363533000000000000000000000000000000000000000000000000000000000000000000000000000000000000000000330000003300373A3A3B3B3B3B3A3A39373300340000000000000000000033000000000000000000000000000000000000000000000000000000000000000000000000003438393A3A3A3A3A3A3937353433000000000000000000000000000000000000000000000000000000000000000000000000000000000000000000000000003300330000330000000000000000000000000000000000000000000000000000000000000000000000000000000000000000000000000000000000000000000000000000000000000000000000000000000000000000000000000000000000000000000000000000000000000000000000000000000000000000000000000000000000000000000000000000000000000000000000000000000000000000000000000000000000000000000000000000000000000000000000000000000000000000000000000000000000000000000000000000000000000000000000000000000000000000000000000000000000000000000000000000000000000000000000000000000000000000000000000000000000000000000000000000000000000000000000000000000000000000000000000000000000000000000000000000000000000000000000000000000000000000000000000000000000000000000000000000000000000000";
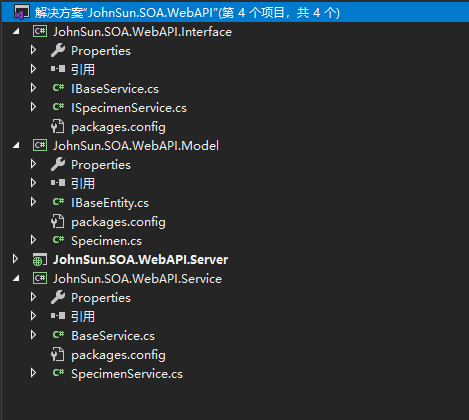
// Unity.WebApi.UnityDependencyScope using System; using System.Collections.Generic; using System.Web.Http.Controllers; using System.Web.Http.Dependencies; using Unity; using Unity.Resolution;
using Autofac; using System; using System.Collections.Generic; using System.Linq; using System.Web.Http.Dependencies;
///<summary> /// Autofac implementation of the <see cref="T:System.Web.Http.Dependencies.IDependencyScope" /> interface. ///</summary> publicclassAutofacWebApiDependencyScope : IDependencyScope, IDisposable { privatebool _disposed;
privatereadonly ILifetimeScope _lifetimeScope;
///<summary> /// Gets the lifetime scope for the current dependency scope. ///</summary> public ILifetimeScope LifetimeScope => _lifetimeScope;
///<summary> /// Initializes a new instance of the <see cref="T:Autofac.Integration.WebApi.AutofacWebApiDependencyScope" /> class. ///</summary> ///<param name="lifetimeScope">The lifetime scope to resolve services from.</param> publicAutofacWebApiDependencyScope(ILifetimeScope lifetimeScope) { if (lifetimeScope == null) { thrownew ArgumentNullException("lifetimeScope"); } _lifetimeScope = lifetimeScope; }
///<summary> /// Finalizes an instance of the <see cref="T:Autofac.Integration.WebApi.AutofacWebApiDependencyScope" /> class. ///</summary> ~AutofacWebApiDependencyScope() { Dispose(disposing: false); }
///<summary> /// Try to get a service of the given type. ///</summary> ///<param name="serviceType">ControllerType of service to request.</param> ///<returns>An instance of the service, or null if the service is not found.</returns> publicobjectGetService(Type serviceType) { return ResolutionExtensions.ResolveOptional((IComponentContext)(object)_lifetimeScope, serviceType); }
///<summary> /// Try to get a list of services of the given type. ///</summary> ///<param name="serviceType">ControllerType of services to request.</param> ///<returns>An enumeration (possibly empty) of the service.</returns> public IEnumerable<object> GetServices(Type serviceType) { if (!ResolutionExtensions.IsRegistered((IComponentContext)(object)_lifetimeScope, serviceType)) { return Enumerable.Empty<object>(); } Type enumerableServiceType = typeof(IEnumerable<>).MakeGenericType(serviceType); return (IEnumerable<object>)ResolutionExtensions.Resolve((IComponentContext)(object)_lifetimeScope, enumerableServiceType); }
///<summary> /// Performs application-defined tasks associated with freeing, releasing, or resetting unmanaged resources. ///</summary> publicvoidDispose() { Dispose(disposing: true); GC.SuppressFinalize(this); }
///<summary> /// Releases unmanaged and - optionally - managed resources. ///</summary> ///<param name="disposing"> ///<see langword="true" /> to release both managed and unmanaged resources; ///<see langword="false" /> to release only unmanaged resources. ///</param> protectedvirtualvoidDispose(bool disposing) { if (!_disposed) { if (disposing && _lifetimeScope != null) { ((IDisposable)_lifetimeScope).Dispose(); } _disposed = true; } } }
using Autofac; using Autofac.Core.Lifetime; using Autofac.Integration.WebApi; using System; using System.Collections.Generic; using System.Web.Http.Dependencies;
///<summary> /// Autofac implementation of the <see cref="T:System.Web.Http.Dependencies.IDependencyResolver" /> interface. ///</summary> publicclassAutofacWebApiDependencyResolver : IDependencyResolver, IDependencyScope, IDisposable { privatebool _disposed;
///<summary> /// Gets the root container provided to the dependency resolver. ///</summary> public ILifetimeScope Container => _container;
///<summary> /// Initializes a new instance of the <see cref="T:Autofac.Integration.WebApi.AutofacWebApiDependencyResolver" /> class. ///</summary> ///<param name="container">The container that nested lifetime scopes will be create from.</param> ///<param name="configurationAction">A configuration action that will execute during lifetime scope creation.</param> publicAutofacWebApiDependencyResolver(ILifetimeScope container, Action<ContainerBuilder> configurationAction) : this(container) { if (configurationAction == null) { thrownew ArgumentNullException("configurationAction"); } _configurationAction = configurationAction; }
///<summary> /// Initializes a new instance of the <see cref="T:Autofac.Integration.WebApi.AutofacWebApiDependencyResolver" /> class. ///</summary> ///<param name="container">The container that nested lifetime scopes will be create from.</param> publicAutofacWebApiDependencyResolver(ILifetimeScope container) { if (container == null) { thrownew ArgumentNullException("container"); } _container = container; _rootDependencyScope = (IDependencyScope)(object)new AutofacWebApiDependencyScope(container); }
///<summary> /// Finalizes an instance of the <see cref="T:Autofac.Integration.WebApi.AutofacWebApiDependencyResolver" /> class. ///</summary> ~AutofacWebApiDependencyResolver() { Dispose(disposing: false); }
///<summary> /// Try to get a service of the given type. ///</summary> ///<param name="serviceType">Type of service to request.</param> ///<returns>An instance of the service, or null if the service is not found.</returns> publicvirtualobjectGetService(Type serviceType) { return _rootDependencyScope.GetService(serviceType); }
///<summary> /// Try to get a list of services of the given type. ///</summary> ///<param name="serviceType">ControllerType of services to request.</param> ///<returns>An enumeration (possibly empty) of the service.</returns> publicvirtual IEnumerable<object> GetServices(Type serviceType) { return _rootDependencyScope.GetServices(serviceType); }
///<summary> /// Starts a resolution scope. Objects which are resolved in the given scope will belong to /// that scope, and when the scope is disposed, those objects are returned to the container. ///</summary> ///<returns> /// The dependency scope. ///</returns> public IDependencyScope BeginScope() { return (IDependencyScope)(object)new AutofacWebApiDependencyScope((_configurationAction == null) ? _container.BeginLifetimeScope(MatchingScopeLifetimeTags.RequestLifetimeScopeTag) : _container.BeginLifetimeScope(MatchingScopeLifetimeTags.RequestLifetimeScopeTag, _configurationAction)); }
///<summary> /// Performs application-defined tasks associated with freeing, releasing, or resetting unmanaged resources. ///</summary> publicvoidDispose() { Dispose(disposing: true); GC.SuppressFinalize(this); }
///<summary> /// Releases unmanaged and - optionally - managed resources. ///</summary> ///<param name="disposing"> ///<see langword="true" /> to release both managed and unmanaged resources; ///<see langword="false" /> to release only unmanaged resources. ///</param> protectedvirtualvoidDispose(bool disposing) { if (!_disposed) { if (disposing && _rootDependencyScope != null) { ((IDisposable)_rootDependencyScope).Dispose(); } _disposed = true; } } }
using System; using System.Collections.Generic; using System.Linq; using System.Net; using System.Net.Http; using System.Web.Http;
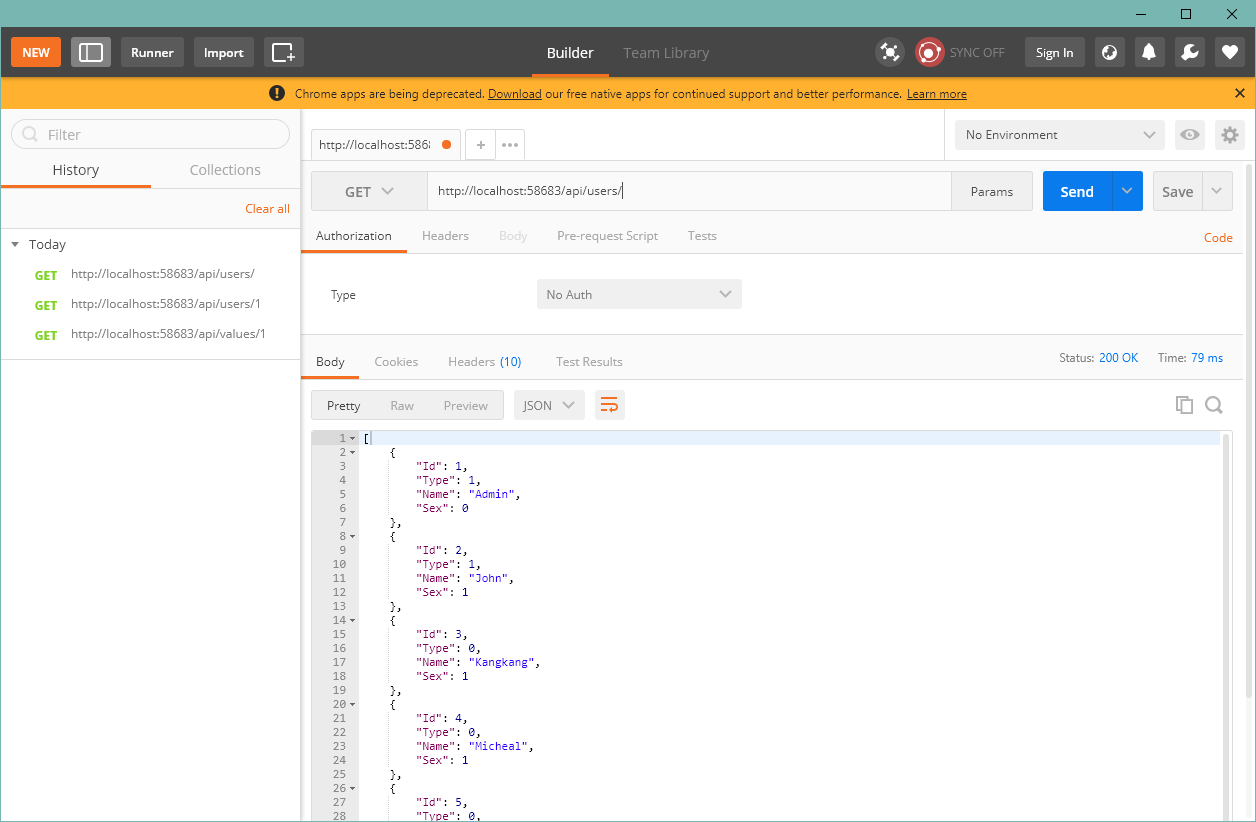
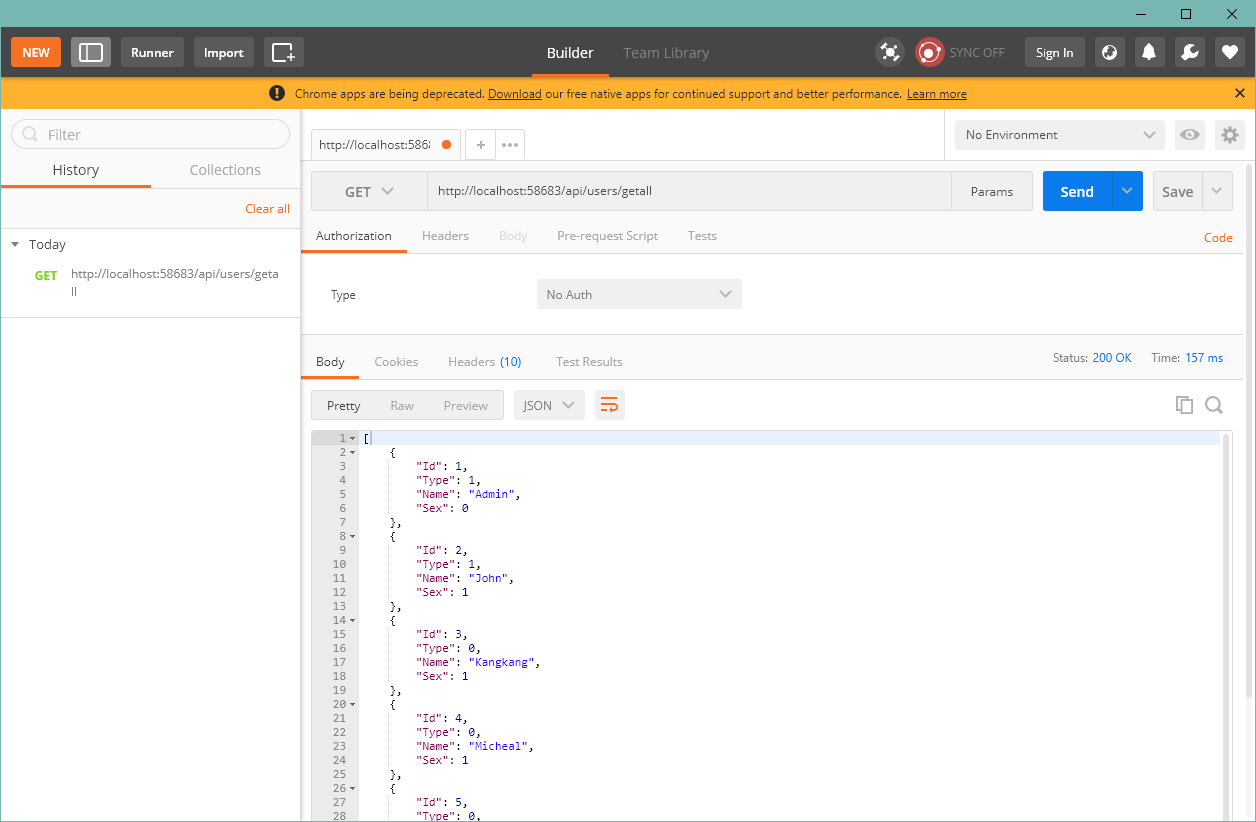
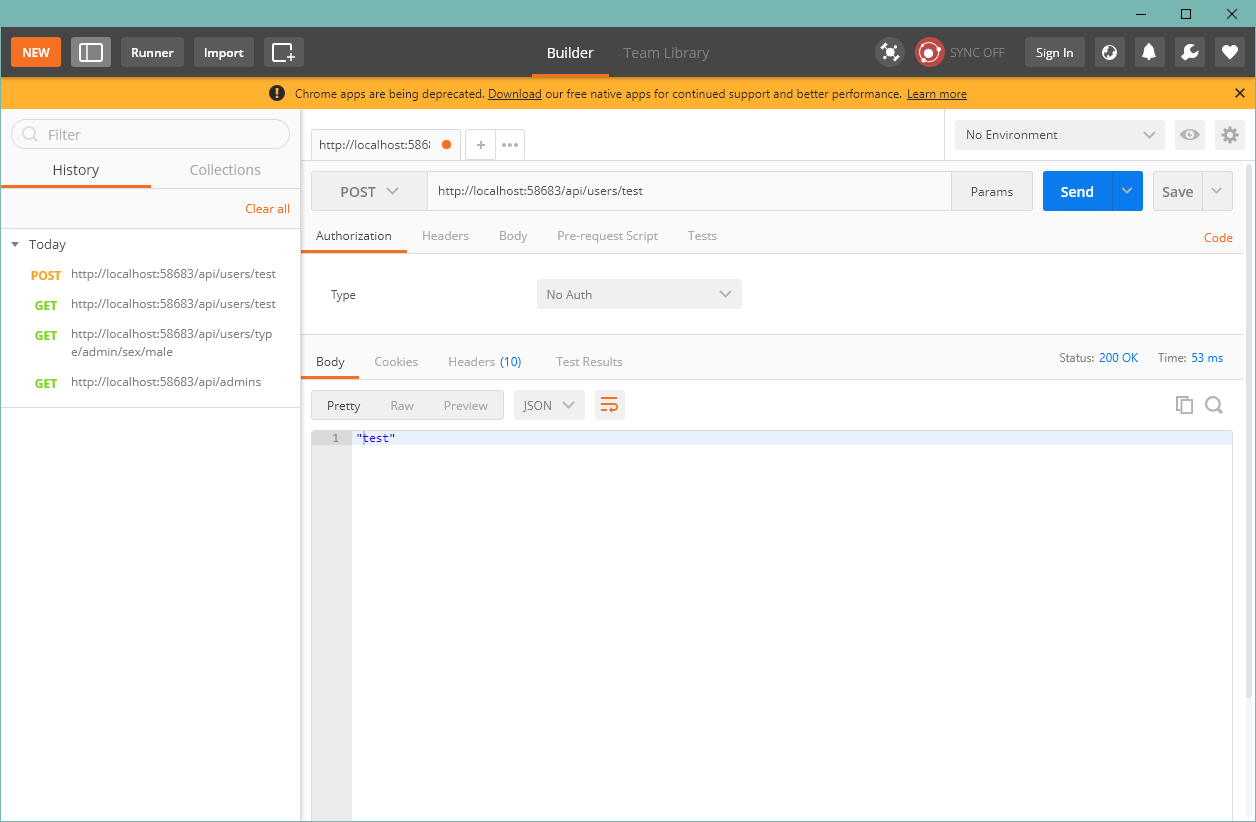
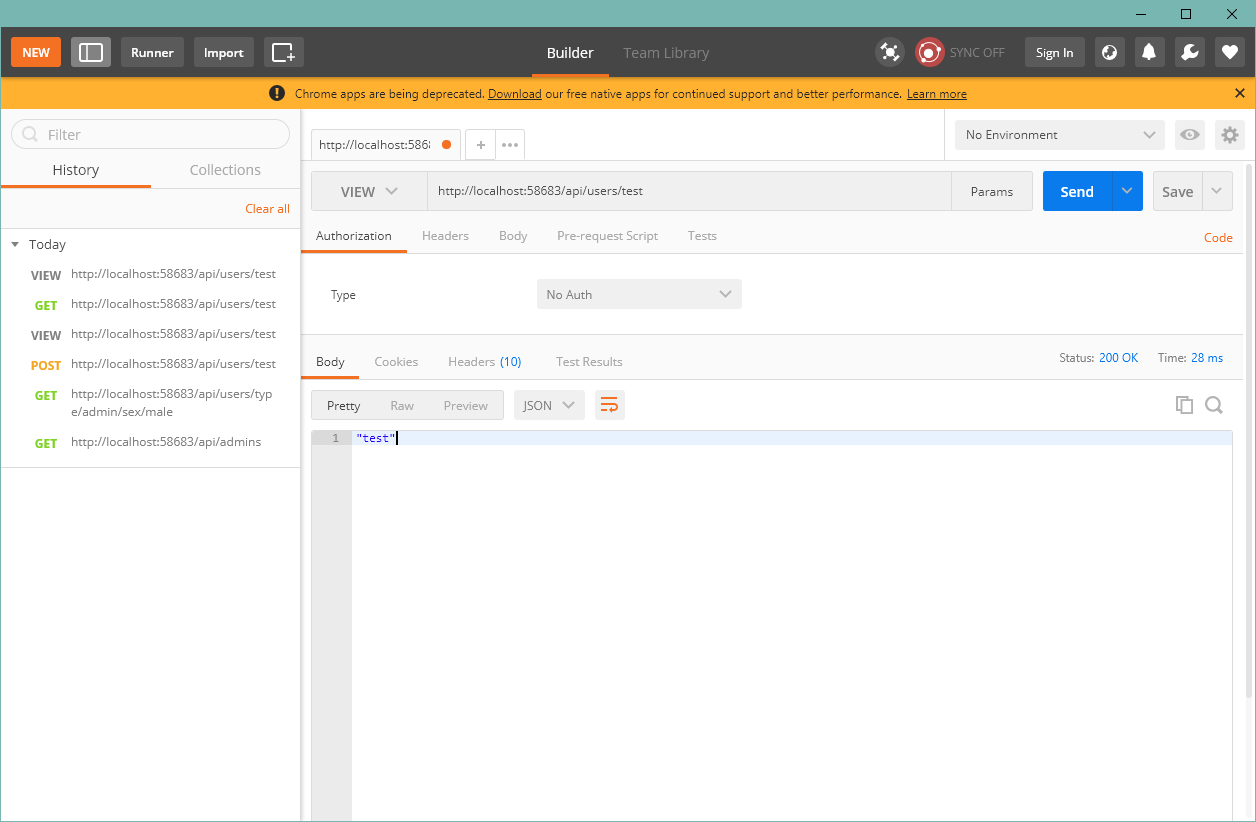
namespaceJohnSun.SOA.WebAPI.Server.Controllers { publicclassUsersController : ApiController { publicstatic List<User> Users = new List<User> { new User{ Id = 1, Type = UserType.Admin, Name = "Admin" }, new User{ Id = 2, Type = UserType.Admin, Name = "John", Sex = UserSex.Male }, new User{ Id = 3, Name = "Kangkang", Sex = UserSex.Male }, new User{ Id = 4, Name = "Micheal", Sex = UserSex.Male }, new User{ Id = 5, Name = "Jane", Sex = UserSex.Female }, new User{ Id = 6, Name = "Meimei", Sex = UserSex.Female }, new User{ Id = 7, Name = "Xiaoli", Sex = UserSex.Female }, };
public List<User> GetAll() { return Users; }
public User GetUser(int id) { return Users.Find(u => u.Id == id); } } publicclassUser { publicint Id { get; set; } public UserType Type { get; set; } publicstring Name { get; set; } public UserSex Sex { get; set; } }
config.Routes.MapHttpRoute(
    name: "DefaultApi",
    routeTemplate: "api/{controller}/{id}",
    defaults: new { id = RouteParameter.Optional },
    constraints: new { id = @"\d{1,2}" }
);
using System; using System.Collections.Generic; using System.Linq; using System.Runtime.Serialization; using System.ServiceModel; using System.Text;
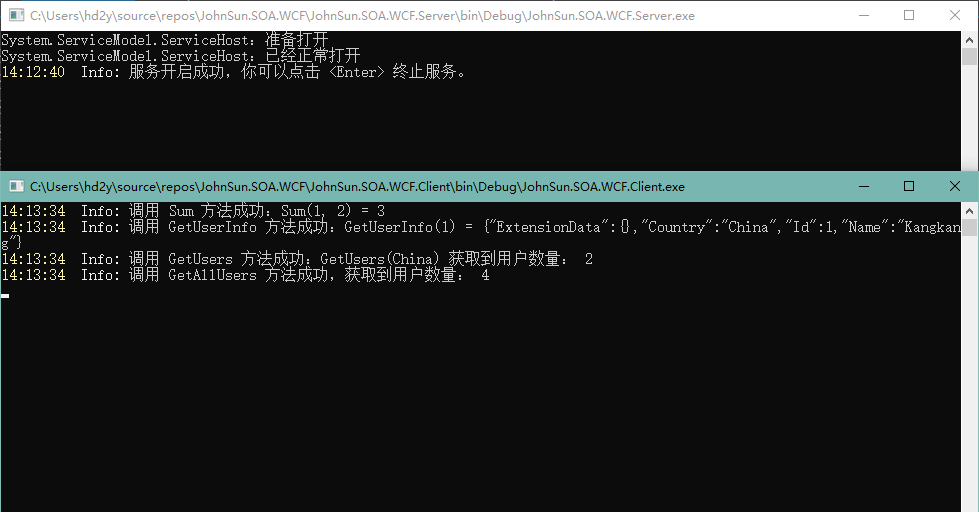
namespaceJohnSun.SOA.WCF.Service { // 注意: 使用“重构”菜单上的“重命名”命令,可以同时更改代码和配置文件中的类名“Service1”。 publicclassMyService : IMyService { privatestaticList<UserInfo> _users = new List<UserInfo>() { new UserInfo(){ Id = 1, Name = "Kangkang", Country = "China" }, new UserInfo(){ Id = 2, Name = "John", Country = "America" }, new UserInfo(){ Id = 3, Name = "Jane", Country = "France" }, new UserInfo(){ Id = 4, Name = "Han Meimei", Country = "China" }, };
public List<UserInfo> GetAllUsers() { return _users; }
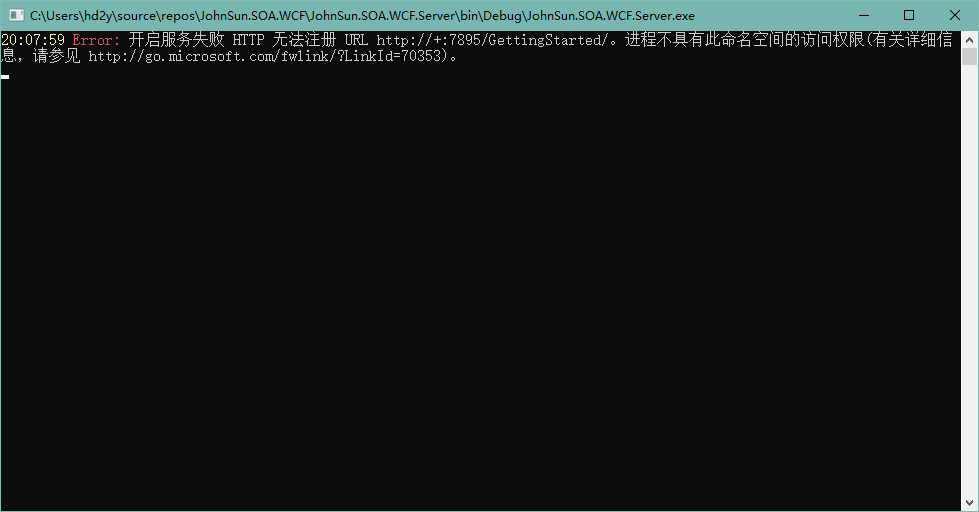
client = new CallbackServiceClient(callbackInstance, new NetTcpBinding(securityMode: SecurityMode.None), new EndpointAddress("net.tcp://localhost:7895/MyDuplexService/"));
using System; using System.Collections.Generic; using System.Linq; using System.Web; using System.Web.Services;
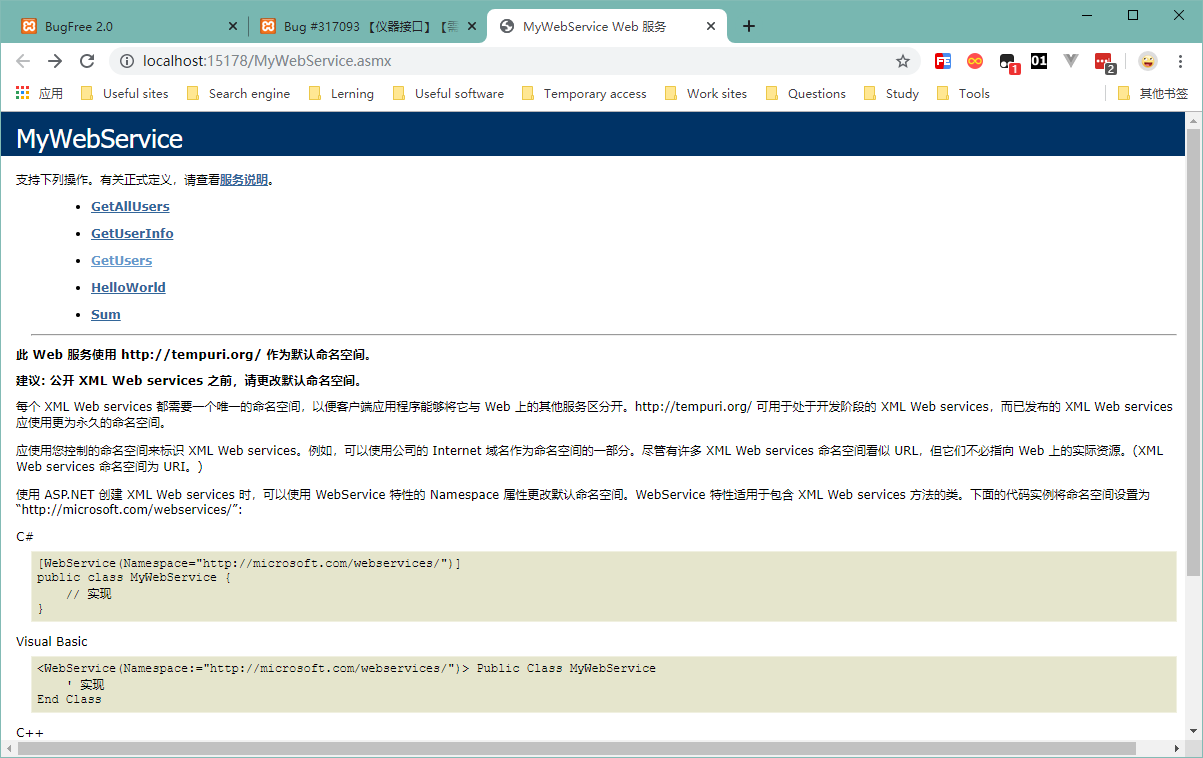
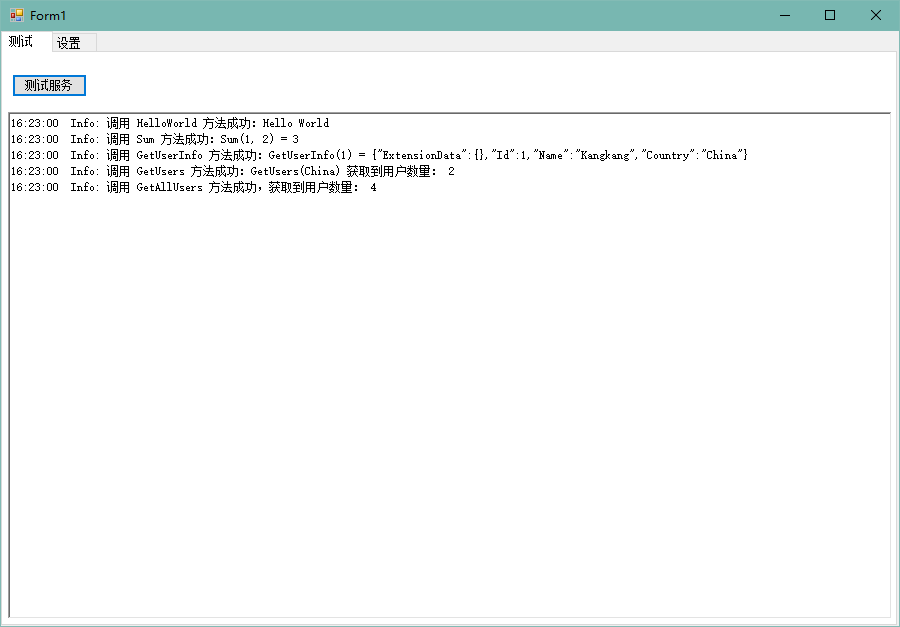
namespaceJohnSun.SOA.WebService.Server { ///<summary> /// MyWebService 的摘要说明 ///</summary> [WebService(Namespace = "http://tempuri.org/")] [WebServiceBinding(ConformsTo = WsiProfiles.BasicProfile1_1)] [System.ComponentModel.ToolboxItem(false)] // 若要允许使用 ASP.NET AJAX 从脚本中调用此 Web 服务,请取消注释以下行。 // [System.Web.Script.Services.ScriptService] publicclassMyWebService : System.Web.Services.WebService { privatestaticList<UserInfo> _users = new List<UserInfo>() { new UserInfo(){ Id = 1, Name = "Kangkang", Country = "China" }, new UserInfo(){ Id = 2, Name = "John", Country = "America" }, new UserInfo(){ Id = 3, Name = "Jane", Country = "France" }, new UserInfo(){ Id = 4, Name = "Han Meimei", Country = "China" }, }; [WebMethod] publicstringHelloWorld() { return"Hello World"; }
using JohnSun.SOA.WebService.Client.MyServiceTest; using System; using System.Collections.Generic; using System.Linq; using System.ServiceModel; using System.Text;
# 安装 git cd /usr/local/src/ wget https://www.kernel.org/pub/software/scm/git/git-2.24.0.tar.xz tar -vxf git-2.24.0.tar.xz cd git-2.24.0 make prefix=/usr/local/git all make prefix=/usr/local/git install echo"export PATH=$PATH:/usr/local/git/bin" >> /etc/profile source /etc/profile git --version