通讯中的编码问题
这里的LIS接口通讯主要指的是串口(RS232)/网口(TCP或UDP)通讯,而串口或网口通讯中,我们经常会遇到乱码或结果解析错误的问题,那么我们应该怎样做才能避免这些问题呢?
首先我们要知道,想要开发接口特别是双工接口,首先要能读懂接口的通讯文档,而通讯文档中经常会有所使用通讯协议的介绍,流入ASTM、HL7。
而通讯协议一般都制定了编码字符集,比如ASCII、UTF-8、GBK等,虽然字符编码的概念是基础,我们都能理解,但是也不能确保顺利的开发出接口,我们还需要了解HEX、控制字符、校验等。
字符编码
首先,字符编码(Character encoding)也称字集码,是把字符集中的字符编码为指定集合中某一对象(例如:比特模式、自然数序列、8位组或者电脉冲),以便文本在计算机中存储和通过通信网络的传递。
常见的例子包括将拉丁字母表编码成摩斯电码和ASCII。其中,ASCII将字母、数字和其它符号编号,并用7比特的二进制来表示这个整数。通常会额外使用一个扩充的比特,以便于以1个字节的方式存储。
ASCII码使用指定的7位或8位二进制数组合来表示128或256种可能的字符,包括大小写字母、数字0-9、标点符号、非打印字符(换行符、制表符等4个)以及控制字符(退格、响铃等)组成。
但是,由于它是针对英语设计的,当处理带有音调标号(形如汉语的拼音)的亚洲文字时就会出现问题。
所以实际我们在通讯过程中会遇到另外几种支持更多字符的编码,例如UTF-8和GBK(或GB2312,GB2312是GBK的子集)。
控制字符
ASCII编码中0~31及127(共33个)是控制字符或通信专用字符(其余为可显示字符),如控制符:LF(换行)、CR(回车)、FF(换页)、DEL(删除)、BS(退格)、BEL(响铃)等;通信专用字符:SOH(文头)、EOT(文尾)、ACK(确认)等;ASCII值为8、9、10和13分别转换为退格、制表、换行和回车字符。它们并没有特定的图形显示,但会依不同的应用程序,而对文本显示有不同的影响。
ASCII编码标准表:
| Bin (二进制) |
Oct (八进制) |
Dec (十进制) |
Hex (十六进制) |
缩写/字符 | 解释 |
|---|---|---|---|---|---|
| 0000 0000 | 00 | 0 | 0x00 | NUL(null) | 空字符 |
| 0000 0001 | 01 | 1 | 0x01 | SOH(start of headline) | 标题开始 |
| 0000 0010 | 02 | 2 | 0x02 | STX (start of text) | 正文开始 |
| 0000 0011 | 03 | 3 | 0x03 | ETX (end of text) | 正文结束 |
| 0000 0100 | 04 | 4 | 0x04 | EOT (end of transmission) | 传输结束 |
| 0000 0101 | 05 | 5 | 0x05 | ENQ (enquiry) | 请求 |
| 0000 0110 | 06 | 6 | 0x06 | ACK (acknowledge) | 收到通知 |
| 0000 0111 | 07 | 7 | 0x07 | BEL (bell) | 响铃 |
| 0000 1000 | 010 | 8 | 0x08 | BS (backspace) | 退格 |
| 0000 1001 | 011 | 9 | 0x09 | HT (horizontal tab) | 水平制表符 |
| 0000 1010 | 012 | 10 | 0x0A | LF (NL line feed, new line) | 换行键 |
| 0000 1011 | 013 | 11 | 0x0B | VT (vertical tab) | 垂直制表符 |
| 0000 1100 | 014 | 12 | 0x0C | FF (NP form feed, new page) | 换页键 |
| 0000 1101 | 015 | 13 | 0x0D | CR (carriage return) | 回车键 |
| 0000 1110 | 016 | 14 | 0x0E | SO (shift out) | 不用切换 |
| 0000 1111 | 017 | 15 | 0x0F | SI (shift in) | 启用切换 |
| 0001 0000 | 020 | 16 | 0x10 | DLE (data link escape) | 数据链路转义 |
| 0001 0001 | 021 | 17 | 0x11 | DC1 (device control 1) | 设备控制1 |
| 0001 0010 | 022 | 18 | 0x12 | DC2 (device control 2) | 设备控制2 |
| 0001 0011 | 023 | 19 | 0x13 | DC3 (device control 3) | 设备控制3 |
| 0001 0100 | 024 | 20 | 0x14 | DC4 (device control 4) | 设备控制4 |
| 0001 0101 | 025 | 21 | 0x15 | NAK (negative acknowledge) | 拒绝接收 |
| 0001 0110 | 026 | 22 | 0x16 | SYN (synchronous idle) | 同步空闲 |
| 0001 0111 | 027 | 23 | 0x17 | ETB (end of trans. block) | 结束传输块 |
| 0001 1000 | 030 | 24 | 0x18 | CAN (cancel) | 取消 |
| 0001 1001 | 031 | 25 | 0x19 | EM (end of medium) | 媒介结束 |
| 0001 1010 | 032 | 26 | 0x1A | SUB (substitute) | 代替 |
| 0001 1011 | 033 | 27 | 0x1B | ESC (escape) | 换码(溢出) |
| 0001 1100 | 034 | 28 | 0x1C | FS (file separator) | 文件分隔符 |
| 0001 1101 | 035 | 29 | 0x1D | GS (group separator) | 分组符 |
| 0001 1110 | 036 | 30 | 0x1E | RS (record separator) | 记录分隔符 |
| 0001 1111 | 037 | 31 | 0x1F | US (unit separator) | 单元分隔符 |
| 0010 0000 | 040 | 32 | 0x20 | (space) | 空格 |
| 0010 0001 | 041 | 33 | 0x21 | ! | 叹号 |
| 0010 0010 | 042 | 34 | 0x22 | “ | 双引号 |
| 0010 0011 | 043 | 35 | 0x23 | # | 井号 |
| 0010 0100 | 044 | 36 | 0x24 | $ | 美元符 |
| 0010 0101 | 045 | 37 | 0x25 | % | 百分号 |
| 0010 0110 | 046 | 38 | 0x26 | & | 和号 |
| 0010 0111 | 047 | 39 | 0x27 | ‘ | 闭单引号 |
| 0010 1000 | 050 | 40 | 0x28 | ( | 开括号 |
| 0010 1001 | 051 | 41 | 0x29 | ) | 闭括号 |
| 0010 1010 | 052 | 42 | 0x2A | * | 星号 |
| 0010 1011 | 053 | 43 | 0x2B | + | 加号 |
| 0010 1100 | 054 | 44 | 0x2C | , | 逗号 |
| 0010 1101 | 055 | 45 | 0x2D | - | 减号/破折号 |
| 0010 1110 | 056 | 46 | 0x2E | . | 句号 |
| 0010 1111 | 057 | 47 | 0x2F | / | 斜杠 |
| 0011 0000 | 060 | 48 | 0x30 | 0 | 字符0 |
| 0011 0001 | 061 | 49 | 0x31 | 1 | 字符1 |
| 0011 0010 | 062 | 50 | 0x32 | 2 | 字符2 |
| 0011 0011 | 063 | 51 | 0x33 | 3 | 字符3 |
| 0011 0100 | 064 | 52 | 0x34 | 4 | 字符4 |
| 0011 0101 | 065 | 53 | 0x35 | 5 | 字符5 |
| 0011 0110 | 066 | 54 | 0x36 | 6 | 字符6 |
| 0011 0111 | 067 | 55 | 0x37 | 7 | 字符7 |
| 0011 1000 | 070 | 56 | 0x38 | 8 | 字符8 |
| 0011 1001 | 071 | 57 | 0x39 | 9 | 字符9 |
| 0011 1010 | 072 | 58 | 0x3A | : | 冒号 |
| 0011 1011 | 073 | 59 | 0x3B | ; | 分号 |
| 0011 1100 | 074 | 60 | 0x3C | < | 小于 |
| 0011 1101 | 075 | 61 | 0x3D | = | 等号 |
| 0011 1110 | 076 | 62 | 0x3E | > | 大于 |
| 0011 1111 | 077 | 63 | 0x3F | ? | 问号 |
| 0100 0000 | 0100 | 64 | 0x40 | @ | 电子邮件符号 |
| 0100 0001 | 0101 | 65 | 0x41 | A | 大写字母A |
| 0100 0010 | 0102 | 66 | 0x42 | B | 大写字母B |
| 0100 0011 | 0103 | 67 | 0x43 | C | 大写字母C |
| 0100 0100 | 0104 | 68 | 0x44 | D | 大写字母D |
| 0100 0101 | 0105 | 69 | 0x45 | E | 大写字母E |
| 0100 0110 | 0106 | 70 | 0x46 | F | 大写字母F |
| 0100 0111 | 0107 | 71 | 0x47 | G | 大写字母G |
| 0100 1000 | 0110 | 72 | 0x48 | H | 大写字母H |
| 0100 1001 | 0111 | 73 | 0x49 | I | 大写字母I |
| 0100 1010 | 0112 | 74 | 0x4A | J | 大写字母J |
| 0100 1011 | 0113 | 75 | 0x4B | K | 大写字母K |
| 0100 1100 | 0114 | 76 | 0x4C | L | 大写字母L |
| 0100 1101 | 0115 | 77 | 0x4D | M | 大写字母M |
| 0100 1110 | 0116 | 78 | 0x4E | N | 大写字母N |
| 0100 1111 | 0117 | 79 | 0x4F | O | 大写字母O |
| 0101 0000 | 0120 | 80 | 0x50 | P | 大写字母P |
| 0101 0001 | 0121 | 81 | 0x51 | Q | 大写字母Q |
| 0101 0010 | 0122 | 82 | 0x52 | R | 大写字母R |
| 0101 0011 | 0123 | 83 | 0x53 | S | 大写字母S |
| 0101 0100 | 0124 | 84 | 0x54 | T | 大写字母T |
| 0101 0101 | 0125 | 85 | 0x55 | U | 大写字母U |
| 0101 0110 | 0126 | 86 | 0x56 | V | 大写字母V |
| 0101 0111 | 0127 | 87 | 0x57 | W | 大写字母W |
| 0101 1000 | 0130 | 88 | 0x58 | X | 大写字母X |
| 0101 1001 | 0131 | 89 | 0x59 | Y | 大写字母Y |
| 0101 1010 | 0132 | 90 | 0x5A | Z | 大写字母Z |
| 0101 1011 | 0133 | 91 | 0x5B | [ | 开方括号 |
| 0101 1100 | 0134 | 92 | 0x5C | \ | 反斜杠 |
| 0101 1101 | 0135 | 93 | 0x5D | ] | 闭方括号 |
| 0101 1110 | 0136 | 94 | 0x5E | ^ | 脱字符 |
| 0101 1111 | 0137 | 95 | 0x5F | _ | 下划线 |
| 0110 0000 | 0140 | 96 | 0x60 | ` | 开单引号 |
| 0110 0001 | 0141 | 97 | 0x61 | a | 小写字母a |
| 0110 0010 | 0142 | 98 | 0x62 | b | 小写字母b |
| 0110 0011 | 0143 | 99 | 0x63 | c | 小写字母c |
| 0110 0100 | 0144 | 100 | 0x64 | d | 小写字母d |
| 0110 0101 | 0145 | 101 | 0x65 | e | 小写字母e |
| 0110 0110 | 0146 | 102 | 0x66 | f | 小写字母f |
| 0110 0111 | 0147 | 103 | 0x67 | g | 小写字母g |
| 0110 1000 | 0150 | 104 | 0x68 | h | 小写字母h |
| 0110 1001 | 0151 | 105 | 0x69 | i | 小写字母i |
| 0110 1010 | 0152 | 106 | 0x6A | j | 小写字母j |
| 0110 1011 | 0153 | 107 | 0x6B | k | 小写字母k |
| 0110 1100 | 0154 | 108 | 0x6C | l | 小写字母l |
| 0110 1101 | 0155 | 109 | 0x6D | m | 小写字母m |
| 0110 1110 | 0156 | 110 | 0x6E | n | 小写字母n |
| 0110 1111 | 0157 | 111 | 0x6F | o | 小写字母o |
| 0111 0000 | 0160 | 112 | 0x70 | p | 小写字母p |
| 0111 0001 | 0161 | 113 | 0x71 | q | 小写字母q |
| 0111 0010 | 0162 | 114 | 0x72 | r | 小写字母r |
| 0111 0011 | 0163 | 115 | 0x73 | s | 小写字母s |
| 0111 0100 | 0164 | 116 | 0x74 | t | 小写字母t |
| 0111 0101 | 0165 | 117 | 0x75 | u | 小写字母u |
| 0111 0110 | 0166 | 118 | 0x76 | v | 小写字母v |
| 0111 0111 | 0167 | 119 | 0x77 | w | 小写字母w |
| 0111 1000 | 0170 | 120 | 0x78 | x | 小写字母x |
| 0111 1001 | 0171 | 121 | 0x79 | y | 小写字母y |
| 0111 1010 | 0172 | 122 | 0x7A | z | 小写字母z |
| 0111 1011 | 0173 | 123 | 0x7B | { | 开花括号 |
| 0111 1100 | 0174 | 124 | 0x7C | ||
| 0111 1101 | 0175 | 125 | 0x7D | } | 闭花括号 |
| 0111 1110 | 0176 | 126 | 0x7E | ~ | 波浪号 |
| 0111 1111 | 0177 | 127 | 0x7F | DEL (delete) | 删除 |
当然我们可以使用简单的几行代码将这些字符打印出来,因为NUL字符在Windows系统剪贴板中无法复制,而且会截断后面的内容,这里直接输出到文件中。
这里我们就不创建项目了,如果是执行一些简单的代码查看运行效果,例如生成一个GUID,这里建议使用C#交互窗口,可以从 VS工具栏 –> 视图 –> 其他窗口 –> C#交互窗口 打开。
运行以下代码:
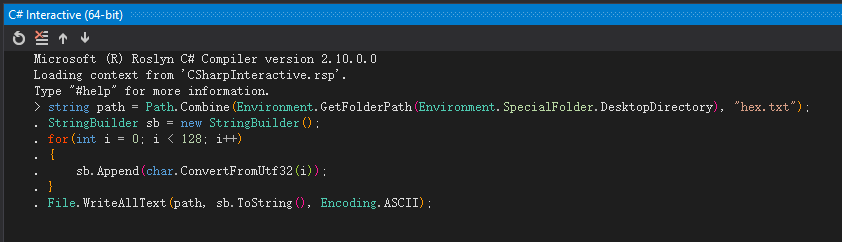
运行成功后会在桌面输出一个文件hex.txt。
注意,如果存在控制字符的文件,建议不要使用系统自带的记事本文件查看,推荐使用Notepad++查看,具体差异可以通过下图看出:
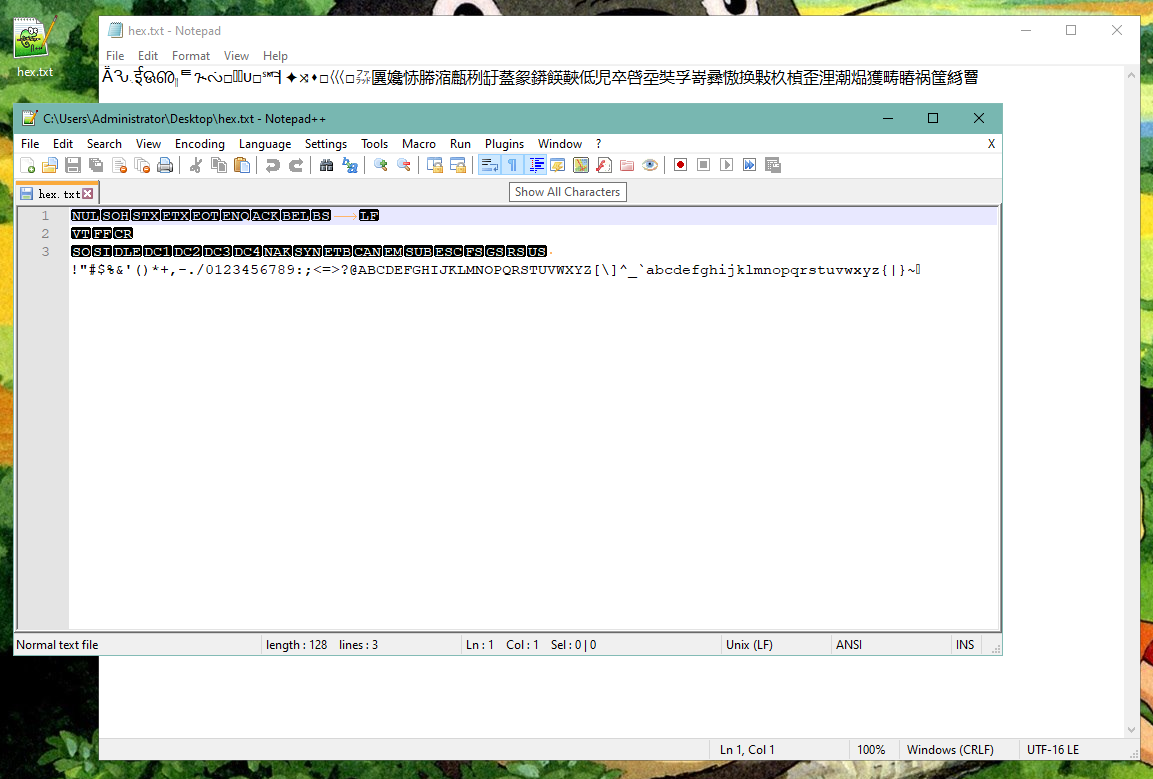
首先是换行符、回车符,Notepad++中默认就是Unix(LF)格式,而记事本要到Win10才能支持,其次控制字符,在Notepad++中,除了DEL,其他都可以看出其控制字符的内容,而记事本就什么也看不到了。另外打开了Notepad++的“Show all characters”,我们甚至可以知道一段空白究竟是由空格符还是制表符构成的,换行效果是由于回车符还是换行符导致的。
当然,如果我们在程序中需要使用这些字符除了上面展示的char.ConvertFromUtf32()方法外,还可以使用C#中的转义符号,如下给出的是常用的控制字符:
1 | public static class ControlCharacter |
十六进制
十六进制(简写为hex或下标16)在数学中是一种逢16进1的进位制。一般用数字0到9和字母A到F(或af)表示,其中:AF表示10~15,这些称作十六进制数字。
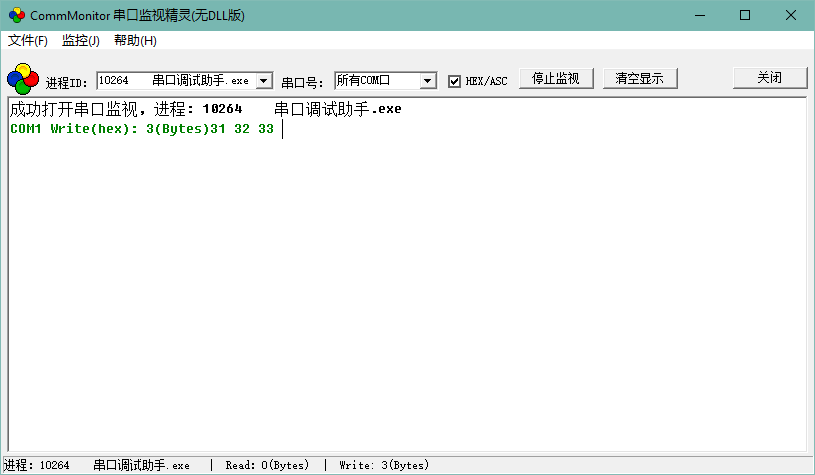
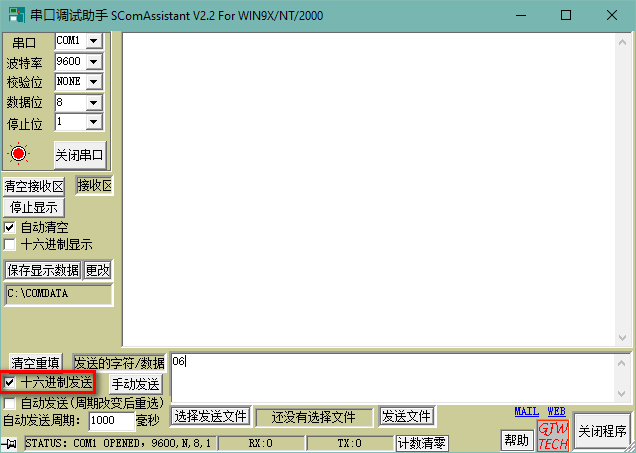
而数据接收串口与网口通讯时,如果我们无法确认接收的编码格式,可以尝试使用十六进制接收,然后根据十六进制数据来判断接收数据的编码格式。
而在发送时,如果我们传输的是控制字符,我们无法使用输入法将控制字符输入到发送区,这时我们可以通过十六进制发送,来发送控制字符,例如需要发送ACK,则只需要输入06即可。
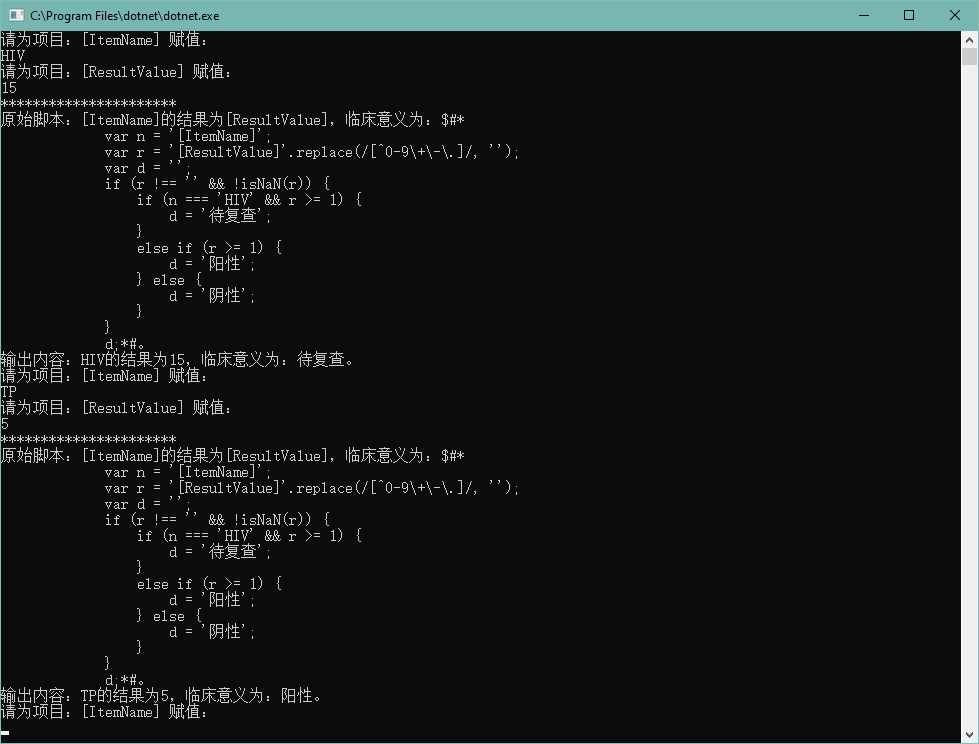
在通讯数据的接收中,我们常常需要将十六进制数据进行转换,其中包括原始文本、十六进制、转义消息三者的相互转换,十六进制与原始文本我们可以理解,转义文本的意思是将不可见的控制字符转换为另外一种特殊的格式进行显示。
例如:收到通知<ACK>的十六进制是06,转义文本是#06'。回车符<CR>的十六进制是0D,转义文本为#0D'。
这里开发了一个简单的转换工具供参考: