WCF 相较于 WebService 更加灵活,支持多种宿主、多种协议,并且支持双工。
印象中读书时也开过 WCF 的课程,但是那本讲 WCF 的书实在是太厚了,所以其实并没有学进去,混个学分后来不了了之。
工作中,使用更多的是 WebService 或者 Socket,所以仅凭偶尔接触的一些小例子,来总结一些简单的使用场景。
创建服务端 不同于 WebService 只能托管在 IIS 上,WCF 可以托管在任意的程序上,可以是网站,也可以是控制台、WinForm、WPF、Windows Service 等。
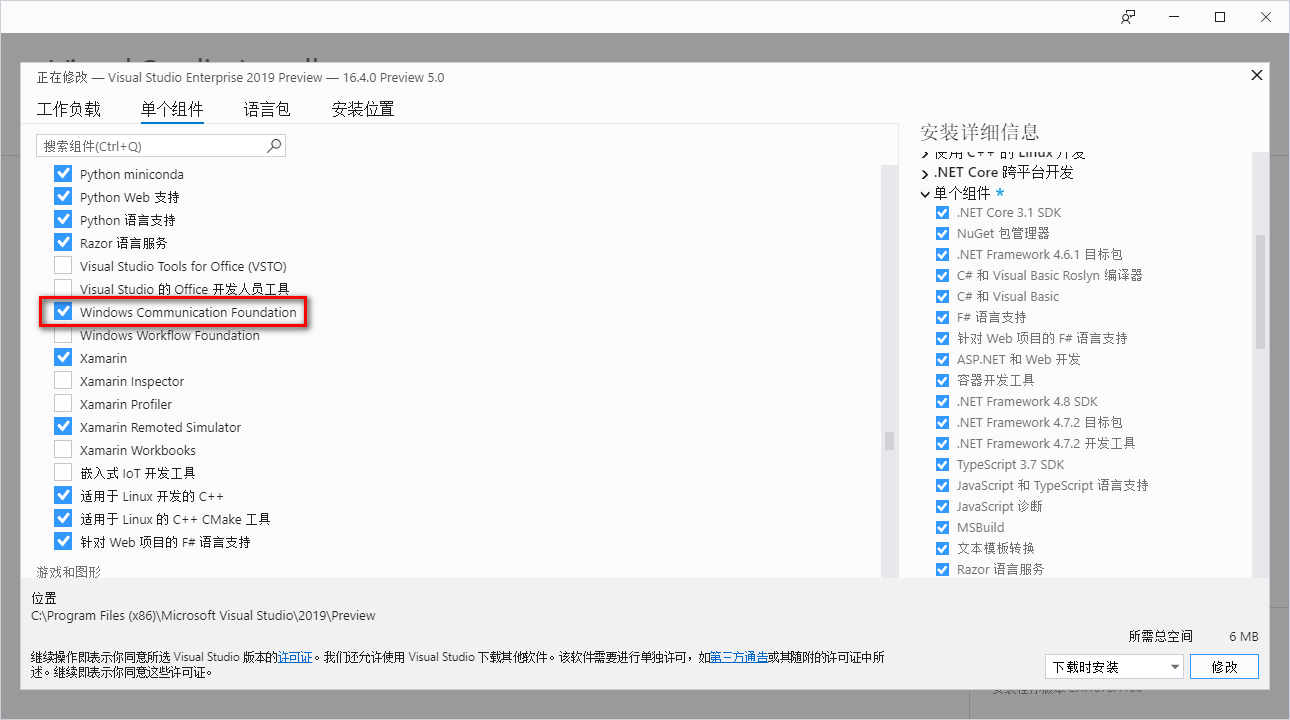
注意:Visual Studio 2019 安装时默认没有勾选 WPF 的模板,可以通过 Visual Studio Installer 安装,点击 修改 -> 单个组件 -> 开发活动 -> Windows Communication Foundation。
定义并实现服务协定 WCF 创建服务端第一步是创建一个服务协定,这样我们就可以很方便的将服务与宿主分离。
后期创建服务端时,可以指定服务运行在不同的宿主上,而不需要调整服务本身的代码,这里我们创建一个 WCF 服务库。
创建完成以后完善一下服务协定中的代码,需要在接口中指定方法,然后再实现。
IMyService.cs 文件:
1
2
3
4
5
6
7
8
9
10
11
12
13
14
15
16
17
18
19
20
21
22
23
24
25
26
27
28
29
30
31
32
33
34
using System;using System.Collections.Generic;using System.Linq;using System.Runtime.Serialization;using System.ServiceModel;using System.Text;namespace JohnSun.SOA.WCF.Service { [ServiceContract ] public interface IMyService { [OperationContract ] string GetData (int value [OperationContract ] CompositeType GetDataUsingDataContract (CompositeType composite ) ; [OperationContract ] decimal Sum (decimal x, decimal y [OperationContract ] UserInfo GetUser (int id ; [OperationContract ] UserInfo[] GetUsers (string country ; [OperationContract ] List<UserInfo> GetAllUsers ( ; } }
MyService.cs 文件:
1
2
3
4
5
6
7
8
9
10
11
12
13
14
15
16
17
18
19
20
21
22
23
24
25
26
27
28
29
30
31
32
33
34
35
36
37
38
39
40
41
42
43
44
45
46
47
48
49
50
51
52
53
54
55
56
57
58
59
using System;using System.Collections.Generic;using System.Linq;using System.Runtime.Serialization;using System.ServiceModel;using System.Text;namespace JohnSun.SOA.WCF.Service { public class MyService : IMyService { private static List <UserInfo > _usersnew List<UserInfo>() { new UserInfo(){ Id = 1 , Name = "Kangkang" , Country = "China" }, new UserInfo(){ Id = 2 , Name = "John" , Country = "America" }, new UserInfo(){ Id = 3 , Name = "Jane" , Country = "France" }, new UserInfo(){ Id = 4 , Name = "Han Meimei" , Country = "China" }, }; public List<UserInfo> GetAllUsers ( return _users; } public string GetData (int value return string .Format("You entered: {0}" , value ); } public CompositeType GetDataUsingDataContract (CompositeType composite ) if (composite == null ) { throw new ArgumentNullException("composite" ); } if (composite.BoolValue) { composite.StringValue += "Suffix" ; } return composite; } public UserInfo GetUser (int id return _users.Find(u => u.Id == id); } public UserInfo[] GetUsers (string country return _users.FindAll(u => u.Country == country).ToArray(); } public decimal Sum (decimal x, decimal y return x + y; } } }
使用宿主运行服务端 WCF 的服务协定创建好以后,就可以使用控制台或窗体程序等将该服务托管并运行起来。
这里以控制台为例,创建一个控制台应用程序,并添加以下代码:
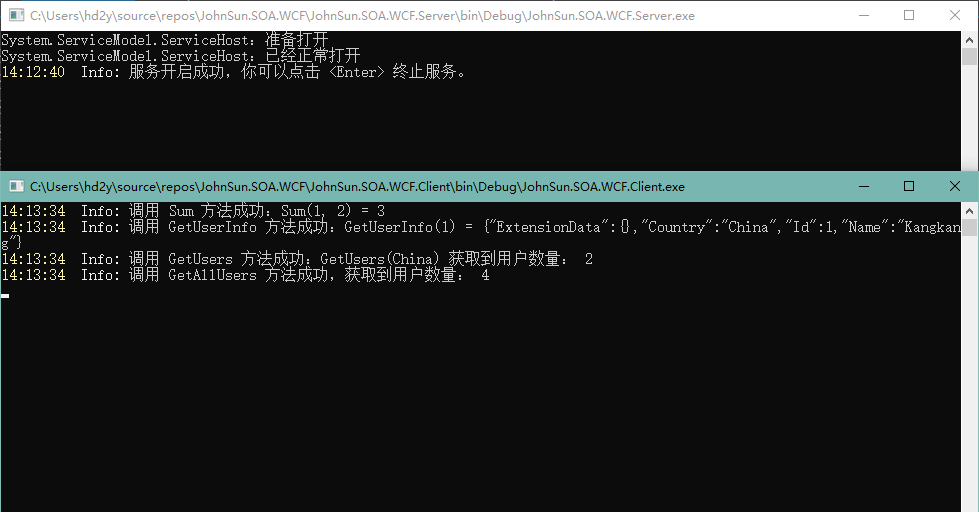
1
2
3
4
5
6
7
8
9
10
11
12
13
14
15
16
17
18
19
20
21
22
23
24
25
26
27
28
29
30
31
32
33
34
35
static void Main (string [] args ServiceHost selfHost = null ; try { Uri baseAddress = new Uri("http://localhost:7895/MyService/" ); selfHost = new ServiceHost(typeof (MyService), baseAddress); selfHost.AddServiceEndpoint(typeof (IMyService), new WSHttpBinding(), "MyService" ); ServiceMetadataBehavior smb = new ServiceMetadataBehavior { HttpGetEnabled = true , }; selfHost.Description.Behaviors.Add(smb); selfHost.Open(); Log(LogLevel.Info, "服务开启成功,你可以点击 <Enter> 终止服务。" ); Console.ReadLine(); selfHost.Close(); } catch (CommunicationException ce) { Log(LogLevel.Error, $"开启服务失败 {ce.Message} " ); if (selfHost != null ) selfHost.Abort(); Console.ReadKey(); } }
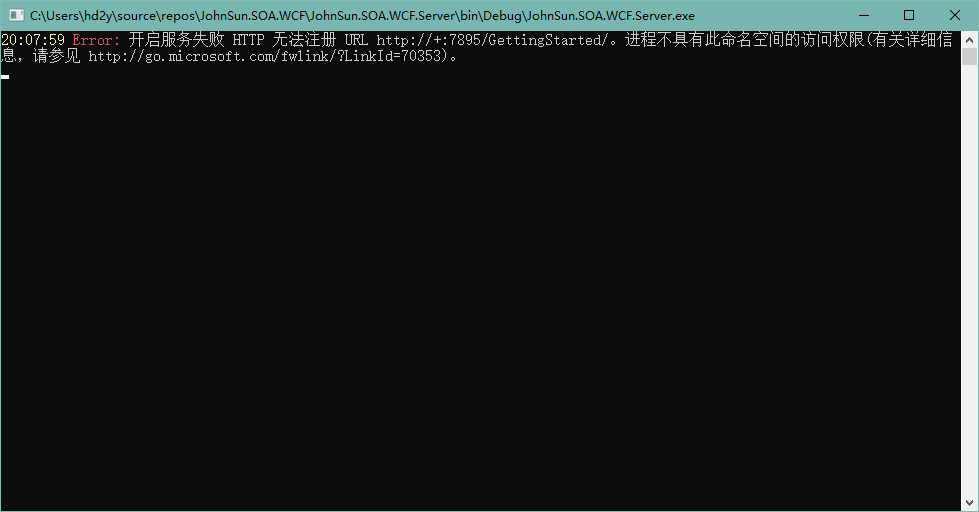
注意:服务端如果需要运行,需要使用管理员身份,否则可能出现下图错误,可以使用管理员身份运行 Visual Studio,或者到 bin 目录下右键可执行程序,使用右键菜单中的 以管理员身份运行。
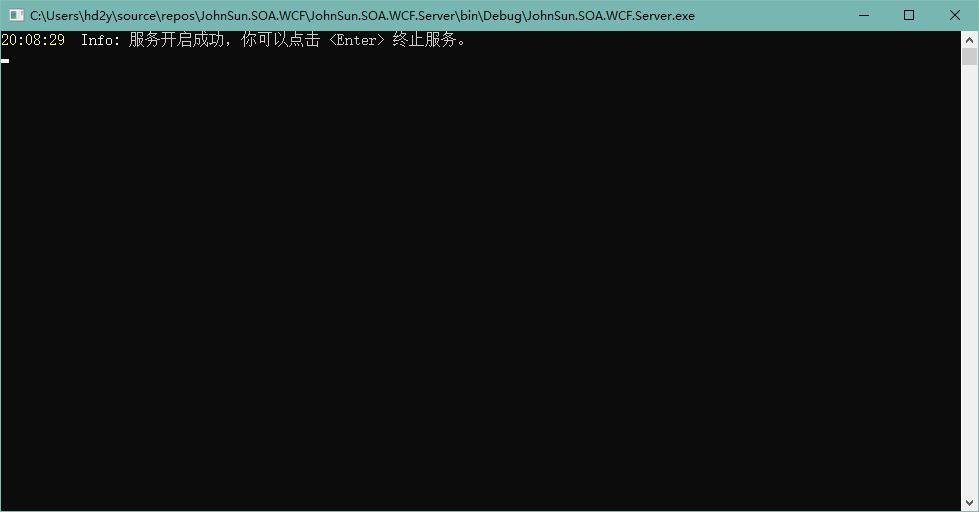
成功运行,控制台输出如下:
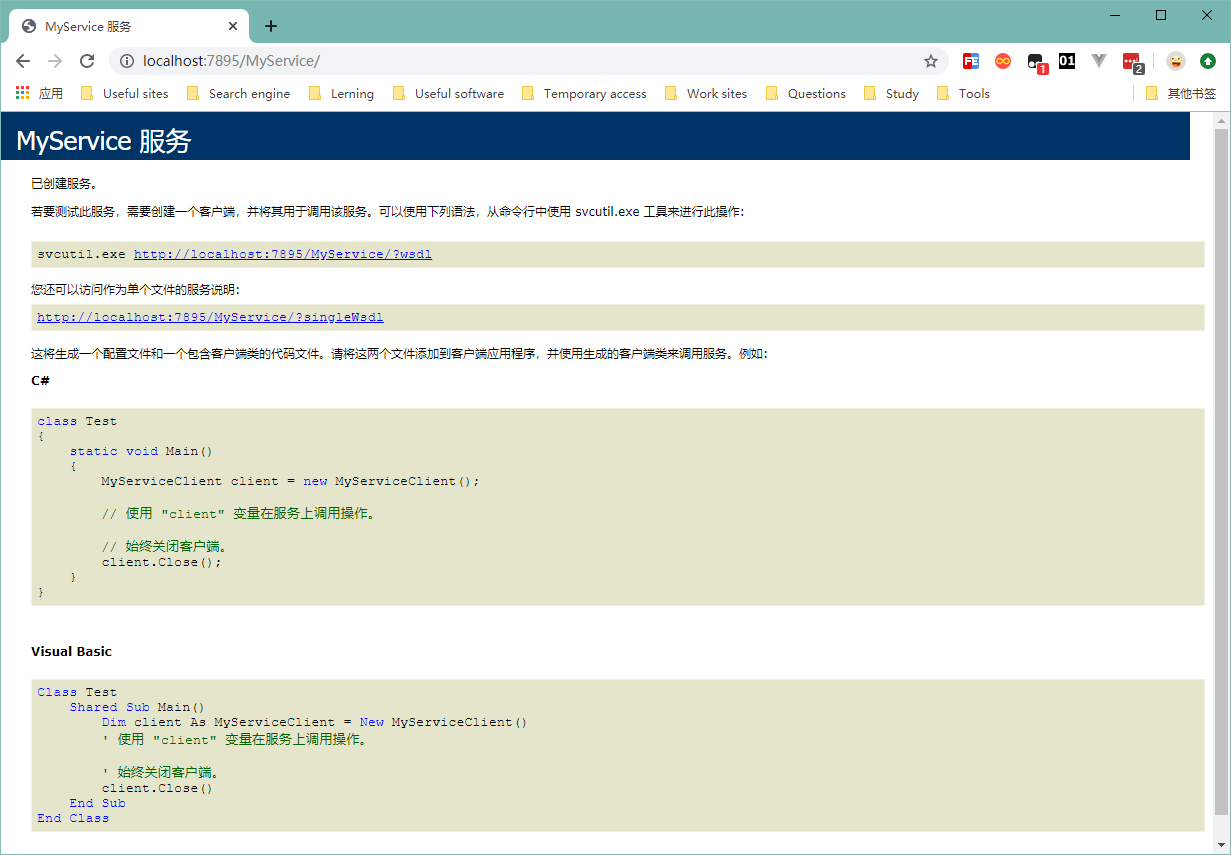
我们可以在浏览器中访问设置的链接:
新建客户端调用服务 服务端创建完成以后,就可以创建一个客户端连接服务,执行简单的调用。
首先创建一个控制台应用程序用于演示,和 WebService 一样,直接在 引用 上右键添加 服务引用 即可。
引用完成以后,会生成一个配置文件 app.config ,里面记录着连接服务端的配置信息:
1
2
3
4
5
6
7
8
9
10
11
12
13
14
15
16
17
18
19
<?xml version="1.0" encoding="utf-8" ?> <configuration > <system.serviceModel > <bindings > <wsHttpBinding > <binding name ="WSHttpBinding_IMyService" /> </wsHttpBinding > </bindings > <client > <endpoint address ="http://localhost:7895/MyService/" binding ="wsHttpBinding" bindingConfiguration ="WSHttpBinding_IMyService" contract ="MyWcfService.IMyService" name ="WSHttpBinding_IMyService" > <identity > <userPrincipalName value ="DESKTOP-V2RPVP4\hd2y" /> </identity > </endpoint > </client > </system.serviceModel > </configuration >
修改控制台的 Program.cs 文件进行调用:
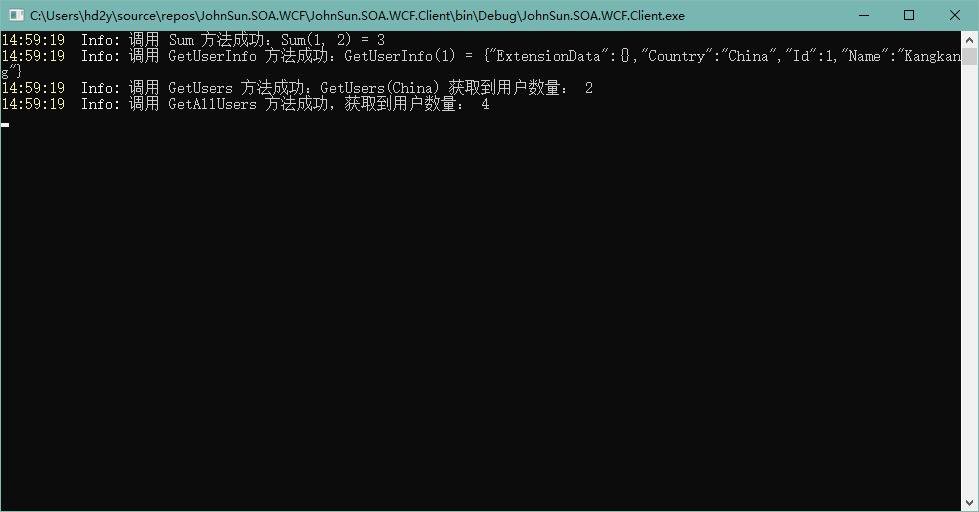
1
2
3
4
5
6
7
8
9
10
11
12
13
14
15
16
17
18
19
20
21
22
23
24
25
26
MyServiceClient client = null ; try { client = new MyServiceClient(); decimal x = 1 m; decimal y = 2 m; decimal d = client.Sum(x, y); Log(LogLevel.Info, $"调用 Sum 方法成功:Sum({x} , {y} ) = {d} " ); int id = 1 ; UserInfo info = client.GetUser(id); JavaScriptSerializer serializer = new JavaScriptSerializer(); Log(LogLevel.Info, $"调用 GetUserInfo 方法成功:GetUserInfo({id} ) = {serializer.Serialize(info)} " ); string country = "China" ; UserInfo[] users = client.GetUsers(country); Log(LogLevel.Info, $"调用 GetUsers 方法成功:GetUsers({country} ) 获取到用户数量: {users.Length} " ); UserInfo[] allUsers = client.GetAllUsers(); Log(LogLevel.Info, $"调用 GetAllUsers 方法成功,获取到用户数量: {allUsers.Length} " ); client.Close(); } catch (Exception exc) { if (client != null ) client.Abort(); Log(LogLevel.Error, "测试服务失败:" + exc.Message); } Console.ReadKey();
注意,同 WebService 一样,连接的释放不能依托于 using 块。
自定义连接 如果不想通过自动生成的服务配置连接服务,可以调整客户端初始化为以下代码:
1 client = new MyServiceClient(new WSHttpBinding(), new EndpointAddress("http://localhost:7895/MyService/" ));
运行的结果和配置文件式初始化的执行结果一致:
WCF 进阶 以上只是类似 WebService 服务的创建与调用,还不能体现 WCF 的优越性,下面一些简单的例子将展示 WCF 的配置,将 WCF 服务承载于 TCP 上。并且演示 WCF 的双工如何使用。
通过配置文件设定服务 除了直接在代码中配置托管服务外,我们也可以通过配置文件来进行设定,配置信息可以参考 WCF 配置架构 。
我们可以通过一个 简化配置 ,来配置我们的客户端,以下是服务端控制台 App.config 的文件内容。
1
2
3
4
5
6
7
8
9
10
11
12
13
14
15
16
17
18
19
20
21
22
23
24
25
26
27
28
29
30
31
32
33
34
<?xml version="1.0" encoding="utf-8" ?> <configuration > <system.serviceModel > <behaviors > <serviceBehaviors > <behavior name ="MyWcfServiceBehavior" > <serviceMetadata httpGetEnabled ="true" /> <serviceDebug includeExceptionDetailInFaults ="false" httpHelpPageEnabled ="false" /> <serviceTimeouts transactionTimeout ="00:10:00" /> <serviceThrottling maxConcurrentCalls ="1000" maxConcurrentInstances ="1000" maxConcurrentSessions ="1000" /> </behavior > </serviceBehaviors > </behaviors > <bindings > <basicHttpBinding > <binding name ="MyBindingConfig" maxBufferSize ="1024" maxReceivedMessageSize ="1024" closeTimeout ="00:01:00" /> <binding closeTimeout ="00:03:00" /> </basicHttpBinding > </bindings > <services > <service behaviorConfiguration ="MyWcfServiceBehavior" name ="JohnSun.SOA.WCF.Service.MyService" > <host > <baseAddresses > <add baseAddress ="http://localhost:7895/MyService/" /> </baseAddresses > </host > <endpoint address ="" binding ="basicHttpBinding" contract ="JohnSun.SOA.WCF.Service.IMyService" bindingConfiguration ="MyBindingConfig" /> </service > </services > </system.serviceModel > </configuration >
配置完成后就可以通过重新生成并由客户端调用,注意之前绑定的协议为 wsHttpBinding,配置文件配置的为 basicHttpBinding,所以客户端需要 更新服务引用。
需要调整为 wsHttpBinding 也很简单,只需要 bindings 节点下的 basicHttpBinding 节点以及 endpoint 中的 binding 属性修改为 wsHttpBinding 即可。
更新后执行效果如下图:
使用 TCP 协议 WCF 除支持 HTTP 协议外还支持多种协议,例如:TCP、MSMQ、命名管道等。
这里仅演示 TCP 协议,首先需要修改配置文件,调整 serviceBehaviors 中的 serviceMetadata 指定 httpGetEnabled 必须为 false。
然后我们修改配置文件中的 bindings 节点,将之前的 basicHttpBinding 或 wsHttpBinding 修改为:
1 2 3 4 5 6 7 <netTcpBinding > <binding name ="MyBindingConfig" closeTimeout ="00:01:00" > <security mode ="None" > <transport clientCredentialType ="None" protectionLevel ="None" /> </security > </binding > </netTcpBinding >
调整 baseAddresses 节点下绑定的链接,将 http 协议修改为 net.tcp 协议:
1 <add baseAddress ="net.tcp://localhost:7895/MyService/" />
最后调整 endpoint 中的 binding 属性即可:
1 <endpoint address ="" binding ="netTcpBinding" contract ="JohnSun.SOA.WCF.Service.IMyService" bindingConfiguration ="MyBindingConfig" />
调整完成后重新生成即可运行服务,我们可以调整以下客户端的服务引用,可以右键对应的服务,选择 配置服务引用,修改服务地址,修改为 net.tcp 协议。
当然之前我们已经删除了配置文件,所以这里直接修改服务端的初始化代码:
1 client = new MyServiceClient(new NetTcpBinding(securityMode: SecurityMode.None), new EndpointAddress("net.tcp://localhost:7895/MyService/" ));
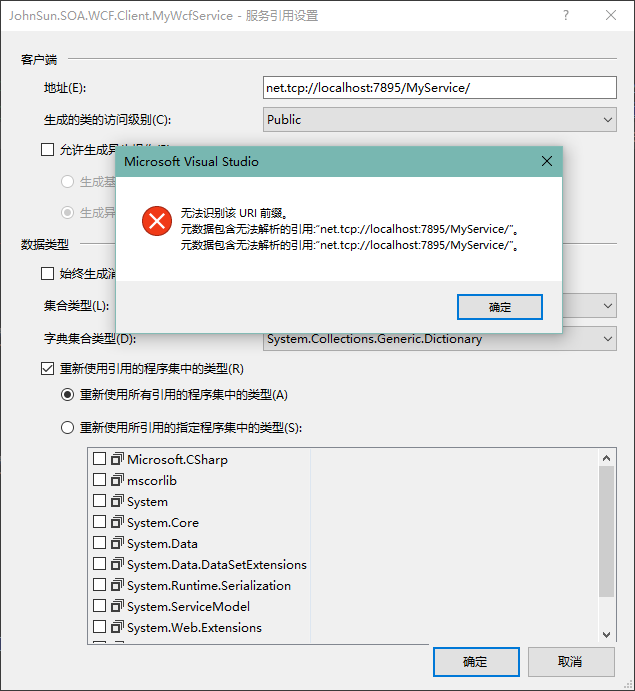
如果调用服务报错,可以添加服务引用,这时可能出现如下图的错误:
无法识别该 URI 前缀。
网上搜索了很多解决方案,包括 启用或关闭 Windows 功能 中有关 WCF 的选项,以及 服务 中 Net.Tcp Listener Adapter 是否启动,均正常。
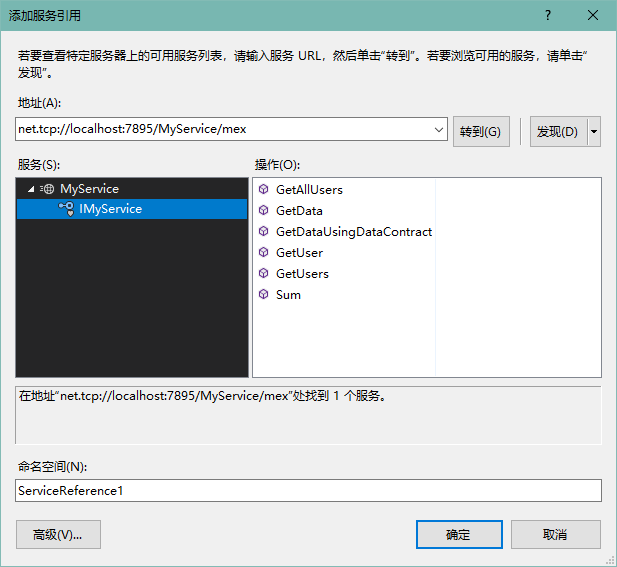
然后调整增加 mexTcpBinding 节点,仍然无法调用(此处必须配置):
1 <endpoint address ="mex" binding ="mexTcpBinding" bindingConfiguration ="" contract ="IMetadataExchange" />
后看到一篇文章发现可能是序列化问题,之前我们增加的类型 UserInfo ,均未配置 DataContract 和 DataMember 特性,增加对应特性后,重新生成并运行服务端,客户端可以正常添加服务引用。
1 2 3 4 5 6 7 8 9 10 [DataContract ] public class UserInfo { [DataMember ] public int Id { get ; set ; } [DataMember ] public string Name { get ; set ; } [DataMember ] public string Country { get ; set ; } }
但是,在可以正常添加以后,移除对应特性,重新编译,无法再重现这个问题,所以建议是添加该特性,并按照以上内容检查所有信息,避免出现这个问题。
使用双工 因为 WebService 是基于 HTTP协议,其是无状态的,所以无法使用双工,但是 WCF 还支持有状态的 TCP 协议,所以可以实现双工通讯。
WCF 中双工的设计是通过回调来实现:
定义一个用于回调的接口 ICallback,供客户端实现;
添加服务协定 ICallbackService ,指定用于回调的协定 ICallback;
实现服务协定,可以通过服务上下文获取回调的通道并调用;
1
2
3
4
5
6
7
8
9
10
11
12
13
14
15
16
17
18
19
20
21
22
23
24
25
26
27
28
29
30
31
32
33
34
35
36
37
38
39
40
41
42
43
44
45
46
47
48
49
50
51
52
53
54
55
56
using System;using System.Collections.Generic;using System.Linq;using System.ServiceModel;using System.Text;using System.Threading;namespace JohnSun.SOA.WCF.Service { [ServiceContract(CallbackContract = typeof(ICallback)) ] public interface ICallbackService { [OperationContract(IsOneWay = true) ] void TestConnect (string message } public interface ICallback { [OperationContract(IsOneWay = true) ] void Reply (string message } public class CallbackService : ICallbackService { public void TestConnect (string message Logger.Log(LogLevel.Info, message); Thread.Sleep(2000 ); ICallback callback = OperationContext.Current.GetCallbackChannel<ICallback>(); callback.Reply(message); } } public class Logger { public static void Log (LogLevel level, string message ) Console.ForegroundColor = ConsoleColor.Yellow; Console.Write($"{DateTime.Now:HH:mm:ss} " ); Console.ForegroundColor = level == LogLevel.Info ? ConsoleColor.White : ConsoleColor.Red; Console.Write($"{level,5 } : " ); Console.ForegroundColor = ConsoleColor.Gray; Console.Write($"{message} \r\n" ); } } [Flags ] public enum LogLevel { Info = 1 , Error = 2 , } }
这样服务协定我们就创建好了,然后就是修改服务托管的代码:
1
2
3
4
5
6
7
8
9
10
11
12
13
14
15
16
17
18
19
20
21
22
23
24
25
26
27
ServiceHost host = null ; try { Uri baseAddress = new Uri("net.tcp://localhost:7895/MyDuplexService/" ); host = new ServiceHost(typeof (CallbackService), baseAddress); host.AddServiceEndpoint(typeof (ICallbackService), new NetTcpBinding(securityMode: SecurityMode.None), "CallbackService" ); host.Description.Behaviors.Add(new ServiceMetadataBehavior()); host.AddServiceEndpoint(typeof (IMetadataExchange), MetadataExchangeBindings.CreateMexTcpBinding(), "mex" ); host.Open(); Log(LogLevel.Info, "服务开启成功,你可以点击 <Enter> 终止服务。" ); Console.ReadLine(); host.Close(); } catch (Exception exc) { Log(LogLevel.Error, $"开启服务失败 {exc.Message} {exc.StackTrace} " ); if (host != null ) host.Abort(); Console.ReadKey(); }
之后我们就可以在客户端添加一个新的服务引用 MyDuplexWcfService,初始化服务连接并调用服务中定义的方法:
1
2
3
4
5
6
7
8
9
10
11
12
13
14
15
16
17
18
19
20
21
22
23
24
CallbackServiceClient client = null ; try { InstanceContext callbackInstance = new InstanceContext(new Callback()); client = new CallbackServiceClient(callbackInstance); for (int i = 0 ; i < 10 ; i++) { string message = $"{i:00 } {DateTime.Now:HH:mm:ss.fff} " ; client.TestConnect(message); Log(LogLevel.Info, $"调用 TestConnect 方法成功:{message} " ); Thread.Sleep(50 ); } Console.WriteLine("服务调用成功,你可以点击 <Enter> 关闭客户端。" ); Console.ReadLine(); client.Close(); } catch (Exception exc) { if (client != null ) client.Abort(); Log(LogLevel.Error, "测试服务失败:" + exc.Message); Console.ReadLine(); }
需要注意的是,带有回调的服务,需要初始化一个InstanceContext,构造函数传递的是一个回调类型 ICallback 的实现类型的实例化对象。
我们引用的服务有一个 ICallbackServiceCallback 类型,这个其实就是 ICallback,需要添加实现:
1
2
3
4
5
6
7
public class Callback : ICallbackServiceCallback { public void Reply (string message Program.Log(LogLevel.Info, $"回调:{message} " ); } }
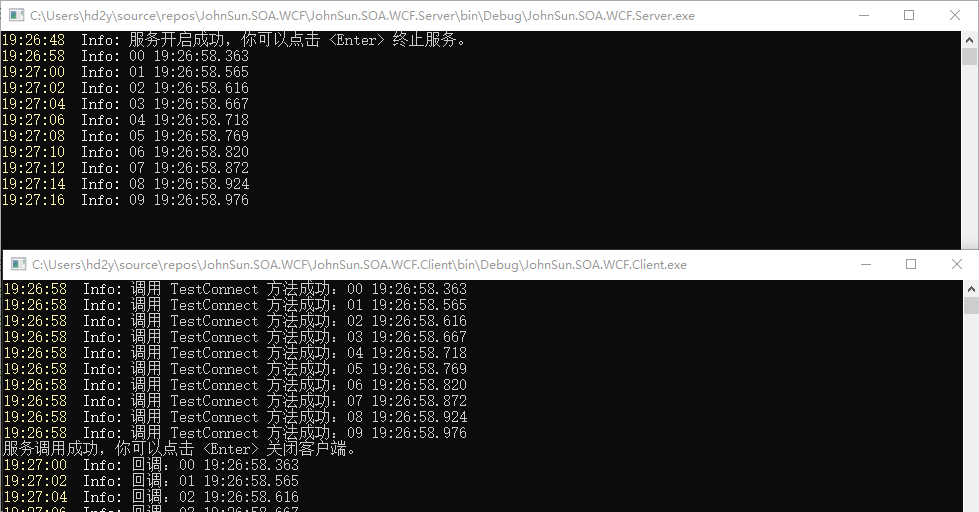
实现以后的客户端与服务端执行效果如下:
同样的针对服务端与客户端调整实现方式,以上服务端展示的是使用代码实现的托管,下面增加一个使用配置文件来进行托管的方案,首先在配置文件的 services 节点内增加以下内容:
1 2 3 4 5 6 7 8 9 <service behaviorConfiguration ="MyWcfServiceBehavior" name ="JohnSun.SOA.WCF.Service.CallbackService" > <host > <baseAddresses > <add baseAddress ="net.tcp://localhost:7895/MyDuplexService/" /> </baseAddresses > </host > <endpoint address ="" binding ="netTcpBinding" contract ="JohnSun.SOA.WCF.Service.ICallbackService" bindingConfiguration ="MyBindingConfig" /> <endpoint address ="mex" binding ="mexTcpBinding" bindingConfiguration ="" contract ="IMetadataExchange" /> </service >
然后服务开启的代码可以调整为以下内容:
1
2
3
4
5
6
7
8
9
10
11
12
13
14
15
16
17
18
19
ServiceHost host = null ; try { host = new ServiceHost(typeof (CallbackService)); host.Open(); Log(LogLevel.Info, "服务开启成功,你可以点击 <Enter> 终止服务。" ); Console.ReadLine(); host.Close(); } catch (Exception exc) { Log(LogLevel.Error, $"开启服务失败 {exc.Message} {exc.StackTrace} " ); if (host != null ) host.Abort(); Console.ReadKey(); }
服务调整好以后,我们可能需要更新一下客户端的服务引用才能使用,因为以上配置文件指定与代码实现的并不完全一致。
客户端目前使用的是配置文件初始化,同样的我们可以删除客户端下的 App.config 文件,客户端实例化修改为以下代码:
1 client = new CallbackServiceClient(callbackInstance, new NetTcpBinding(securityMode: SecurityMode.None), new EndpointAddress("net.tcp://localhost:7895/MyDuplexService/" ));
后记 WCF 的知识点比较多,这里仅仅是简单的实现与使用,更多的内容建议还是查看 MSDN 文档。
基本以上内容学习以后,工作中一些常见的场景都可以实现,身份认证建议使用 Token 会简单一些,如果有兴趣可以研究一下 x509证书。
参考:
源码下载: